Table of Contents
Using APP Customizer
- Item Placement - Allows the user to add objects (labels, text fields, buttons) or tabs to forms without the use of programming knowledge.
- Process Rules - allows the user to add field and event based validations and procedure executions to forms without the use of programming knowledge.
- Tab Order - allows the user to establish, edit, and remove custom designated tab orders for forms that will override the normal order of moving between fields on a form.
- Mandatory Fields - allows the user to establish, edit, and remove custom designated mandatory fields for forms that will operate in addition to the normal required fields on a form.

How To Convert APP Form Customized Data to XML During APP Upgrade
Information for forms that have been customized using APP will be saved into the database as XML. These XML files are used at the time that the form is loaded in SAP® Business One.
If you are upgrading to a new version of APP from a prior version that did not store customized form data as XML, you will be required to convert or “migrate” the customization data during the upgrade process.
TWBS APP Server Configuration screen access is controlled through the SAP® Business One Authorizations function.
- Click the Report Definition menu option under the Administration
 Setup APP Configuration menu groups to load the APP Server Configuration screen.


- Click the Generate XML button to initiate the process of saving APP form modifications information to the database as XML.
This process may take a few minutes depending on the number of forms that have been customized with APP.
If any add-on applications have forms that were customized using APP, they must be connected and running at the time that the Generate XML button is clicked otherwise the user will receive an error in the conversion process.
- If there are any issues saving the XML into the database for any forms with customizations, the user will receive the following form listing the problem Form Type and Form Title.

- The user should fill in the Menu UID for each form and then click the Generate XML button.
- When the process is complete the user will receive a message on the SAP® B1 satus bar that the process was successful.
How To Publish APP Customizer Changes to All Users
The APP Customizer Publish Forms screen lists all SAP® Business One forms or other APP registered forms that have been modified through APP Customizer (Item Placement, Tab Order, and Mandatory Fields).
Click the SAP menu option titled Publish Forms under the Administration  Setup APP Configuration Customizer menu to load the APP Customizer Publish Forms screen.

- Click the Select column checkbox at the right of each form listing that you wish to publish APP Customizer modifications to all users.
- Click the Publish button.
- Close the APP Customizer Publish Forms screen.
Once APP Customizer form modifications have been published for all users, the changes will be reflected once any open instances of the form(s) published have been closed and reopened.
Item Placement
Item Placement functionality allows the user to add objects (labels, text fields, buttons, and tabs) to enhance any SAP® Business One forms or UI-based add-on application screens or edit the properties of existing SAP objects without the use of programming knowledge.
How To Auto Reference a Control During Item Placement
During the Item Placement process, it is necessary to designate a reference control on the form that will serve as an anchor point for the placement of the new item. This section will describe the process of automatically referencing an item during this process.
Automatic referencing of the control will reduce the number of item placement steps.
This example is for the Business Partner Master Data screen.
- Click the SAP menu option titled Business Partner Master Data under the Business Partner menu to load the Business Partner Master Data screen.
- Determine the item that you want to use as the reference control item (Currency field for this example).
- Select the New Item option from the APP Customizer menu group option from the right-click menu on the form. Select the option for the type of item to be added to the form.
The right-click menu should be launched while the mouse is on top of the item being used as the reference control.

- The Item Placement Options screen will load with the information for the reference control item entered into the Reference Control ID field.
Automatically referencing the control item does not prevent the user from clicking the … button and manually selecting a different reference control. For additional information on the manual reference process, refer to the How To Manually Reference a Control During Item Placement section.
How To Manually Reference a Control During Item Placement
During the Item Placement process, it is necessary to designate a reference control on the form that will serve as an anchor point for the placement of the new item. This section will describe the process of manually referencing an item during this process.
This example is for the Business Partner Master Data screen.
- Click the SAP menu option titled Business Partner Master Data under the Business Partner menu to load the Business Partner Master Data screen.
- Select the New Item option from the APP Customizer menu group option from the right-click menu on the form. Select the option for the type of item to be added to the form.

- Click the … button next to the Reference Control ID field.


- Select the item on the form that you want to use as the Reference Control item. The unique ID value for the selected item will be placed in the Reference Control ID field of the placement form.

How To Place a New Item on Form
This example is for the Business Partner Master Data screen and utilizes the automatic control reference process.
- Click the SAP menu option titled Business Partner Master Data under the Business Partner menu to load the Business Partner Master Data screen.
- Determine the item that you want to use as the reference control item (Opportunities field for this example).
- Select the New Item option from the APP Customizer menu group option from the right-click menu on the form. Select the option for the type of item to be added to the form.
Current options are text box, label, tab, or button.

- The unique ID value for the selected reference control item will be placed in the Reference Control ID field of the placement form. Select the location (in regards to the reference control item) where you want the item to be placed. Available options are…
- Left
- Right
- Above
- Below
- Click the OK button.

- The Item Properties/Events screen for the newly positioned item will load.

- Edit any properties that need to be altered.
- Click the Save or Save & Close button.
- The new item will be displayed on the form.

How To Place a New Tab on Form
This example is for the Activity screen.
- Click the SAP menu option titled Business Partner Master Data under the Business Partner menu to load the Business Partner Master Data screen.
- Select the Tab option from the APP Customizer New Item menu group option from the right-click menu on the form.
The right-click menu should be launched while the mouse is on top of the tab to the left of the position where you want the new tab to be added on the form.
- The Item Properties/Events screen for the new tab item will load.

- Edit any properties that need to be altered.
- Click the Save or Save & Close button.
- The new tab will be displayed on the form.

- Once the tab has been added to the form, other objects can be added. Please refer to the How To Place a New Item on Form section of the user guide.
- Here is an example of some labels, text boxes, and a button added to a custom tab.

How To Place a User Defined Field on Form
This example is for the Business Partner Master Data screen and utilizes the automatic control reference process.
- Click the SAP menu option titled Business Partner Master Data under the Business Partner menu to load the Business Partner Master Data screen.
- Determine the item that you want to use as the reference control item (El. Doc. Export Format field for this example).
- Select the user defined field option to be added to the form (rbLblUse in example) from the APP Customizer -UDF menu group option from the right-click menu on the form.

- Select the location (in regards to the Reference Control item) where you want the user defined field to be placed. Available options are…
- Left
- Right
- Above
- Below
- Click the OK button.

- The field to represent the selected user-defined field will now be placed on the form at the location that was selected.

Updates to the value on either the form-placed user-defined field or the UDF tab field will be reflected in all fields on update.
How To Edit an Existing Item on Form - Standard SAP Item
This example is for the Business Partner Master Data screen.
- Click the SAP menu option titled Business Partner Master Data under the Business Partner menu to load the Business Partner Master Data screen.
- Select the Control Properties option from the APP Customizer menu group option from the right-click menu on the form.
The right-click from the form should be performed while the cursor is on the item on the form.

- The Item Properties/Events screen will load with the information for the item that is to be edited.
- Edit any information to be changed about the item.

- Click the Save or Save & Close button.
- Changes to the item will be reflected on the form.

How To Edit an Existing Item on Form - Custom Item
This example is for the Business Partner Master Data screen.
- Click the SAP menu option titled Business Partner Master Data under the Business Partner menu to load the Business Partner Master Data screen.
- Select the Item Placement Configurator option from the APP Customizer menu group option from the right-click menu on the form.

- Determine the item that you want to edit the properties for. Click the **Edit** button on the line for that item on the **Item** **Configurator** screen.

- The Item Properties/Events screen will load with the information for the item that is to be edited.
- Edit any information to be changed about the item.

- Click the Save or Save & Close button.
- Changes to the item will be reflected on the form.

How To Edit an Existing Item on Form - User Defined Field
This example is for the Business Partner Master Data screen.
- Click the SAP menu option titled Business Partner Master Data under the Business Partner menu to load the Business Partner Master Data screen.
- Select the Control Properties option from the APP Customizer menu group option from the right-click menu on the form.
{
The right-click from the form should be performed while the cursor is on the user defined field or label on the form.
- The Item Properties/Events screen will load with the information for the user-defined field or label that is to be edited.

- Edit any information to be changed about the item.

- Click the Save or Save & Close button.
- Changes to the item will be reflected on the form.

How To Change Visibility of a Standard SAP Item
This example is for the Business Partner Master Data screen.
- Click the SAP menu option titled Business Partner Master Data under the Business Partner menu to load the Business Partner Master Data screen.
- Select the Control Properties option from the APP Customizer menu group option from the right-click menu on the form.
The right-click from the form should be performed while the cursor is on the item on the form.

- The Item Properties/Events screen will load with the information for the item that is to be made not visible.

- Change the visible property of the item by unchecking the Visible checkbox.
- Click the Save or Save & Close button.
- The item edited will be removed from the form.

- To restore the visibility of the item, select the Item Placement Configurator option from the APP Customizer menu group option from the right-click menu on the form.
- Click the Remove button on the line for the item on the Item Placement Configurator screen.

- Click the Close button.
The form must be closed and reopened in order for the item to reappear on the form.
How To Change Panes of a Standard SAP Item
This example is for the Business Partner Master Data screen.
- Click the SAP menu option titled Business Partner Master Data under the Business Partner menu to load the Business Partner Master Data screen.
- Select the Control Properties option from the APP Customizer menu group option from the right-click menu on the form.
The right-click from the form should be performed while the cursor is on the item on the form.

- The Item Properties/Events screen will load with the information for the item that is to have its pane display value changed.

- Change the pane level properties of the item by setting the From Pane values.

- Click the Save or Save & Close button.
- The item edited will be removed from the original pane of the form.

- The item edited will be displayed on the new pane of the form.

- To restore the original pane of the item, select the Item Placement Configurator option from the APP Customizer menu group option from the right-click menu on the form.
- Click the Remove button on the line for the item on the Item Placement Configurator screen.
- Click the Close button.
important boxThe form must be closed and reopened in order for the item to reappear on the form.
How To Copy a Placed Item to Another Form
This example is for the Business Partner Master Data screen.
- Click the SAP menu option titled Business Partner Master Data under the Business Partner menu to load the Business Partner Master Data screen.
- Select the Item Placement Configurator option from the APP Customizer menu group option from the right-click menu on the form.
- Determine the item that you want to copy to another form. Highlight the line for that item(s) on the Item Configurator screen.
- Click the Copy To button.

- The List of Forms screen will load to allow the selection of the destination form for the copied item(s).

- Click the OK button.
- Click the SAP menu option titled Sales Order under the Sales - A/R menu to load the Sales Order screen.
- The copied item(s) will be placed on the destination form.

The properties of the newly copied item on the destination form will in most cases need to be edited for position, height, width, etc.
How To Remove a Placed Item on Form
This example is for the Sales Order screen.
Note -
- Click the SAP menu option titled Sales Order under the Sales - A/R menu to load the Sales Order screen.
- Select the Item Placement Configurator option from the AP Customizer menu group option from the right-click menu on the form.
- Determine the item that you want to remove from the form. Click the Remove button on the line for that item on the Item Configurator screen.

- Click the Close button.
The form must be closed and reopened in order for the item removal to take effect.
Process Rules
Process Rules functionality allows the user to add field validations and procedure executions to enhance any SAP® Business One forms or UI-based add-on application screens without the use of programming knowledge.
How To Auto-Record a Macro
This example is for the Business Partner Master Data screen.
The macro editor will only support actions against screens where there are not multiple instances of that screen open in SAP® Business One when the macro is being performed. For example, a macro that performs an action against form #139 (the Sales Order form) should only be performed with one Sales Order form window open.
- Click the SAP menu option titled Business Partner Master Data under the Business Partner menu to load the Business Partner Master Data screen.
- Determine the item that you want to establish process rules for (Create Order button for this example).
The right-click menu should be launched while the mouse is on top of the item.

- Select the Control Properties option from the APP Customizer menu group option from the right-click menu on the form to load the Item Properties/Events screen.

- Select the Events tab.
- Click the Define button on the Event that you want to record the process rules macro for. This will launch the Process Rules Event Handler screen.


- Enter an Event Description value for the event.
- Select the validation level option (No Validation option selected for this example).
- Click the Define New option from the Procedure drop down. This will launch the Procedure Handler screen.

- Click the Record button.
- Perform the steps in SAP® Business One that you want to be recorded into the macro.
The Auto-Record function has limited support for opening forms and copying of data from field to field using the right-click menu option at this time.
- To copy the value from a field, select the Copy Item option from the APP Customizer menu group option from the right-click menu on the form.
The right-click menu should be launched while the mouse is on top of the field to copy.
- To paste a copied value into a field, select the Paste Item option from the APP Customizer menu group option from the right-click menu on the form.
The right-click menu should be launched while the mouse is on top of the field the value is being pasted into.

- Click the Stop button.

- To view or manually edit the recorded macro, click the Load Macro Editor button. This will launch the Macro Editor screen.
For more information on manually editing a macro, refer to the How To Manually Setup a Macro section of the user guide.

- The Macro Editor screen will display each step in the macro.

- Click the OK button on the Procedure Handler screen.

- Click the Save & Close button on the Process Rules Event Handler screen.

- Click the Save & Close button on the Item Properties/Events screen.
How To Manually Setup a Macro
This example is for the Business Partner Master Data screen.
The macro editor will only support actions against screens where there are not multiple instances of that screen open in SAP® Business One when the macro is being performed. For example, a macro that performs an action against form #139 (the Sales Order form) should only be performed with one Sales Order form window open.
- Click the SAP menu option titled Business Partner Master Data under the Business Partner menu to load the Business Partner Master Data screen.
- Determine the item that you want to establish process rules for (Create Order button for this example).
The right-click menu should be launched while the mouse is on top of the item.
- Select the Control Properties option from the APP Customizer menu group option from the right-click menu on the form to load the Item Properties/Events screen.
- Select the Events tab.
- Click the Define button on the Event that you want to record the process rules macro for. This will launch the Process Rules Event Handler screen.

- Click the Edit button beneath the procedure drop down. This will launch the Procedure Handler screen.
- To view or manually edit the recorded macro, click the Load Macro Editor button. This will launch the Macro Editor screen.
- The Macro Editor screen will display each step in the macro.
This example is for the Business Partner Master Data screen. (Insert Row option selected for this example)
- To add or remove a row from the Macro Editor, highlight the row and use one of the following right-click menu options…
- Add Row - This will add a row to the end of the macro.
- Insert Row - This will insert a row to the macro before the selected row of the macro.
- Delete Row - This will remove the selected row from the macro.
- Disable - This will deactivate this row from the macro.

- Edit the information for the row.
Optional information for the macro row will be colored in light yellow. Required information for the macro row will be colored in light red. Fields that are not required for the action type will be colored in light grey. For more information on the fields and data that are required for each action type, refer to the Macro Editor screen section of the user guide.

- Click the Save & Close button on th Macro Editor screen.
- Click the OK button on the Procedure Handler screen.
- Click the Save & Close button on the Process Rules Event Handler screen.]]
- Click the Save & Close button on the Item Properties/Events screen.
How To Use Multiple Event Instances
This example is for the Item Master Data screen.
- Click the SAP menu option titled Item Master Data under the Inventory menu to load the Item Master Data screen.
- Determine the item that you want to establish process rules for (Fire Macro button for this example).

The right-click menu should be launched while the mouse is on top of the item.

- Select the Control Properties option from the APP Customizer menu group option from the right-click menu on the form to load the Item Properties/Events screen.

- Select the Events tab.
- Choose the Event option that you want to record the process rules macro for.
- Click the Define or Edit button on the Event that you want to record the process rules macro for. This will launch the Process Rules Event Handler screen.

- Enter the Event Description value to identify the Event.
- Click the Define New option in the Execute Procedure drop down.
- This will launch the Procedure Handler screen.

- Enter a value in the Procedure Name field to identify the procedure.
- Click the Load Macro Editor button on the Procedure Handler screen.
- This will launch the Macro Editor screen.

- Select the option from the Action Types drop down column. For this example I'll select the Messagebox option.
- The APP application will clear any existing parameter values. Any parameter value columns that are not optional (identified in yellow) or required (identified in red) will be deactivated (identified in gray).
- Complete the information needed for the Messagebox macro action type that you want to execute. Clicking in the Value column will load the Macro Editor Values Entry screen.

- Complete the information for the Message Box arguments.
- Click the OK button on the Macro Editor Values Entry screen.

- Click the Save & Close button.
- Click the OK button on the Procedure Handler screen.

- Complete the appropriate Event properties (Inner Event, Before Action, etc.)
The value of the Sort Order field will determine the order in which the Events are executed in the case of multiple instances of the same Event. The application automatically assigns a value which can be manually altered. If two instances of the same Event are given the same Sort Order value, the Events will be executed according to the date/time the Event was added to the system.
- Click the Save & Close button on the Process Rules Event Handler screen.

- Choose the second instance of the same Event that you want to record the process rules macro for.
- Click the Define or Edit button on the Event that you want to record the process rules macro for. This will launch the Process Rules Event Handler screen.

- Enter the Event Description value to identify the Event.
- Click the Define New option in the Execute Procedure drop down . This will launch the Procedure Handler screen.

- Enter a value in the Procedure Name field to identify the procedure.
- Click the Load Macro Editor button on the Procedure Handler screen. This will launch the Macro Editor screen.

- Select the option from the Action Types drop down column. For this example I'll select the Messagebox option.
- The APP application will clear any existing parameter values. Any parameter value columns that are not optional (identified in yellow) or required (identified in red) will be deactivated (identified in gray).
- Complete the information needed for the Messagebox macro action type that you want to execute. Clicking in the Value column will load the Macro Editor Values Entry screen.

- Complete the information for the Message Box arguments.
- Click the OK button on the Macro Editor Values Entry screen.

- Click the Save & Close button.
- Click the OK button on the Procedure Handler screen.

- Complete the appropriate Event properties (Inner Event, Before Action, etc.)
- Click the Save & Close button on the Process Rules Event Handler screen.

- Click the Save & Close button on the Item Properties/Events screen.
- Click the Fire Macro button on the Item Master Data screen.

- The first message box will appear.
- Click the Okay button on the first message box window.

- Click the Okay button on the second message box window.
How To Use the Addon Loaded Event
- On the SAP Main Menu, Click the recommended area (see image below) while holding the Ctrl and Shift keys down.
The top area of the main menu is mostly covered by the Company and User labels.

- The Form Properties/Events screen will load and will identify the form and caption for the Main Menu area.

- Click the Events tab.

- Select the Addon Loaded Event from the drop down.
This Event is only applicable for the successful loading of the APP application. This cannot be applied to any other add-on applications.
- Click the Define button. This will launch the Process Rules Event Handler screen.

- Select the validations and procedures to be executed when the APP application is loaded.
- Click the Save & Close button on the Process Rules Event Handler screen.
- Click the Save & Close button on the Item Properties/Events screen.
- Click the SAP menu option titled Add-On Manager under the Administration Add-Ons menus to load the Add-On Manager screen.
- Highlight the APP application. Click the Stop button.

- Once the application has stopped, highlight the APP application. Click the Start button.

- Once the application has successfully been loaded, the designated procedures for the Addon Loaded Event will be executed according to the validation set up.
How To Use the Macro Action Types
The macro editor will only support actions against screens where there are not multiple instances of that screen open in SAP® Business One when the macro is being performed. For example, a macro that performs an action against form #139 (the Sales Order form) should only be performed with one Sales Order form window open.
How To Use the AddRow Action Type
This example is for the Item Master Data screen.
- Click the SAP menu option titled Item Master Data under the Inventory menu to load the Inventory Master Data screen.
- Determine the item that you want to establish process rules for (Fire Macro button for this example).
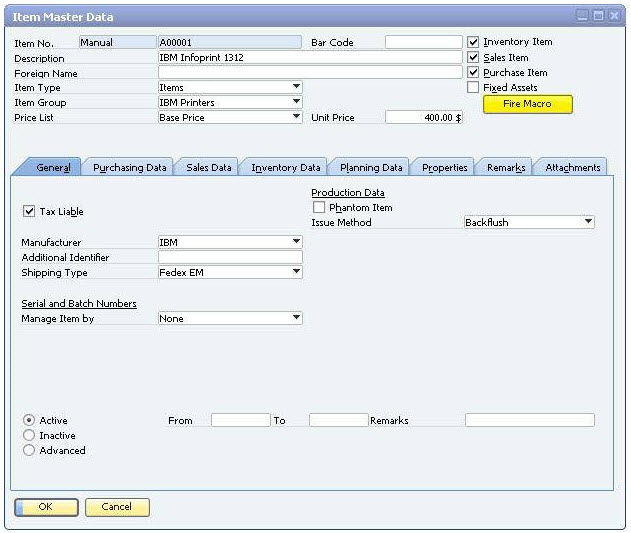
The right-click menu should be launched while the mouse is on top of the item.
- Select the Control Properties option from the APP Customizer menu group option from the right-click menu on the form to load the Item Properties/Events screen.

- Select the Events tab.
- Click the Define or Edit button on the Event that you want to record the process rules macro for. This will launch the Process Rules Event Handler screen.

- Click the … button next to the procedure to be executed. This will launch the Procedure Handler screen.

- Click the Load Macro Editor button on the Procedure Handler screen. This will launch the Macro Editor screen.

- Select the AddRow option from the Action Types drop down column.
- The APP application will clear any existing parameter values. Any parameter value columns that are not optional (identified in yellow) or required (identified in red) will be deactivated (identified in gray).
- Complete the information needed for the AddRow Macro Action Type that you want to execute.
- Complete any other information and/or Action Types required to complete your Macro.
- Click the Save & Close button.
- Click the OK button on the Procedure Handler screen.

- Set the Before Action value to True.
- Click the Save & Close button on the Process Rules Event Handler screen.
- Click the Save & Close button on the Item Properties/Events screen.

- Click the Fire Macro button on the Item Master Data screen.

- The specified macro action is executed.
How To Use the CallAPPProcedure Action Type
This example is for the Item Master Data screen.
- Click the SAP menu option titled Item Master Data under the Inventory menu to load the Inventory Master Data screen.
- Determine the item that you want to establish process rules for (Fire Macro button for this example).
The right-click menu should be launched while the mouse is on top of the item.
- Select the Control Properties option from the APP Customizer menu group option from the right-click menu on the form to load the Item Properties/Events screen.
- Select the Events tab.
- Click the Define or Edit button on the Event that you want to record the process rules macro for. This will launch the Process Rules Event Handler screen.
- Click the … button next to the procedure to be executed. This will launch the Procedure Handler screen.
- Click the Load Macro Editor button on the Procedure Handler screen. This will launch the Macro Editor screen.

- Select the CallAPPProcedure option from the Action Types drop down column.
- The APP application will clear any existing parameter values. Any parameter value columns that are not optional (identified in yellow) or required (identified in red) will be deactivated (identified in gray).
- Complete the information needed for the CallAPPProcedure Macro Action Type that you want to execute.
- Complete any other information and/or Action Types required to complete your Macro.
- Below indicates the steps from Procedure #7 for the purpose of displaying expected results on execution.

- Click the Save & Close button.
- Click the OK button on the Procedure Handler screen.
- Set the Before Action value to True.
- Click the Save & Close button on the Process Rules Event Handler screen.
- Click the Save & Close button on the Item Properties/Events screen.
- Click the Fire Macro button on the Item Master Data screen.

- The specified macro action is executed.
How To Use the ComboSelect Action Type
This example is for the Item Master Data screen.
- Click the SAP menu option titled Item Master Data under the Inventory menu to load the Inventory Master Data screen.
- Determine the item that you want to establish process rules for (Fire Macro button for this example).
The right-click menu should be launched while the mouse is on top of the item.
- Select the Control Properties option from the APP Customizer menu group option from the right-click menu on the form to load the Item Properties/Events screen.
- Select the Events tab.
- Click the Define or Edit button on the Event that you want to record the process rules macro for. This will launch the Process Rules Event Handler screen.
- Click the … button next to the procedure to be executed. This will launch the Procedure Handler screen.
- Click the Load Macro Editor button on the Procedure Handler screen. This will launch the Macro Editor screen.

- Select the ComboSelect option from the Action Types drop down column.
- The APP application will clear any existing parameter values. Any parameter value columns that are not optional (identified in yellow) or required (identified in red) will be deactivated (identified in gray).
- Complete the information needed for the ComboSelect Macro Action Type that you want to execute.
The value for selection must be an existing option in the combo box.
- Complete any other information and/or Action Types required to complete your Macro.
- Click the Save & Close button.
- Click the OK button on the Procedure Handler screen.
- Set the Before Action value to True.
- Click the Save & Close button on the Process Rules Event Handler screen.
- Click the Save & Close button on the Item Properties/Events screen.

- Click the Fire Macro button on the Item Master Data screen.

- The specified macro action is executed.
How To Use the ConditionExecution Action Type
This example is for the Item Master Data screen.
- Click the SAP menu option titled Item Master Data under the Inventory menu to load the Inventory Master Data screen.
- Determine the item that you want to establish process rules for (Fire Macro button for this example).
The right-click menu should be launched while the mouse is on top of the item.
- Select the Control Properties option from the APP Customizer menu group option from the right-click menu on the form to load the Item Properties/Events screen.
- Select the Events tab.
- Click the Define or Edit button on the Event that you want to record the process rules macro for. This will launch the Process Rules Event Handler screen.

- Click the … button next to the procedure to be executed. This will launch the Procedure Handler screen.

- Click the Load Macro Editor button on the Procedure Handler screen. This will launch the Macro Editor screen.

- Select the ConditionExecution option from the Action Types drop down column.
- The APP application will clear any existing parameter values. Any parameter value columns that are not optional (identified in yellow) or required (identified in red) will be deactivated (identified in gray).
- Complete the information needed for the ConditionExecution Macro Action Type that you want to execute.
- Complete any other information and/or Action Types required to complete your Macro.
- Click the Save & Close button.
- Click the OK button on the Procedure Handler screen.

- Set the Before Action value to True.
- Click the Save & Close button on the Process Rules Event Handler screen.
- Click the Save & Close button on the Item Properties/Events screen.
- Click the Fire Macro button on the Item Master Data screen.

- The value of the Item Group field is evaluated and the appropriate message box according to the Macro is displayed to the user.

- Navigate to another Item with an Item Group value different from the last Item.
- Click the Fire Macro button on the Item Master Data screen.

- The value of the Item Group field is again evaluated and the appropriate message box according to the Macro is displayed to the user.

How To Use the DeleteRow Action Type
This example is for the Sales Order screen.
- Click the SAP menu option titled Sales Order under the Sales - A/R menu to load the Sales Order screen.
- Determine the item that you want to establish process rules for (Fire Macro button for this example).
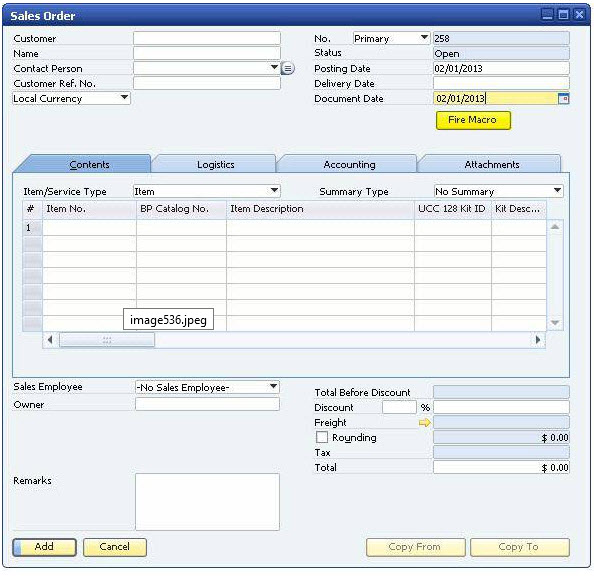
The right-click menu should be launched while the mouse is on top of the item.
- Select the Control Properties option from the APP Customizer menu group option from the right-click menu on the form to load the Item Properties/Events screen.

- Select the Events tab.
- Click the Define or Edit button on the Event that you want to record the process rules macro for. This will launch the Process Rules Event Handler screen.

- Click the … button next to the procedure to be executed. This will launch the Procedure Handler screen.
- Click the Load Macro Editor button on the Procedure Handler screen. This will launch the Macro Editor screen.

- Select the DeleteRow option from the Action Types drop down column.
- The APP application will clear any existing parameter values. Any parameter value columns that are not optional (identified in yellow) or required (identified in red) will be deactivated (identified in gray).
- Complete the information needed for the DeleteRow Macro Action Type that you want to execute.
- Complete any other information and/or Action Types required to complete your Macro.
- Click the Save & Close button.
- Click the OK button on the Procedure Handler screen.

- Set the Before Action value to False.
- Click the Save & Close button on the Process Rules Event Handler screen.
- Click the Save & Close button on the Item Properties/Events screen.
- Create a Sales Order with multiple detail lines.

- Click the Fire Macro button on the Sales Order screen.

- The designated Line is removed from the Sales Order.
- Click the Fire Macro button on the Sales Order screen again.

- The designated Line is again removed from the Sales Order.
How To Use the DisableItem Action Type
This example is for the Item Master Data screen.
- Click the SAP menu option titled Item Master Data under the Inventory menu to load the Inventory Master Data screen.
- Determine the item that you want to establish process rules for (Fire Macro button for this example).
The right-click menu should be launched while the mouse is on top of the item.
- Select the Control Properties option from the APP Customizer menu group option from the right-click menu on the form to load the Item Properties/Events screen.
- Select the Events tab.
- Click the Define or Edit button on the Event that you want to record the process rules macro for. This will launch the Process Rules Event Handler screen.
- Click the … button next to the procedure to be executed. This will launch the Procedure Handler screen.
- Click the Load Macro Editor button on the Procedure Handler screen. This will launch the Macro Editor screen.

- Select the DisableItem option from the Action Types drop down column.
- The APP application will clear any existing parameter values. Any parameter value columns that are not optional (identified in yellow) or required (identified in red) will be deactivated (identified in gray).
- Complete the information needed for the DisableItem Macro Action Type that you want to execute.
- Complete any other information and/or Action Types required to complete your Macro.
- Click the Save & Close button.
- Click the OK button on the Procedure Handler screen.
- Set the Before Action value to True.
- Click the Save & Close button on the Process Rules Event Handler screen.
- Click the Save & Close button on the Item Properties/Events screen.

- Click the Fire Macro button on the Item Master Data screen.

- The specified field is disabled.
How To Use the DoubleClick Action Type
This example is for the Item Master Data screen.
- Click the SAP menu option titled Item Master Data under the Inventory menu to load the Inventory Master Data screen.
- Determine the item that you want to establish process rules for (Fire Macro button for this example).
The right-click menu should be launched while the mouse is on top of the item.
- Select the Control Properties option from the APP Customizer menu group option from the right-click menu on the form to load the Item Properties/Events screen.
- Select the Events tab.
- Click the Define or Edit button on the Event that you want to record the process rules macro for. This will launch the Process Rules Event Handler screen.
- Click the … button next to the procedure to be executed. This will launch the Procedure Handler screen.
- Click the Load Macro Editor button on the Procedure Handler screen. This will launch the Macro Editor screen.

- Select the DoubleClick option from the Action Types drop down column.
- The APP application will clear any existing parameter values. Any parameter value columns that are not optional (identified in yellow) or required (identified in red) will be deactivated (identified in gray).
- Complete the information needed for the DoubleClick Macro Action Type that you want to execute.
- Complete any other information and/or Action Types required to complete your Macro.
- Click the Save & Close button.
- Click the OK button on the Procedure Handler screen.
- Set the Before Action value to True.
- Click the Save & Close button on the Process Rules Event Handler screen.
- Click the Save & Close button on the Item Properties/Events screen.
- Click the Fire Macro button on the Item Master Data screen.

- The specified macro action is executed.
How To Use the EnableItem Action Type
This example is for the Item Master Data screen.
- Click the SAP menu option titled Item Master Data under the Inventory menu to load the Inventory Master Data screen.
- Determine the item that you want to establish process rules for (Fire Macro button for this example).
The right-click menu should be launched while the mouse is on top of the item.
- Select the Control Properties option from the APP Customizer menu group option from the right-click menu on the form to load the Item Properties/Events screen.
- Select the Events tab.
- Click the Define or Edit button on the Event that you want to record the process rules macro for. This will launch the Process Rules Event Handler screen.
- Click the … button next to the procedure to be executed. This will launch the Procedure Handler screen.
- Click the Load Macro Editor button on the Procedure Handler screen. This will launch the Macro Editor screen.

- Select the EnableItem option from the Action Types drop down column.
- The APP application will clear any existing parameter values. Any parameter value columns that are not optional (identified in yellow) or required (identified in red) will be deactivated (identified in gray).
- Complete the information needed for the EnableItem Macro Action Type that you want to execute.
- Complete any other information and/or Action Types required to complete your Macro.
- Click the Save & Close button.
- Click the OK button on the Procedure Handler screen.
- Set the Before Action value to True.
- Click the Save & Close button on the Process Rules Event Handler screen.
- Click the Save & Close button on the Item Properties/Events screen.

- Click the Fire Macro button on the Item Master Data screen.

- The specified macro action is executed.
How To Use the EndWhile Type
This example is for the Item Master Data screen.
This example is a dual example of the While and EndWhile Action Types.
- Click the SAP menu option titled Item Master Data under the Inventory menu to load the Inventory Master Data screen.
- Determine the item that you want to establish process rules for (Fire Macro button for this example).
The right-click menu should be launched while the mouse is on top of the item.
- Select the Control Properties option from the APP Customizer menu group option from the right-click menu on the form to load the Item Properties/Events screen.
- Select the Events tab.
- Choose the Event that you want to record the process rules macro for.
- Click the Define or Edit button on the Event that you want to record the process rules macro for. This will launch the Process Rules Event Handler screen.
- Click the … button next to the procedure to be executed. This will launch the Procedure Handler screen.
- Click the Load Macro Editor button on the Procedure Handler screen. This will launch the Macro Editor screen.

- Select the While option from the Action Types drop down column.
- The APP application will clear any existing parameter values. Any parameter value columns that are not optional (identified in yellow) or required (identified in red) will be deactivated (identified in gray).
- Complete the information needed for the While Macro Action Type that you want to execute.
- Select the End While option from the Action Types drop down column.
- The APP application will clear any existing parameter values. Any parameter value columns that are not optional (identified in yellow) or required (identified in red) will be deactivated (identified in gray).
- Complete the information needed for the End While Macro Action Type that you want to execute.
- Complete any other information and/or Action Types required to complete your Macro.
- Click the Save & Close button.
- Click the OK button on the Procedure Handler screen.
- Set the Before Action value to False.
- Click the Save & Close button on the Process Rules Event Handler screen.
- Click the Save & Close button on the Item Properties/Events screen.
- Click the Fire Macro button on the Item Master Data screen.
How To Use the ExecuteSQL Type
This example is for the Item Master Data screen.
- Click the SAP menu option titled Item Master Data under the Inventory menu to load the Inventory Master Data screen.
- Determine the item that you want to establish process rules for (Fire Macro button for this example).
The right-click menu should be launched while the mouse is on top of the item.
- Select the Control Properties option from the APP Customizer menu group option from the right-click menu on the form to load the Item Properties/Events screen.
- Select the Events tab.
- Choose the Event that you want to record the process rules macro for.
- Click the Define or Edit button on the Event that you want to record the process rules macro for. This will launch the Process Rules Event Handler screen.
- Click the … button next to the procedure to be executed. This will launch the Procedure Handler screen.
- Click the Load Macro Editor button on the Procedure Handler screen. This will launch the Macro Editor screen.

- Select the ExecuteSQL option from the Action Types drop down column.
- The APP application will clear any existing parameter values. Any parameter value columns that are not optional (identified in yellow) or required (identified in red) will be deactivated (identified in gray).
- Click in the Value column of the Macro Editor screen for the ExecuteSQL Action Type. This will load the Macro Editor Values Entry screen.

- Enter the SQL statement to be executed in the Macro Editor Values Entry screen.
- Click the OK button to return to the Macro Editor screen.
- Complete the information needed for the ExecuteSQL Macro Action Type that you want to execute.
- Complete any other information and/or Action Types required to complete your Macro.
- Click the Save & Close button.
- Click the OK button on the Procedure Handler screen.
- Set the Before Action value to False.
- Click the Save & Close button on the Process Rules Event Handler screen.
- Click the Save & Close button on the Item Properties/Events screen.
- Click the Fire Macro button on the Item Master Data screen to execute your SQL statement.
How To Use the FormClose Action Type
This example is for the Item Master Data screen.
- Click the SAP menu option titled Item Master Data under the Inventory menu to load the Inventory Master Data screen.
- Determine the item that you want to establish process rules for (Fire Macro button for this example).
The right-click menu should be launched while the mouse is on top of the item.
- Select the Control Properties option from the APP Customizer menu group option from the right-click menu on the form to load the Item Properties/Events screen.
- Select the Events tab.
- Choose the Event that you want to record the process rules macro for.
- Click the Define or Edit button on the Event that you want to record the process rules macro for. This will launch the Process Rules Event Handler screen.
- Click the … button next to the procedure to be executed. This will launch the Procedure Handler screen.
the **Procedure Handler** screen.
- Click the Load Macro Editor button on the Procedure Handler screen. This will launch the Macro Editor screen.

- Select the FormClose option from the Action Types drop down column.
- The APP application will clear any existing parameter values. Any parameter value columns that are not optional (identified in yellow) or required (identified in red) will be deactivated (identified in gray).
- Complete the information needed for the FormClose Macro Action Type that you want to execute.
The form to be closed must have been opened in the same macro session.
- Complete any other information and/or Action Types required to complete your Macro.
- Click the Save & Close button.
- Click the OK button on the Procedure Handler screen.
- Set the Before Action value to True.
- Click the Save & Close button on the Process Rules Event Handler screen.
- Click the Save & Close button on the Item Properties/Events screen.
- Click the Fire Macro button on the Item Master Data screen.


- The specified macro action is executed.
How To Use the GetFieldValue Action Type - Status Bar Example
This example is for the Item Master Data screen.
- Click the SAP menu option titled Item Master Data under the Inventory menu to load the Inventory Master Data screen.
- Determine the item that you want to establish process rules for (Fire Macro button for this example).
The right-click menu should be launched while the mouse is on top of the item.
- Select the Control Properties option from the APP Customizer menu group option from the right-click menu on the form to load the Item Properties/Events screen.
- Select the Events tab.
- Choose the Event that you want to record the process rules macro for.
- Click the Define or Edit button on the Event that you want to record the process rules macro for. This will launch the Process Rules Event Handler screen.
- Click the … button next to the procedure to be executed. This will launch the Procedure Handler screen.
- Click the Load Macro Editor button on the Procedure Handler screen. This will launch the Macro Editor screen.

- Select the GetFieldValue option from the Action Types drop down column.
- The APP application will clear any existing parameter values. Any parameter value columns that are not optional (identified in yellow) or required (identified in red) will be deactivated (identified in gray).
- Complete the information needed for the GetFieldValue Macro Action Type that you want to execute.
This example is being combined with the SetStatusBar action to pull the Item Code and Item Name values into variables and use a variable substitution to assign those values into the text of the status bar message.
- Complete any other information and/or Action Types required to complete your Macro.
- Click the Save & Close button.
- Click the OK button on the Procedure Handler screen.
- Set the Before Action value to True.
- Click the Save & Close button on the Process Rules Event Handler screen.
- Click the Save & Close button on the Item Properties/Events screen.
- Click the Fire Macro button on the Item Master Data screen.

- The specified message, with variable substitutions, appears on the SAP status bar.
How To Use the GetFieldValue Action Type - Field Example
This example is for the Item Master Data screen.
- Click the SAP menu option titled Item Master Data under the Inventory menu to load the Inventory Master Data screen.
- Determine the item that you want to establish process rules for (Fire Macro button for this example).
The right-click menu should be launched while the mouse is on top of the item.
- Select the Control Properties option from the APP Customizer menu group option from the right-click menu on the form to load the Item Properties/Events screen.
- Select the Events tab.
- Choose the Event that you want to record the process rules macro for.
- Click the Define or Edit button on the Event that you want to record the process rules macro for. This will launch the Process Rules Event Handler screen.
- Click the … button next to the procedure to be executed. This will launch the Procedure Handler screen.
- Click the Load Macro Editor button on the Procedure Handler screen. This will launch the Macro Editor screen.

- Select the GetFieldValue option from the Action Types drop down column.
- The APP application will clear any existing parameter values. Any parameter value columns that are not optional (identified in yellow) or required (identified in red) will be deactivated (identified in gray).
- Complete the information needed for the GetFieldValue Macro Action Type that you want to execute.
This example is being combined with the SetFieldValue action to pull the Item Code and Item Name values into variables and use a variable substitution to assign those values into the field being assigned through the macro action.
- Complete any other information and/or Action Types required to complete your Macro.
- Click the Save & Close button.
- Click the OK button on the Procedure Handler screen.
- Set the Before Action value to True.
- Click the Save & Close button on the Process Rules Event Handler screen.
- Click the Save & Close button on the Item Properties/Events screen.
- Click the Fire Macro button on the Item Master Data screen.

- The specified macro action is executed.
How To Use the GetSQLValue Action Type

Note - This example is for the Item Master Data screen.
 Click the SAP menu option titled Item Master Data under
the Inventory menu to load the Inventory Master Data screen.
Determine the item that you want to establish process rules for (Fire
Macro button for this example).
Note - The right-click menu should be launched while the mouse is on top of the item.
Select the Control Properties option from the APP Customizer menu group option from the right-click menu on the form to load the **Item** **Properties/Events** screen.
Select the Events tab.
Click the Define or Edit button on the Event that you want to record the process rules macro for. This will launch the **Process Rules Event** **Handler** screen.
Click the … button next to the procedure to be executed. This will launch
the **Procedure Handler** screen.
Click the Load Macro Editor button on the **Procedure Handler** screen.
This will launch the **Macro Editor** screen.

Select the GetSQLValue option from the Action Types drop down column.
The APP application will clear any existing parameter values. Any parameter value columns that are not optional (identified in yellow) or required (identified in red) will be deactivated (identified in gray). Complete the information needed for the GetSQLValue Macro Action Type that you want to execute.

Note - The complete SQL query used for this example is SELECT
I.ItemCode + '-' + CONVERT(nvarchar,I.ItmsGrpCod) + ': ' + I.ItemName AS [Frgn] FROM OITM I (NOLOCK) WHERE ItemCode = $[$5.0.0].
Complete any other information and/or Action Types required to complete your Macro.
Click the Save & Close button.
Click the OK button on the **Procedure Handler** screen.
Set the Before Action value to True.
Click the **Save & Close** button on the **Process Rules Event** **Handler** screen.
Click the Save & Close button on the **Item Properties/Events** screen.
Click the Fire Macro button on the Item Master Data screen.

The specified macro actions are executed.
How To Use the HideItem Action Type
This example is for the Item Master Data screen.
- Click the SAP menu option titled Item Master Data under the Inventory menu to load the Inventory Master Data screen.
- Determine the item that you want to establish process rules for (Fire Macro button for this example).
The right-click menu should be launched while the mouse is on top of the item.
- Select the Control Properties option from the APP Customizer menu group option from the right-click menu on the form to load the Item Properties/Events screen.
- Select the Events tab.
- Choose the Event that you want to record the process rules macro for.
- Click the Define or Edit button on the Event that you want to record the process rules macro for. This will launch the Process Rules Event Handler screen.
- Click the … button next to the procedure to be executed. This will launch the Procedure Handler screen.
- Click the Load Macro Editor button on the Procedure Handler screen. This will launch the Macro Editor screen.

- Select the HideItem option from the Action Types drop down column.
- The APP application will clear any existing parameter values. Any parameter value columns that are not optional (identified in yellow) or required (identified in red) will be deactivated (identified in gray).
- Complete the information needed for the HideItem Macro Action Type that you want to execute.
- Complete any other information and/or Action Types required to complete your Macro.
- Click the Save & Close button.
- Click the OK button on the Procedure Handler screen.
- Set the Before Action value to True.
- Click the Save & Close button on the Process Rules Event Handler screen.
- Click the Save & Close button on the Item Properties/Events screen.

- Click the Fire Macro button on the Item Master Data screen.

- The specified macro action is executed.
How To Use the ItemClick Action Type
This example is for the Item Master Data screen.
- Click the SAP menu option titled Item Master Data under the Inventory menu to load the Inventory Master Data screen.
- Determine the item that you want to establish process rules for (Fire Macro button for this example).
The right-click menu should be launched while the mouse is on top of the item.
- Select the Control Properties option from the APP Customizer menu group option from the right-click menu on the form to load the Item Properties/Events screen.
- Select the Events tab.
- Choose the Event that you want to record the process rules macro for.
- Click the Define or Edit button on the Event that you want to record the process rules macro for. This will launch the Process Rules Event Handler screen.
- Click the … button next to the procedure to be executed. This will launch the Procedure Handler screen.
- Click the Load Macro Editor button on the Procedure Handler screen. This will launch the Macro Editor screen.

- Select the ItemClick option from the Action Types drop down column.
- The APP application will clear any existing parameter values. Any parameter value columns that are not optional (identified in yellow) or required (identified in red) will be deactivated (identified in gray).
- Complete the information needed for the ItemClick Macro Action Type that you want to execute.
- Complete any other information and/or Action Types required to complete your Macro.
- Click the Save & Close button.
- Click the OK button on the Procedure Handler screen.
- Set the Before Action value to True.
- Click the Save & Close button on the Process Rules Event Handler screen.
- Click the Save & Close button on the Item Properties/Events screen.
- Click the Fire Macro button on the Item Master Data screen.

- The specified macro action is executed.
How To Use the LineEvents Action Type
This example is for the Sales Order screen.
- Click the SAP menu option titled Sales Order under the Sales - A/R menu to load the Sales Order screen.
- Determine the item that you want to establish process rules for (Calculate Shipping Costs button for this example).
The right-click menu should be launched while the mouse is on top of the item.

- Select the Control Properties option from the APP Customizer menu group option from the right-click menu on the form to load the Item Properties/Events screen.
Select the Events tab.
- Select the Events tab.
- Choose the Event that you want to record the process rules macro for.
- Click the Define or Edit button on the Event that you want to record the process rules macro for. This will launch the Process Rules Event Handler screen.

- Enter the Event Description value.
- Select the validation type and procedure to be executed.
- Click the … button next to the procedure to be executed. This will launch the Procedure Handler screen.

- Click the Load Macro Editor button on the Procedure Handler screen. This will launch the Macro Editor screen.
image580.jpeg_772x491_wrap_center_round_info_90_the_color
- Select an existing Line Event and click the Load button or click the Define New button to create a new Line Event.
- Designate the Name for the Line Event.
- Enter the unique ID for the form on which the Line Event will operate in the Form Type field.
- Enter the unique ID for the item on which the Line Event will operate in the Item UID field.

Line Events can be coded to only one form and item at a time.
- Select the validation to be used. For this example, I'll select the Query Validation option.
- Click in the SQL field.

- Enter the SQL Query to be used in the evaluation for validation.
For this example, the Query will determine if the Item Code <> “Shipping” and the Item Property 1 checkbox is selected. If this criteria is met, the value will be “T”, otherwise the value will be “F”.
- Click the OK button.
- Enter the valid return values in the Value column.
- If the value returned should execute a procedure, select the procedure from the Procedure for All column.
For this example, the returned value “F” will execute a procedure to remove the line with the Item Code “Shipping”.
- If the procedure needs to be modified, click the Edit button. This will launch the Procedure Handler screen.
- To remove a valid return value from the screen, click the Remove button.
- If the procedure to be executed returns a value to take action with, select the Operation option for the operation to be done with the value.
- Enter the logic to be evaluated with the Operation in the Column field.
For this example, the returned value “T” will obtain the value from the APP Macro Ship Pct user defined field from the Item Master Data screen, divide it by 100, and multiple it by the Item Price to SUM the shipping for each item on the order as it evaluates the lines of the Sales Order.
- Select the Break Loop checkbox if the valid return value should cause the Line Events to terminate.
- Repeat the process until all valid return value entries have been completed.

- In the Final Result Validation section, enter the valid final result return values in the Value column.
- If the final result value returned should execute a procedure, select the procedure from the Procedure column.
For this example, the returned value “T” will execute a procedure to add a line with the Item Code “Shipping” to the order with the calculated total shipping cost.
- If the procedure needs to be modified, click the Edit button. This will launch the Procedure Handler screen.
- To remove a valid final result value from the screen, click the Remove button
- Click the Save & Close button on the Macro Editor Line Events Values Entry screen.
- Complete the information needed for the LineEvents Macro Action Type that you want to execute.
- Complete any other information and/or Action Types required to complete your Macro.
- Click the Save & Close button.
- Click the OK button on the Procedure Handler screen.

- Set the Before Action value to False.
- Click the Save & Close button on the Process Rules Event Handler screen.
- Click the Save & Close button on the Item Properties/Events screen.
- Create a Sales Order with multiple item lines.

- Click the Calculate Shipping Costs button on the Sales Order screen.

- The initiating message box from the Macro is displayed to the user.

- The LineEvents Action Type from the Macro is processed, with a new “Shipping” line being added to the Sales Order calculating a $53.75 shipping cost.
Prior to the Macro execution, an item needs to be added to the Inventory with the Item Code “Shipping” for this example to complete successfully.

- The terminating message box from the Macro is displayed to the user.
How To Use the LoadB1Query Action Type
This example is for the Item Master Data screen.
- Click the SAP menu option titled Item Master Data under the Inventory menu to load the Inventory Master Data screen.
- Determine the item that you want to establish process rules for (Fire Macro button for this example).
The right-click menu should be launched while the mouse is on top of the item.
- Select the Control Properties option from the APP Customizer menu group option from the right-click menu on the form to load the Item Properties/Events screen.
- Select the Events tab.
- Choose the Event that you want to record the process rules macro for.
- Click the Define or Edit button on the Event that you want to record the process rules macro for. This will launch the Process Rules Event Handler screen.
- Click the … button next to the procedure to be executed. This will launch the Procedure Handler screen.
- Click the Load Macro Editor button on the Procedure Handler screen. This will launch the Macro Editor screen.

- Select the LoadB1Query option from the Action Types drop down column.
- The APP application will clear any existing parameter values. Any parameter value columns that are not optional (identified in yellow) or required (identified in red) will be deactivated (identified in gray).
- Complete the information needed for the LoadB1Query Macro Action Type that you want to execute.
- The value for the B1 Query is determined by the following criteria…
- The first part of the B1 Query value is the form number associated with the SAP query window. This value can be determined by the associated number displayed in the system information.

- The second part of the B1 Query value is the menu name (APP) associated with the SAP query.



- Complete any other information and/or Action Types required to complete your Macro.
- Click the Save & Close button.
- Click the OK button on the Procedure Handler screen.
- Set the Before Action value to True.
- Click the Save & Close button on the Process Rules Event Handler screen.
- Click the Save & Close button on the Item Properties/Events screen.
- Click the Fire Macro button on the Item Master Data screen.

- The SAP form to display the query is opened.
The SAP form will be used to display the query even if the TWBS Visual Query Editor screen is the preferred display option in the query definition.
How To Use the LoadUserTable Action Type
This example is for the Item Master Data screen.
- Click the SAP menu option titled Item Master Data under the Inventory menu to load the Inventory Master Data screen.
- Determine the item that you want to establish process rules for (Fire Macro button for this example).
The right-click menu should be launched while the mouse is on top of the item.
- Select the Control Properties option from the APP Customizer menu group option from the right-click menu on the form to load the Item Properties/Events screen.
- Select the Events tab.
- Choose the Event that you want to record the process rules macro for.
- Click the Define or Edit button on the Event that you want to record the process rules macro for. This will launch the Process Rules Event Handler screen.
- Click the … button next to the procedure to be executed. This will launch the Procedure Handler screen.
- Click the Load Macro Editor button on the Procedure Handler screen. This will launch the Macro Editor screen.

- Select the LoadUserTable option from the Action Types drop down column.
- The APP application will clear any existing parameter values. Any parameter value columns that are not optional (identified in yellow) or required (identified in red) will be deactivated (identified in gray).
- Complete the information needed for the LoadUserTable Macro Action Type that you want to execute.
- The value for the user defined table is determined by the following criteria…
- The value of the user defined table is the code associated with the user defined table.

- Complete any other information and/or Action Types required to complete your Macro.
- Click the Save & Close button.
- Click the OK button on the Procedure Handler screen.
- Set the Before Action value to True.
- Click the Save & Close button on the Process Rules Event Handler screen.
- Click the Save & Close button on the Item Properties/Events screen.
- Click the Fire Macro button on the Item Master Data screen.

- The SAP user defined table is opened.
How To Use the MacroCommand Type
This example is for the Item Master Data screen.
- Click the SAP menu option titled Item Master Data under the Inventory menu to load the Inventory Master Data screen.
- Determine the item that you want to establish process rules for (Fire Macro button for this example).
The right-click menu should be launched while the mouse is on top of the item.
- Select the Control Properties option from the APP Customizer menu group option from the right-click menu on the form to load the Item Properties/Events screen.
- Select the Events tab.
- Choose the Event that you want to record the process rules macro for.
- Click the Define or Edit button on the Event that you want to record the process rules macro for. This will launch the Process Rules Event Handler screen.
- Click the … button next to the procedure to be executed. This will launch the Procedure Handler screen.
- Click the Load Macro Editor button on the Procedure Handler screen. This will launch the Macro Editor screen.

- Select the MacroCommand option from the Action Types drop down column.
- The APP application will clear any existing parameter values. Any parameter value columns that are not optional (identified in yellow) or required (identified in red) will be deactivated (identified in gray).
- Complete the information needed for the MacroCommand Macro Action Type that you want to execute.
- Complete any other information and/or Action Types required to complete your Macro.
- Click the Save & Close button.
- Click the OK button on the Procedure Handler screen.
- Set the Before Action value to False.
- Click the Save & Close button on the Process Rules Event Handler screen.
- Click the Save & Close button on the Item Properties/Events screen.
- Click the Fire Macro button on the Item Master Data screen.

- The Line 3 message box appears for the user.
How To Use the MenuClick Action Type
This example is for the Item Master Data screen.
- Click the SAP menu option titled Item Master Data under the Inventory menu to load the Inventory Master Data screen.
- Determine the item that you want to establish process rules for (Fire Macro button for this example).
The right-click menu should be launched while the mouse is on top of the item.
- Select the Control Properties option from the APP Customizer menu group option from the right-click menu on the form to load the Item Properties/Events screen.
- Select the Events tab.
- Choose the Event that you want to record the process rules macro for.
- Click the Define or Edit button on the Event that you want to record the process rules macro for. This will launch the Process Rules Event Handler screen.
- Click the … button next to the procedure to be executed. This will launch the Procedure Handler screen.
- Click the Load Macro Editor button on the Procedure Handler screen. This will launch the Macro Editor screen.

- Select the MenuClick option from the Action Types drop down column.
- The APP application will clear any existing parameter values. Any parameter value columns that are not optional (identified in yellow) or required (identified in red) will be deactivated (identified in gray).
- Complete the information needed for the MenuClick Macro Action Type that you want to execute.
- Complete any other information and/or Action Types required to complete your Macro.
- Click the Save & Close button.
- Click the OK button on the Procedure Handler screen.
- Set the Before Action value to True.
- Click the Save & Close button on the Process Rules Event Handler screen.
- Click the Save & Close button on the Item Properties/Events screen.
- Click the Fire Macro button on the Item Master Data screen.

- The specified menu click is executed.
For this example, the menu click launched the Sales Order screen.
How To Use the Messagebox Action Type
This example is for the Item Master Data screen.
- Click the SAP menu option titled Item Master Data under the Inventory menu to load the Inventory Master Data screen.
- Determine the item that you want to establish process rules for (Fire Macro button for this example).
The right-click menu should be launched while the mouse is on top of the item.
- Select the Control Properties option from the APP Customizer menu group option from the right-click menu on the form to load the Item Properties/Events screen.
- Select the Events tab.
- Choose the Event that you want to record the process rules macro for.
- Click the Define or Edit button on the Event that you want to record the process rules macro for. This will launch the Process Rules Event Handler screen.
- Click the … button next to the procedure to be executed. This will launch the Procedure Handler screen.
- Click the Load Macro Editor button on the Procedure Handler screen. This will launch the Macro Editor screen.

- Select the MessageBox option from the Action Types drop down column.
- The APP application will clear any existing parameter values. Any parameter value columns that are not optional (identified in yellow) or required (identified in red) will be deactivated (identified in gray).
- Complete the information needed for the MessageBox Macro Action Type that you want to execute.
This example is being combined with several GetFieldValue actions to pull the Item Code and Item Name values into variables and use a variable substitution to assign those values into the text of the message box.
- Complete any other information and/or Action Types required to complete your Macro.
- Click the Save & Close button.
- Click the OK button on the Procedure Handler screen.
- Set the Before Action value to True.
- Click the Save & Close button on the Process Rules Event Handler screen.
- Click the Save & Close button on the Item Properties/Events screen.
- Click the Fire Macro button on the Item Master Data screen.

- The specified message box text appears.
How To Use the OpenExternalProgram Action Type
This example is for the Item Master Data screen.
- Click the SAP menu option titled Item Master Data under the Inventory menu to load the Inventory Master Data screen.
- Determine the item that you want to establish process rules for (Fire Macro button for this example).
The right-click menu should be launched while the mouse is on top of the item.
- Select the Control Properties option from the APP Customizer menu group option from the right-click menu on the form to load the Item Properties/Events screen.
- Select the Events tab.
- Choose the Event that you want to record the process rules macro for.
- Click the Define or Edit button on the Event that you want to record the process rules macro for. This will launch the Process Rules Event Handler screen.
- Click the … button next to the procedure to be executed. This will launch the Procedure Handler screen.
- Click the Load Macro Editor button on the Procedure Handler screen. This will launch the Macro Editor screen.

- Select the OpenExternalProgram option from the Action Types drop down column.
- The APP application will clear any existing parameter values. Any parameter value columns that are not optional (identified in yellow) or required (identified in red) will be deactivated (identified in gray).
- Complete the information needed for the OpenExternalProgram Macro Action Type that you want to execute.
APP Customizer will pass the value specified for the OpenExternalProgram action type as if the user had typed the value on the Run command window. In order for a value to work through APP Customizer, it should be able to function if manually typed on the Run command window.
- Complete any other information and/or Action Types required to complete your Macro.
- Click the Save & Close button.
- Click the OK button on the Procedure Handler screen.
- Set the Before Action value to True.
- Click the Save & Close button on the Process Rules Event Handler screen.
- Click the Save & Close button on the Item Properties/Events screen.
- Click the Fire Macro button on the Item Master Data screen.

- The specified application executable from the macro is opened.
How To Launch a Website in Internet Explorer
This example is for the Item Master Data screen.
- Click the SAP menu option titled Item Master Data under the Inventory menu to load the Inventory Master Data screen.
- Determine the item that you want to establish process rules for (Fire Macro button for this example).
The right-click menu should be launched while the mouse is on top of the item.
- Select the Control Properties option from the APP Customizer menu group option from the right-click menu on the form to load the Item Properties/Events screen.

- Select the Events tab.
- Choose the Event that you want to record the process rules macro for.
- Click the Define button on the Double Click event. This will launch the Process Rules Event Handler screen.

- Either select the Define New option from the procedure drop down or select the existing procedure from the drop down and click the … button next to the drop down. This will launch the Procedure Handler screen.
For this demonstration an existing procedure is being used.
- Click the Load Macro Editor button on the Procedure Handler screen. This will launch the Macro Editor screen.

- Select the OpenExternalProgram option from the Action Types drop down column.
- The APP application will clear any existing parameter values. Any parameter value columns that are not optional (identified in yellow) or required (identified in red) will be deactivated (identified in gray).
- Complete the information needed for the OpenExternalProgram Macro Action Type that you want to execute.
- Click the Value field to open the window to edit the value passed.
The value “iexplore” must be in quotations.
APP Customizer will pass the value specified for the OpenExternalProgram action type as if the user had typed the value on the Run command window. In order for a value to work through APP Customizer, it should be able to function if manually typed on the Run command window.

- Click the OK button on the Value editing screen.
- Complete any other information and/or Action Types required to complete your Macro.
- Click the Save & Close button on the Macro Editor screen.
- Click the OK button on the Procedure Handler screen.

- Set the Before Action value to False.
- Click the Save & Close button on the Process Rules Event Handler screen.
- Click the Save & Close button on the Item Properties/Events screen.
- Double click the Web Site field on the Business Partner Master Data screen.

- The specified website will be launched in a new Internet Explorer browser window.

How To Launch a Skype Call to a Contact
This example is for the Business Partner Master Data screen.
- Click the SAP menu option titled Business Partner Master Data under the Business Partner menu to load the Business Partner Master Data screen.
The right-click menu should be launched while the mouse is on top of the item.
- Select the Control Properties option from the APP Customizer menu group option from the right-click menu on the form to load the Item Properties/Events screen.

- Select the Events tab.
- Choose the Event that you want to record the process rules macro for.
- Click the Define button on the Event that you want to record the process rules macro for. This will launch the Process Rules Event Handler screen.

- Either select the Define New option from the procedure drop down or select the existing procedure from the drop down and click the … button next to the drop down. This will launch the Procedure Handler screen.
For this demonstration an existing procedure is being used.
- Click the Load Macro Editor button on the Procedure Handler screen. This will launch the Macro Editor screen.

- Select the OpenExternalProgram option from the Action Types drop down column.
- The APP application will clear any existing parameter values. Any parameter value columns that are not optional (identified in yellow) or required (identified in red) will be deactivated (identified in gray).
- Complete the information needed for the OpenExternalProgram Macro Action Type that you want to execute.
- Click the Value field to open the window to edit the value passed.
The location of the application executable must be in quotations.
APP Customizer will pass the value specified for the OpenExternalProgram action type as if the user had typed the value on the Run command window. In order for a value to work through APP Customizer, it should be able to function if manually typed on the Run command window.
- Click the OK button on the Value editing screen.
- Complete any other information and/or Action Types required to complete your Macro.
- Click the Save & Close button on the Macro Editor screen.
- Click the OK button on the Procedure Handler screen.

- Set the Before Action value to False.
- Click the Save & Close button on the Process Rules Event Handler screen.
- Click the Save & Close button on the Item Properties/Events screen.
- Double click the Web Site field on the Business Partner Master Data screen.

- The specified phone number will be launched in a new Skype call.
If not logged into a Skype account, the user will be prompted first for their login credentials.
How To Use the RightClick Action Type
This example is for the Item Master Data screen.
- Click the SAP menu option titled Item Master Data under the Inventory menu to load the Inventory Master Data screen.
- Determine the item that you want to establish process rules for (Fire Macro button for this example).
The right-click menu should be launched while the mouse is on top of the item.
- Select the Control Properties option from the APP Customizer menu group option from the right-click menu on the form to load the Item Properties/Events screen.
- Select the Events tab.
- Choose the Event that you want to record the process rules macro for.
- Click the Define or Edit button on the Event that you want to record the process rules macro for. This will launch the Process Rules Event Handler screen.
- Click the … button next to the procedure to be executed. This will launch the Procedure Handler screen.
- Click the Load Macro Editor button on the Procedure Handler screen. This will launch the Macro Editor screen.

- Select the RightClick option from the Action Types drop down column.
- The APP application will clear any existing parameter values. Any parameter value columns that are not optional (identified in yellow) or required (identified in red) will be deactivated (identified in gray).
- Complete the information needed for the RightClick Macro Action Type that you want to execute.
- Complete any other information and/or Action Types required to complete your Macro.
- Click the Save & Close button.
- Click the OK button on the Procedure Handler screen.
- Set the Before Action value to True.
- Click the Save & Close button on the Process Rules Event Handler screen.
- Click the Save & Close button on the Item Properties/Events screen.
- Click the Fire Macro button on the Item Master Data screen.

- The specified macro action is executed.
How To Use the SendKeys Action Type
This example is for the Item Master Data screen.
- Click the SAP menu option titled Item Master Data under the Inventory menu to load the Inventory Master Data screen.
- Determine the item that you want to establish process rules for (Fire Macro button for this example).
The right-click menu should be launched while the mouse is on top of the item.
- Select the Control Properties option from the APP Customizer menu group option from the right-click menu on the form to load the Item Properties/Events screen.
- Select the Events tab.
- Choose the Event that you want to record the process rules macro for.
- Click the Define or Edit button on the Event that you want to record the process rules macro for. This will launch the Process Rules Event Handler screen.
- Click the … button next to the procedure to be executed. This will launch the Procedure Handler screen.
- Click the Load Macro Editor button on the Procedure Handler screen. This will launch the Macro Editor screen.

- Select the SendKeys option from the Action Types drop down column.
- The APP application will clear any existing parameter values. Any parameter value columns that are not optional (identified in yellow) or required (identified in red) will be deactivated (identified in gray).
- Complete the information needed for the SendKeys Macro Action Type that you want to execute.
The SendKeys Reference Guide section of the User Guide provides additional information on the SendKeys values that you can utilize.
For this example, the SendKeys value is being set up to mimic the SAP® Business One menu option keystroke shortcut for launching the Forms Settings screen.

- Complete any other information and/or Action Types required to complete your Macro.
- Click the Save & Close button.
- Click the OK button on the Procedure Handler screen.
- Set the Before Action value to True.
- Click the Save & Close button on the Process Rules Event Handler screen.
- Click the Save & Close button on the Item Properties/Events screen.
- Click the Fire Macro button on the Item Master Data screen.

- The forms settings for the Item Master Data form are opened.
How To Use the SetBackColor Action Type
This example is for the Item Master Data screen.
- Click the SAP menu option titled Item Master Data under the Inventory menu to load the Inventory Master Data screen.
- Determine the item that you want to establish process rules for (Fire Macro button for this example).
The right-click menu should be launched while the mouse is on top of the item.
- Select the Control Properties option from the APP Customizer menu group option from the right-click menu on the form to load the Item Properties/Events screen.
- Select the Events tab.
- Choose the Event that you want to record the process rules macro for.
- Click the Define or Edit button on the Event that you want to record the process rules macro for. This will launch the Process Rules Event Handler screen.
- Click the … button next to the procedure to be executed. This will launch the Procedure Handler screen.
- Click the Load Macro Editor button on the Procedure Handler screen. This will launch the Macro Editor screen.

- Select the SetBackColor option from the Action Types drop down column.
- The APP application will clear any existing parameter values. Any parameter value columns that are not optional (identified in yellow) or required (identified in red) will be deactivated (identified in gray).
- Complete the information needed for the SetBackColor Macro Action Type that you want to execute.
- Complete any other information and/or Action Types required to complete your Macro.
- Click the Save & Close button on the Macro Editor screen.
- Click the OK button on the Procedure Handler screen.
- Set the Before Action value to True.
- Click the Save & Close button on the Process Rules Event Handler screen.
- Click the Save & Close button on the Item Properties/Events screen.
- Click the Fire Macro button on the Item Master Data screen.

- The specified macro action is executed.
How To Use the SetFieldValue Action Type
This example is for the Item Master Data screen.
- Click the SAP menu option titled Item Master Data under the Inventory menu to load the Inventory Master Data screen.
- Determine the item that you want to establish process rules for (Fire Macro button for this example).
The right-click menu should be launched while the mouse is on top of the item.
- Select the Control Properties option from the APP Customizer menu group option from the right-click menu on the form to load the Item Properties/Events screen.
- Select the Events tab.
- Choose the Event that you want to record the process rules macro for.
- Click the Define or Edit button on the Event that you want to record the process rules macro for. This will launch the Process Rules Event Handler screen.
- Click the … button next to the procedure to be executed. This will launch the Procedure Handler screen.
- Click the Load Macro Editor button on the Procedure Handler screen. This will launch the Macro Editor screen.

- Select the SetFieldValue option from the Action Types drop down column.
- The APP application will clear any existing parameter values. Any parameter value columns that are not optional (identified in yellow) or required (identified in red) will be deactivated (identified in gray).
- Complete the information needed for the SetFieldValue Macro Action Type that you want to execute.
This example is being combined with several GetFieldValue actions to pull the Item Code and Item Name values into variables and use a variable substitution to assign those values into the field being assigned through the macro action.
- Complete any other information and/or Action Types required to complete your Macro.
- Click the Save & Close button on the Macro Editor screen.
- Click the OK button on the Procedure Handler screen.
- Set the Before Action value to True.
- Click the Save & Close button on the Process Rules Event Handler screen.
- Click the Save & Close button on the Item Properties/Events screen.
- Click the Fire Macro button on the Item Master Data screen.
- The specified macro action is executed.
How To Use the SetForeColor Action Type
This example is for the Item Master Data screen.
- Click the SAP menu option titled Item Master Data under the Inventory menu to load the Inventory Master Data screen.
- Determine the item that you want to establish process rules for (Fire Macro button for this example).
The right-click menu should be launched while the mouse is on top of the item.
- Select the Control Properties option from the APP Customizer menu group option from the right-click menu on the form to load the Item Properties/Events screen.
- Select the Events tab.
- Choose the Event that you want to record the process rules macro for.
- Click the Define or Edit button on the Event that you want to record the process rules macro for. This will launch the Process Rules Event Handler screen.
- Click the … button next to the procedure to be executed. This will launch the Procedure Handler screen.
- Click the Load Macro Editor button on the Procedure Handler screen. This will launch the Macro Editor screen.
- Select the SetForeColor option from the Action Types drop down column.
- The APP application will clear any existing parameter values. Any parameter value columns that are not optional (identified in yellow) or required (identified in red) will be deactivated (identified in gray).
- Complete the information needed for the SetForeColor Macro Action Type that you want to execute.
- Complete any other information and/or Action Types required to complete your Macro.
- Click the Save & Close button on the Macro Editor screen.
- Click the OK button on the Procedure Handler screen.
- Set the Before Action value to True.
- Click the Save & Close button on the Process Rules Event Handler screen.
- Click the Save & Close button on the Item Properties/Events screen.
- Click the Fire Macro button on the Item Master Data screen.
- The specified macro action is executed.
How To Use the SetFormTitle Action Type
This example is for the Item Master Data screen.
- Click the SAP menu option titled Item Master Data under the Inventory menu to load the Inventory Master Data screen.
- Determine the item that you want to establish process rules for (Fire Macro button for this example).
The right-click menu should be launched while the mouse is on top of the item.
- Select the Control Properties option from the APP Customizer menu group option from the right-click menu on the form to load the Item Properties/Events screen.
- Select the Events tab.
- Choose the Event that you want to record the process rules macro for.
- Click the Define or Edit button on the Event that you want to record the process rules macro for. This will launch the Process Rules Event Handler screen.
- Click the … button next to the procedure to be executed. This will launch the Procedure Handler screen.
- Click the Load Macro Editor button on the Procedure Handler screen. This will launch the Macro Editor screen.

- Select the SetFormTitle option from the Action Types drop down column.
- The APP application will clear any existing parameter values. Any parameter value columns that are not optional (identified in yellow) or required (identified in red) will be deactivated (identified in gray).
- Complete the information needed for the SetFormTitle Macro Action Type that you want to execute.
- Complete any other information and/or Action Types required to complete your Macro.
- Click the Save & Close button on the Macro Editor screen.
- Click the OK button on the Procedure Handler screen.
- Set the Before Action value to False.
- Click the Save & Close button on the Process Rules Event Handler screen.
- Click the Save & Close button on the Item Properties/Events screen.
- Click the Fire Macro button on the Item Master Data screen.

- The form title is changed to the value from the Macro.
How To Use the SetStatusBar Action Type
This example is for the Item Master Data screen.
- Click the SAP menu option titled Item Master Data under the Inventory menu to load the Inventory Master Data screen.
- Determine the item that you want to establish process rules for (Fire Macro button for this example).
The right-click menu should be launched while the mouse is on top of the item.
- Select the Control Properties option from the APP Customizer menu group option from the right-click menu on the form to load the Item Properties/Events screen.
- Select the Events tab.
- Choose the Event that you want to record the process rules macro for.
- Click the Define or Edit button on the Event that you want to record the process rules macro for. This will launch the Process Rules Event Handler screen.
- Click the … button next to the procedure to be executed. This will launch the Procedure Handler screen.
- Click the Load Macro Editor button on the Procedure Handler screen. This will launch the Macro Editor screen.

This example is being combined with several GetFieldValue actions to pull the Item Code and Item Name values into variables and use a variable substitution to assign those values into the text of the status bar message.
- Select the SetStatusBar option from the Action Types drop down column.
- The APP application will clear any existing parameter values. Any parameter value columns that are not optional (identified in yellow) or required (identified in red) will be deactivated (identified in gray).
- Click in the Value column of the Macro Editor screen for the SetStatusBar Action Type. This will load the Macro Editor Values Entry screen.

- Complete the information needed for the AddRow Macro Action Type that you want to execute.
- Complete any other information and/or Action Types required to complete your Macro.
- Click the Save & Close button on the Macro Editor screen.
- Click the OK button on the Procedure Handler screen.
- Set the Before Action value to True.
- Click the Save & Close button on the Process Rules Event Handler screen.
- Click the Save & Close button on the Item Properties/Events screen.
- Click the Fire Macro button on the Item Master Data screen.

- The specified message, with variable substitutions, appears on the status bar.
How To Use the ShowItem Action Type
This example is for the Item Master Data screen.
- Click the SAP menu option titled Item Master Data under the Inventory menu to load the Inventory Master Data screen.
- Determine the item that you want to establish process rules for (Fire Macro button for this example).
The right-click menu should be launched while the mouse is on top of the item.
- Select the Control Properties option from the APP Customizer menu group option from the right-click menu on the form to load the Item Properties/Events screen.
- Select the Events tab.
- Choose the Event that you want to record the process rules macro for.
- Click the Define or Edit button on the Event that you want to record the process rules macro for. This will launch the Process Rules Event Handler screen.
- Click the … button next to the procedure to be executed. This will launch the Procedure Handler screen.
- Click the Load Macro Editor button on the Procedure Handler screen. This will launch the Macro Editor screen.

- Select the ShowItem option from the Action Types drop down column.
- The APP application will clear any existing parameter values. Any parameter value columns that are not optional (identified in yellow) or required (identified in red) will be deactivated (identified in gray).
- Complete the information needed for the ShowItem Macro Action Type that you want to execute.
- Complete any other information and/or Action Types required to complete your Macro.
- Click the Save & Close button on the Macro Editor screen.
- Click the OK button on the Procedure Handler screen.
- Set the Before Action value to True.
- Click the Save & Close button on the Process Rules Event Handler screen.
- Click the Save & Close button on the Item Properties/Events screen.

- Click the Fire Macro button on the Item Master Data screen.

- The specified field is shown.
How To Use the While Action Type
This example is for the Item Master Data screen.
This example is a dual example of the While and EndWhile Action Types.
- Click the SAP menu option titled Item Master Data under the Inventory menu to load the Inventory Master Data screen.
- Determine the item that you want to establish process rules for (Fire Macro button for this example).
The right-click menu should be launched while the mouse is on top of the item.
- Select the Control Properties option from the APP Customizer menu group option from the right-click menu on the form to load the Item Properties/Events screen.
- Select the Events tab.
- Choose the Event that you want to record the process rules macro for.
- Click the Define or Edit button on the Event that you want to record the process rules macro for. This will launch the Process Rules Event Handler screen.
- Click the … button next to the procedure to be executed. This will launch the Procedure Handler screen.
- Click the Load Macro Editor button on the Procedure Handler screen. This will launch the Macro Editor screen.
- Select the While option from the Action Types drop down column.
- The APP application will clear any existing parameter values. Any parameter value columns that are not optional (identified in yellow) or required (identified in red) will be deactivated (identified in gray).
- Complete the information needed for the While Macro Action Type that you want to execute.
- Select the End While option from the Action Types drop down column.
- The APP application will clear any existing parameter values. Any parameter value columns that are not optional (identified in yellow) or required (identified in red) will be deactivated (identified in gray).
- Complete the information needed for the End While Macro Action Type that you want to execute.
- Complete any other information and/or Action Types required to complete your Macro.
- Click the Save & Close button.
- Click the OK button on the Procedure Handler screen.
- Set the Before Action value to False.
- Click the Save & Close button on the Process Rules Event Handler screen.
- Click the Save & Close button on the Item Properties/Events screen.
- Click the Fire Macro button on the Item Master Data screen.
How To Perform Validation on Button Click
This example is for the Sales Order screen.
- Click the SAP menu option titled Sales Order under the Sales - A/R menu to load the Sales Order screen.
- Determine the item that you want to establish process rules for (OK/Add/Update button for this example).
The right-click menu should be launched while the mouse is on top of the item.

- Select the Control Properties option from the APP Customizer menu group option from the right-click menu on the form to load the Item Properties/Events screen.

- Select the Events tab.
- Choose the Event that you want to record the process rules macro for.
- Click the Define or Edit button on the Event that you want to record the process rules macro for. This will launch the Process Rules Event Handler screen.

- Enter a Description for the event.
- Select the validation level option (Simple Validation option selected for this example).
- Click the Source Field box and a separate form will load in which the user can enter the Item UID for the field on the form that will be used as the source field for the validation.

- Select the mathematical Operation to be used in the validation.
- Enter the Source Value to be used in the evaluation of the mathematical Operation for the Source Field.
- Click the Define New option from the Procedure drop down. This will launch the Procedure Handler screen.

- Enter a Name for the procedure.
- Select the Alert Type to be given to the user (Status Bar option selected for this example).
- Select the Severity of the status bar message (Error option selected for this example).
- Select the Duration for the status bar message (Medium option selected for this example).
- Enter the Message text for the status bar message.
- Click the OK button on the |Procedure Handler screen.
- The new procedure will be automatically selected as the procedure to be executed for the validation.

- Click the Save & Close button on the Process Rules Event Handler screen.
- Click the Save & Close button on the Item Properties/Events screen.
Tab Order Sequence
Tab Order configuration functionality allows the user to establish, edit, and remove custom designated tab orders for forms that will override the normal order of moving between fields on a form.
The tab order cannot be used to set the tab order of columns in an SAP UI grid or matrix object. This is an SAP® Business One UI limitation.
How To Set Tab Order Sequence
This example is for the Business Partner Master Data screen.
- Click the SAP menu option titled Business Partner Master Data under the Business Partner menu to load the Business Partner Master Data screen.
- Select the Set Tab Sequence option from the APP Customizer Tab Order menu group option from the right-click menu on the form.

- The user will be prompted with the following message.

- Select the fields on the form in the exact order in which you want to set the tab order.
The tab order cannot be used to set the tab order of columns in an SAP UI grid or matrix object. This is an SAP® Business One UI limitation.

- As you select the fields on the form, they will be marked in Red to identify that they have been chosen in the tab order selection.

- To complete the tab order selection process, select the Set Tab Sequence - Done option from the APP Customizer Tab Order menu group option from the right-click menu on the form.

- The Tab Order Settings: Configuration screen will be loaded and display the tab sequencing information that was just set. Users can Add or Remove items from the tab sequence or move items Up or Down in the sequence order using the buttons on the screen.
The form that you are setting the new Tab Order Sequence on will need to be published and the form reloaded for the changes to be visible to the user.
How To Edit Tab Order Sequence
This example is for the Business Partner Master Data screen.
The tab order cannot be used to set the tab order of columns in an SAP UI grid or matrix object. This is an SAP® Business One UI limitation.
- Click the SAP menu option titled Business Partner Master Data under the Business Partner menu to load the Business Partner Master Data screen.
- Select the Tab Sequence Configurator option from the APP Customizer Tab Order menu group option from the right-click menu on the form.

- The Tab Order Configuration Summary screen for the Business Partner Master Data screen will load and display any tab sequences for the form.

- Click the Edit button at the end of the line for the tab sequence you want to edit.

- Make any needed changes to the tab sequence and click the OK button.
The form that you are editing the existing Tab Order Sequence on will need to be published and the form reloaded for the changes to be visible to the user.
How To Activate/Deactivate Tab Order Sequence
This example is for the Business Partner Master Data screen.
- Click the SAP menu option titled Business Partner Master Data under the Business Partner menu to load the Business Partner Master Data screen.
- Select the Tab Sequence Configurator option from the APP Customizer Tab Order menu group option from the right-click menu on the form.
- The Tab Order Configuration Summary screen for the Business Partner Master Data screen will load and display any tab sequences for the form.
- Click the Edit button at the end of the line for the tab sequence you want to edit.

- Check/uncheck the Active checkbox as needed.
- Click the OK button.
The form that you are altering the Tab Order Sequence on will need to be published and the form reloaded for the changes to be visible to the user.
How To Exclude Users from Tab Sequence
This example is for the Business Partner Master Data screen.
- Click the SAP menu option titled Business Partner Master Data under the Business Partner menu to load the Business Partner Master Data screen.
- Select the Tab Sequence Configurator option from the APP Customizer Tab Order menu group option from the right-click menu on the form.
- The Tab Order Configuration Summary screen for the Business Partner Master Data screen will load and display any tab sequences for the screen.
- Click the Edit button at the end of the line for the tab sequence you want to exclude items from to launch the Tab Order Configuration Detail screen.

- Click the
 button to launch the Customizer User List screen.


- Select the users, branches, and/or departments that you want to exclude from the Tab Order Sequence.
- Click the Select button to return to the Tab Order Configuration Detail screen.

- Select the Exclude Selected Items checkbox.
- Click the OK button.
How To Copy Tab Order Sequence
This example is for the Business Partner Master Data screen.
- Click the SAP menu option titled Business Partner Master Data under the Business Partner menu to load the Business Partner Master Data screen.
- Select the Tab Sequence Configurator option from the APP Customizer Tab Order menu group option from the right-click menu on the form.
- The Tab Order Configuration Summary screen for the Business Partner Master Data screen will load and display any tab sequences for the form.

- Highlight the tab sequence that you want to copy and click the Copy To button.

- Select the SAP Business One® screen that the tab sequence will be copied to and click the OK button.
The application will perform no validation that the fields in the tab order sequence are present on the form to which the sequence is being copied. The user is responsible for verifying the fields on the new form and removing any not applicable entries from the tab order sequence.
How To Reset Tab Order Sequence
This example is for the Business Partner Master Data screen.
- Click the SAP menu option titled Business Partner Master Data under the Business Partner menu to load the Business Partner Master Data screen.
- Select the Reset to Default Tab Sequence option from the APP Customizer Tab Order menu group option from the right-click menu on the form.

How To Remove Tab Order Sequence
This example is for the Business Partner Master Data screen.
- Click the SAP menu option titled Business Partner Master Data under the Business Partner menu to load the Business Partner Master Data screen.
- Select the Tab Sequence Configurator option from the APP Customizer Tab Order menu group option from the right-click menu on the form.
- The Tab Order Configuration Summary screen for the Business Partner Master Data screen will load and display any tab sequences for the form.

- Click the Remove button at the end of the line for the tab sequence you want to remove.
Mandatory Fields
Mandatory Fields functionality allows the user to establish, edit, and remove custom designated mandatory fields for forms that will operate in addition to the normal required fields on a form.
How To Set Mandatory Fields
This example is for the Business Partner Master Data screen.
- Click the SAP menu option titled Business Partner Master Data under the Business Partner menu to load the Business Partner Master Data screen.
- Select the Set Mandatory Fields option from the APP Customizer Mandatory Fields menu group option from the right-click menu on the form.

- The user will be prompted with the following message.

- Select the fields on the form which you want to set as mandatory fields.
Any user-defined fields must have items placed on the regular SAP® Business One forms in order to be included in mandatory fields setting.
Items that are check boxes cannot be set as mandatory fields.

- As fields are selected on the form, they will be marked in Red to identify that they have been chosen as mandatory fields.

- Complete the mandatory fields selection process by selecting the Set Mandatory Fields - Done option from the the APP Customizer Mandatory Fields menu group option from the right-click menu on the form.

- The Mandatory Fields: Configuration screen will be loaded and display the mandatory fields information that was just set. Users can Add or Remove items from the required fields list using the buttons on the configuration screen.
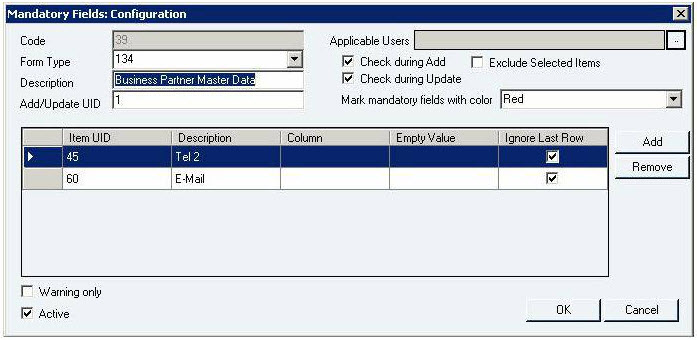
The form that you are setting the new Mandatory Fields requirements on will need to be published and the form reloaded for the changes to be visible to the user.
How To Edit Mandatory Fields
This example is for the Business Partner Master Data screen.
- Click the SAP menu option titled Business Partner Master Data under the Business Partner menu to load the Business Partner Master Data screen.
- Select the Mandatory Settings Configurator option from the APP Customizer Mandatory Fields menu group option from the right-click menu on the form.

- The Mandatory Fields Configuration Summary screen for the Business Partner Master Data screen will load and display any mandatory fields configurations for the form.

- Click the Edit button at the end of the line for the mandatory fields you want to edit.
- The Mandatory Fields: Configuration screen will load for the mandatory fields you chose to edit.

- Make any needed changes to the mandatory fields and click the OK button.
The form that you are editing the Mandatory Fields requirements on will need to be published and the form reloaded for the changes to be visible to the user.
How To Activate/Deactivate Mandatory Fields
This example is for the Business Partner Master Data screen.
- Click the SAP menu option titled Business Partner Master Data under the Business Partner menu to load the Business Partner Master Data screen.
- Select the Mandatory Settings Configurator option from the APP Customizer Mandatory Fields menu group option from the right-click menu on the form.
- The Mandatory Fields Configuration Summary screen for the Business Partner Master Data screen will load and display any mandatory fields configurations for the form.
- Click the Edit button at the end of the line for the mandatory fields you want to edit.

- Check/uncheck the Active checkbox as needed and click the OK button.
The form that you are activating/deactivating the Mandatory Fields requirements on will need to be published and the form reloaded for the changes to be visible to the user.
How To Exclude Users from Mandatory Fields
This example is for the Business Partner Master Data screen.
- Click the SAP menu option titled Business Partner Master Data under the Business Partner menu to load the Business Partner Master Data screen.
- Select the Mandatory Settings Configurator option from the APP Customizer Mandatory Fields menu group option from the right-click menu on the form.
- The Mandatory Fields Configuration Summary screen for the Business Partner Master Data screen will load and display any mandatory fields configurations for the form.
- Click the Edit button at the end of the line for the mandatory fields you want to exclude items from to launch the Mandatory Fields Configuration Detail screen.

- Click the button to launch the Customizer User List screen.
- Select the users, branches, and/or departments that you want to exclude from the Mandatory Fields.
- Click the Select button to return to the Mandatory Fields Configuration Detail screen.

- Select the Exclude Selected Items checkbox.
- Click the OK button.
The form that you are editing the Mandatory Fields requirements on will need to be published and the form reloaded for the changes to be visible to the user.
How To Copy Mandatory Fields
This example is for the Business Partner Master Data screen.
- Click the SAP menu option titled Business Partner Master Data under the Business Partner menu to load the Business Partner Master Data screen.
- Select the Mandatory Settings Configurator option from the APP Customizer Mandatory Fields menu group option from the right-click menu on the form.
- The Mandatory Fields Configuration Summary screen for the Business Partner Master Data screen will load and display any mandatory fields configurations for the form.

- Highlight the mandatory fields that you want to copy and click the Copy To button.

- Select the SAP Business One® screen that you want to copy the mandatory fields to and click the OK button.
The application will perform no validation that the fields in the mandatory fields are present on the form to which the sequence is being copied. The user is responsible for verifying the fields on the new form and removing any not applicable entries from the mandatory fields.
The form that you are copying the Mandatory Fields requirements to will need to be published and the form reloaded for the changes to be visible to the user.
How To Clone Mandatory Fields
This example is for the Business Partner Master Data screen.
- Click the SAP menu option titled Business Partner Master Data under the Business Partner menu to load the Business Partner Master Data screen.
- Select the Mandatory Settings Configurator option from the APP Customizer Mandatory Fields menu group option from the right-click menu on the form.
- The Mandatory Fields Configuration Summary screen for the Business Partner Master Data screen will load and display any mandatory fields configurations for the form.

- Click the Clone button at the end of the line for the mandatory fields you want to clone.
- The Mandatory Fields: Configuration screen will load for the mandatory fields you chose to clone.

- Make any needed changes to the mandatory fields and click the OK button.

- The Mandatory Fields Configuration Summary screen for the Business Partner Master Data screen will load and contain the newly cloned configuration.
How To Reset Mandatory Fields
This example is for the Business Partner Master Data screen.
- Click the SAP menu option titled Business Partner Master Data under the Business Partner menu to load the Business Partner Master Data screen.
- Select the Reset to Mandatory Fields option from the APP Customizer Mandatory Fields menu group option from the right-click menu on the form.

How To Remove Mandatory Fields
This example is for the Business Partner Master Data screen.
- Click the SAP menu option titled Business Partner Master Data under the Business Partner menu to load the Business Partner Master Data screen.
- Select the Mandatory Settings Configurator option from the APP Customizer Mandatory Fields menu group option from the right-click menu on the form.
- The Mandatory Fields Configuration Summary screen for the Business Partner Master Data screen will load and display any mandatory fields configurations for the form.

- Click the Remove button at the end of the line for the mandatory fields you want to remove.
The form that you are removing the Mandatory Fields requirements from will need to be published and the form reloaded for the changes to be visible to the user.
How To Delete Item Configurations
This example is for the Sales Order screen.
- Click the SAP menu option titled Sales Order under the Sales - A/R menu to load the Sales Order screen.
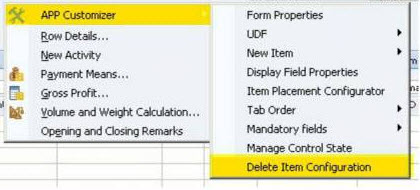
The right-click menu should be launched while the mouse is on top of the custom configured item.
- Select the Delete Item Configuration option from the APP Customizer menu group option from the right-click menu.

- All APP modifications to the object will be removed. This can be confirmed by loading the Item Configurator screen.
If the control whose customizations are being removed is a custom control added through APP Customizer, the control will be removed from the form.
How To Create Menu Shortcuts
- Click the Report Definition menu option under the Administration Setup APP Configuration menu groups.
- Load the appropriate object that you want to create the menu option for.

- Click the Menu Position Tool button
 to the right of the Category field.
 - An object will appear on the screen instructing you to click on the menu item either before or after the location in which you want to place your new custom menu option.


- Click on the SAP menu option before or after the location where you want to place the custom menu option to use it as a position reference (for the purpose of this example, the Delivery menu option).
- The SAP Menu Setting screen will appear and will populate the Menu ID field with the value of the menu you selected as a position reference. Select either the Menu Before or Menu After option to specifically place your custom menu option.

- Click the Save button.
- The Menu Position Tool button icon on the Reports Maintenance screen is now changed to indicate that a menu option has been placed for the object.

How To Use the Manage Control State Screen
This example is for the Item Master Data screen.
The visible/enabled properties are not being removed from the Form Properties/Events screen. Any values set for controls there in previous versions of APP will retain their values. However, any Manage Control State customized entries will override the Form Properties/Events screen settings.
- Click the SAP menu option titled Item Master Data under the Inventory menu to load the Inventory Master Data screen.
- Right click on the form. Select the option titled Manage Control State under the APP Customizer right click menu to load the Manage Control State screen.

- For the purpose of this example, I'll deactivate the Description field in Add and OK mode. I will also deactivate and hide the Item Group field in Add and OK mode. The fields will not be affected in Find mode.
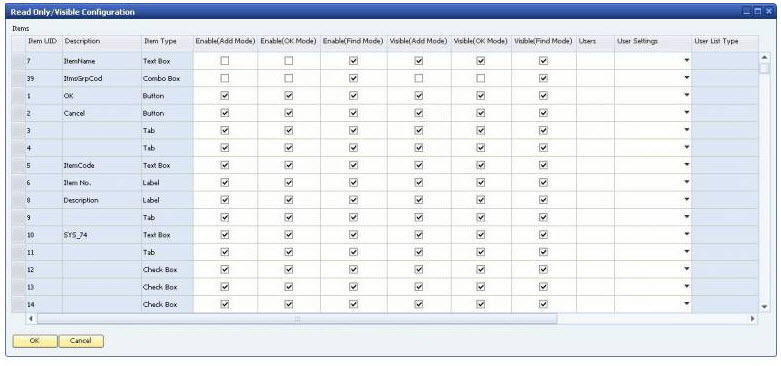
When the Manage Control State screen is opened, any modified control lines will show at the top of the form, followed by unmodified control lines.
Only one entry per form control is allowed and modifiable on this screen. Therefore you cannot have one line for a control assigned to or excluding specific users and also have a second line configured differently for the same control.
The customized entry on the Manage Control State screen will be overridden by any customized properties set directly on the control itself.
- Click the Update button to apply the customization.
- Click the OK button or Cancel button to close the form.
The Item Master Data screen needs to be closed and reopened for the changes to take affect.
- Reopen the Item Master Data screen and move to the last Item.

- The Description field is now disabled and the Item Group field is now invisible.
To remove a customized control line, you'll need to manually select the Visible and/or Enabled check boxes and remove assigned users in order to return the form control to the default state.
How To Select a Color Value for Properties
APP Customizer includes the ability to set values for display colors for several properties of forms and items. Several commonly used colors are referenced below for easy application of the values and the methods that can be used to determine a color are explained.
Selecting A Color Value
- Click the … button next to the field that you want to specify a color for.

- Select a color through one of the following means…
- Select a Basic Color or a predefined Custom Color.
- Drag the cross hairs graphic around the rainbow color chart to determine your color.
- Manually enter the Red, Green, Blue (RGB) or Hue, Saturation, Luminescence values for the color.

- Click the OK button.

- The color selected will be returned to the property field.
Commonly Used Color Values
 Red (255)
 Pink (12615935)
 Orange (33023)
 Yellow (65535)
 Lt. Green (8454016)
 Green (65280)
 Lt. Blue (16777088)
 Blue (16744448)
 Purple (8388736)
 White (16777215)
 Gray (12632256)
 Brown (4210816)


Exporting/Importing APP Objects and Properties
APP Customizer includes the ability to export and import a number of objects, including…
- Item Properties and Events
- Charts
- Dashboards
After importing any objects into APP, the application must be stopped and restarted for the imported modifications to take effect.
How To Export Item Properties and Events
This example is for the Item Master Data screen.
- Click the SAP menu option titled Item Master Data under the Inventory menu to load the Inventory Master Data screen. Load the information for an Item into the screen.
For this example, the Unit Price field and label have been given a customized position on the screen.

- Select the Item Placement Configurator option from the APP Customizer menu group option from the right-click menu on the form to load the Item Configurator screen.

- There are two entries on the Item Configurator screen, one for the Unit Price entry field and one for the accompanying label. Select the configuration items that you want to export.
At least one item configuration must be selected in order to utilize the export function.

- Click the down arrowhead on the Export button at the bottom of the screen and select the appropriate option.

- A window will open to allow you to specify the directory and file name under which the exported XML file will be saved.

- Enter a file name.
- Click the Save button.
- Navigating and opening the exported XML file shows the data that has been exported and can be imported into either the same SAP database or any other SAP database utilizing APP Customizer.

How To Import Item Properties and Events
This example is for the Item Master Data screen.
- Click the SAP menu option titled Item Master Data under the Inventory menu to load the Inventory Master Data screen.
For this example, I am reusing the same SAP database. The Unit Price field and label customization has been removed following the export of the data to the XML file.

- Click the Import XML menu option under the Administration Setup APP Configuration menu groups.
- A window will open to allow you to specify the directory and file name for the XML file to be imported.

- Double click the file name or select the file and click the Open button. The XML file will be imported into APP Customizer.

- Stop and restart the APP application.
After importing any objects into APP, the application must be stopped and restarted for the imported modifications to take effect.
- Click the SAP menu option titled Item Master Data under the Inventory menu to load the Item Master Data screen.

- The Item Master Data screen now reflects the customization to the Unit Price entry field and accompanying label imported from the XML file.
How To Export Charts
- Click the Report Definition menu option under the Administration Setup APP Configuration menu groups.
- Click on the object with the associated Chart that you want to export.

- Click the Manage Charts button
 . The Chart Definition screen is displayed.

 or required (identified in red) will be deactivated (identified in gray).
* Click in the %3Ccolor #00a2e8%3E**Value**%3C/color%3E column of the **Macro Editor** screen for the %3Ccolor #00a2e8%3E**LineEvents**%3C/color%3E Action Type. This will load the **Macro Editor Line Events Values Entry** screen.
{{:app/image581.jpeg)

- Click the Export button.
- A window will open to allow you to specify the directory and file name under which the exported XML file will be saved.

- Enter a file name.
- Click the Save button.
- Navigating and opening the exported XML file shows the data that has been exported and can be imported into either the same SAP database or any other SAP database utilizing APP Customizer.
The Query for the Chart is also included in the exported XML file information.

How To Import Charts
- Click the SAP menu option titled Import XML under the Administration Setup APP Configuration menu groups.
- A window will open to allow you to specify the directory and file name for the XML file to be imported.

- Double click the file name or select the file and click the Open button.
- The XML file will be imported into APP Customizer
- Stop and restart the APP application.
After importing any objects into APP, the application must be stopped and restarted for the imported modifications to take effect.
How To Export Dashboards
- Click the SAP menu option titled Dashboard Setup under the Administration Setup APP Configuration menu groups to load the Dashboards setup screen.
- Load the Dashboard that you want to export.

- Click the Export button.
- A window will open to allow you to specify the directory and file name under which the exported XML file will be saved.

- Enter a file name.
- Click the Save button.
- Navigating and opening the exported XML file shows the data that has been exported and can be imported into either the same SAP database or any other SAP database utilizing APP Customizer.
The Query for the Dashboard panes are also included in the exported XML file information.

How To Import Dashboards
- Click the SAP menu option titled Import XML under the Administration Setup APP Configuration menu groups.
- A window will open to allow you to specify the directory and file name for the XML file to be imported.

- Double click the file name or select the file and click the Open button. The XML file will be imported into APP Customizer
- Stop and restart the APP application.
After importing any objects into APP, the application must be stopped and restarted for the imported modifications to take effect.