
This is an old revision of the document!
Table of Contents
APP - Report Maintenance and Delivery Screens
Report Maintenance Screen - General Form Information
TWBS Advanced Productivity Pack (APP) creates a screen through the SAP® Business One User Interface (UI) that allows for the administrative maintenance of reports, report groups, queries, and emails. This functionality allows the user to add, update, clone or delete definitions. The user also has the ability to add or delete categories.
- Click the Report Definition menu option under the Administration
 Setup APP Configuration menu groups.


The Report Maintenance screen can also be accessed from the APP reports area of the SAP® Business One main menu. Hold the Ctrl & Shift keys and click on any report menu option to launch the Report Maintenance screen with the information for the selected report loaded.
- Report Definitions Matrix – The report definitions matrix gives the user some key information regarding the report definitions stored in the database.
- Refresh button (
 ) – Allows the user to refresh the data in the Report Definitions Matrix.
 - Expand button (
 ) – Allows the user to expand all category headers to show the report groups, reports, and queries listed beneath.
 - Collapse button (
 ) – Allows user to collapse and hide report groups, reports, and queries under their category headers.


The Report Maintenance screen allows for the management of the following options…
- Report Maintenance – Select this option to allow the user to add a new report or change the properties of an existing report.
- Report Group Maintenance – Select this option to allow the user to add or modify a collection of reports that can be printed, e-mailed, or faxed together at the single click of a button.
- Query Maintenance – Select this option to allow an SAP® Business One defined query to be attached to this or any standard SAP® Business One window.
- Email Only Maintenance – Selecting this option allows the users to create a report for sending E-mails/Faxes.
Form buttons
- Menu Position Tool – (
 ) This tool allows the user to place a menu item linked to the report definition on any of the SAP menus.
 - Add/Update button – The report definitions window opens in Add mode. You can start entering report definition information and click the Add button to save the report definition to the database. Clicking on one of the report definitions in the Report Definitions matrix switches the screen to Update mode and populates the fields with the report definition information. You can switch back to Add mode by clicking the Cancel button.
- Clone button – Users can use this feature to duplicate the report definition information. In addition to copying over the existing report definitions, APP also duplicates any parameter information associated with the report definition.
- Delete button – Deletes the report definition. This function does not delete the associated Crystal Report itself.
- Cancel button – Clears all fields and switches the screen to Add mode.
- Close button – Closes the Report Definitions window.
- Refresh APP Menu button – Clicking this button will clear the existing APP menu and reload the current report definitions.


Report Maintenance Screen - Report Option - General Tab Information
The General tab is used to set the basic information about the report being registered.

- Report ID - Assigns an ID number to the report definition.
- Name - Assigns a name to the report definition.
- Category - The drop down lists the standard categories pre-defined in APP. This is a required field. APP uses this information to group your reports in a logical fashion in the SAP® Business One APP Reports menu.
To add a new category click Define New in the drop-down list. This will open the Manage Categories screen.
- Select Database - Identifies the target company database for the report definition. If you select a specific company database name, then the report will run only when you are logged in to that company database. APP also gives users the ability to setup a report definition and have it apply across all SAP® Business One companies on the server. To do so, please select the All option from the drop down list.
- Description - Enter a detailed description or any special comments.
- File Path - This field stores the file path to the Crystal Report file. The report must reside in a network shared folder that is accessible by all SAP® Business One users. You can browse to the desired folder using the … browse button.
- Map Parameters button - This button will launch a new window that will enable you to map the associated Crystal Report parameters to SAP® Business One fields so that the values can be passed directly into the reports. For a detailed description of functionality on this window, please refer to the Map Report Parameters screen section.
- Edit Report button - This button will launch Crystal Reports (if installed) and allow for the editing of the report content.
- Link To - This drop down list lets you select the Marketing Document to link to your Crystal Report. This selection is relevant only if the Is Document Specific checkbox is checked.
To add a new form click the Define New option in the drop-down list. This will open the Form Registration screen.
- Default for all Business Partners checkbox - This indicates that this is the default report for the assigned Marketing Document. The default report will be executed each time the user clicks the Print or Preview buttons when the SAP® Business One Marketing Document form is the active form. This report will also be used with the Document Printing function.
- Create Activity On Delivery checkbox - This feature is available only for document specific reports. If this feature is enabled, APP will create an activity record each time an email is generated. The activity record will also save the attachment in the Attachment folder path specified under the SAP menu option titled General Settings Administration System Initialization menus.
- Create Activity On Print checkbox - This feature is also available for document specific reports. If this feature is enabled, APP will create an activity record each time the report is printed.
- Enabled checkbox - This checkbox is used to enable or disable a report. Only enabled report definitions are displayed on the SAP® Business One menu.
- Do Not Display on RCM checkbox - This checkbox is used to exclude a report definition from appearing on right-click menus.
- Is Document Specific checkbox - This checkbox is used to specify that the report definition is linked to a specific SAP® Business One document (form or screen).
Report Maintenance Screen - Report Option - Delivery Preferences Tab
The Delivery Preferences tab is used to define delivery options for your document specific reports; those associated with a specific form/screen in SAP® Business One.

- To Disk File checkbox – Use this checkbox to export the report to a disk file. This option will not appear in Email Only settings.
- File Format – Select the desired export file format for your report. Available options include…
- Adobe PDF
- MS Excel
- MS Word
- SBO-XML
- Save In – Use the … browse button to browse to the folder where you want to save the exported file.
- To Email checkbox – Use this checkbox to deliver the report to an email.
- Email Provider – This is a drop down box to define the email provider. Available options include…
- Outlook
- SMTP
- Send Options – Available options include…
- Save as Draft
- Send
- Message ID – This is a drop down box to specify the Message selected for the delivery. The list contains all the messages defined previously. For defining new message, select Define New from the list.
- Attachment Format – Select the desired email attachment file format for your report. Available options include…
- No Attachment
- Adobe PDF
- MS Excel
- MS Word
- SBO-XML
- Email From – Designate the email address which will be used as the sender's address if SMTP is specified as the e-mail provider. The field will be disabled and selected Default Outlook User if Outlook is specified as the e-mail provider.
- Delivery Receipt checkbox – Specify a delivery receipt.
- Read Receipt checkbox – Specify a read receipt.
- Add Email Recipients button – Enable the user to specify the recipients of the email. Please see the Additional Email Address Setup screen section for detailed documentation.
- Fax a Copy checkbox – Specify delivery of the report to an internet fax service.
This feature will only work with Internet fax services like efax.com, myfax.com, etc. It is not for use with windows-based fax services like Winfax® or Rightfax®.
- Fax Provider Info – Enter the domain name of your internet fax provider. (e.g. efax.com).
Report Maintenance Screen - Report Option - Print Preferences Tab
The Printing Preferences tab is used to define delivery options for document specific reports; those associated with a specific form/screen in SAP® Business One.

- Printer Settings Matrix - The printer settings matrix gives the user information regarding the printers associated with the definitions.
- Printer Name - Used to specify the printer(s) that will be used when the document is printed.
- Copies - Used to specify the number of copies that will be generated when the document is printed.
- Deliver on Print checkbox - Specify that the report will be automatically delivered at the same time it is printed.
- Collated checkbox - Specify whether or not the report output is to be collated. This functionality is somewhat printer dependent.
- Auto Print on Add checkbox - This feature is available only for certain standard SAP® Business One documents. It is used to specify if the report will automatically print when the document is added.
If you select the Auto Print on Add check box on the Print Preferences window, the Document Editor version of the form will print.
- Auto Deliver On Add checkbox - This feature is available only for document specific reports. It is used to specify that the report will be automatically delivered (e-mail/fax) when the document is added. The feature does not consider any other APP settings, like Auto Print On Add or Deliver On Print.
Report Maintenance Screen - Report Option - Advanced Delivery Definitions Tab
If the category selected for the definition is Adv Delivery, the Advanced Delivery Definitions tab will be available to the user to define advanced delivery options.

Clicking on the Advanced Delivery Definitions tab will provide the user with a list of advanced delivery definitions for the object and all the user to add new definitions, clone existing definitions, remove existing definitions, or edit existing definitions.

- ID - The ID number of the advanced delivery definition.
The advanced delivery definition ID number is unique for the APP application, and is not solely relative to the object on which it is defined. Therefore, a definition added to another object will be assigned the next available ID #, and will not start numbering at #1.
- Name - The name of the advanced delivery definition.
- Form - The ID for the form associated with the advanced delivery definition.
- New button - Add a new advanced delivery definition. This button will load the Advanced Delivery Definition screen.
- Clone button - Clone/copy an advanced delivery definition. This button will load the Advanced Delivery Definition screen.
- Delete button - Delete an advanced delivery definition.
- Edit button - Edit an existing advanced delivery definition. This button will load the Advanced Delivery Definition screen.
Report Maintenance Screen - Report Group Option - General Tab
The General tab is used to set the basic information about the report being registered.

- Report ID - Assigns an ID number to the report definition.
- Name - Assigns a name to the report definition.
- Category - The drop down lists the standard categories pre-defined in APP. This is a required field. APP uses this information to group your reports in a logical fashion in the SAP® Business One APP Reports menu.
To add a new category click Define New in the drop-down list. This will open the Manage Categories screen.
- Select Database - Identifies the target company database for the report definition. If you select a specific company database name, then the report will run only when you are logged in to that company database. APP also gives users the ability to setup a report definition and have it apply across all SAP® Business One companies on the server. To do so, please select the All option from the drop down list.
- Description - Enter a detailed description or any special comments.
- Link To - This drop down list lets you select the Marketing Document to link to your Crystal Report. This selection is relevant only if the Is Document Specific checkbox is checked.
To add a new form click the Define New option in the drop-down list. This will open the Form Registration screen.
- Select Reports - On selection of the Link To document, all individual reports associated with that document will be listed so that they can be selected for inclusion in the Report Group.
- Default for all Business Partners checkbox - This indicates that this is the default report for the assigned Marketing Document. The default report will be executed each time the user clicks the Print or Preview buttons when the SAP® Business One Marketing Document form is the active form. This report will also be used with the Document Printing function.
- Create Activity On Delivery checkbox - This feature is available only for document specific reports. If this feature is enabled, APP will create an activity record each time an email is generated. The activity record will also save the attachment in the Attachment folder path specified under the SAP menu option titled General Settings Administration System Initialization menus.
- Create Activity On Print checkbox - This feature is also available for document specific reports. If this feature is enabled, APP will create an activity record each time the report is printed.
- Enabled checkbox - This checkbox is used to enable or disable a report. Only enabled report definitions are displayed on the SAP® Business One menu.
- Do Not Display on RCM checkbox - This checkbox is used to exclude a report definition from appearing on right-click menus.
- Is Document Specific checkbox - This checkbox is used to specify that the report definition is linked to a specific SAP® Business One document (form or screen).
Report Maintenance Screen - Report Group Option - Delivery Preferences Tab
The Delivery Preferences tab is used to define delivery options for your document specific reports; those associated with a specific form/screen in SAP® Business One.

- To Email checkbox – Use this checkbox to deliver the report to an email.
- Consolidate Attachments checkbox - Use this checkbox to designate the consolidation of attachments
Once the Consolidate Attachments checkbox has been selected, the regular To Email fields will appear on the tab.
- Email Provider – This is a drop down box to define the email provider. Available options include…
- Outlook
- SMTP
- Send Options – Available options include…
- Save as Draft
- Send
- Message ID – This is a drop down box to specify the Message selected for the delivery. The list contains all the messages defined previously. For defining new message, select Define New from the list.
- Attachment Format – For Report Groups the email attachment file format for reports in the group will automatically be defaulted to Adobe PDF.
- Email From – Designate the email address which will be used as the sender's address if SMTP is specified as the e-mail provider. The field will be disabled and selected Default Outlook User if Outlook is specified as the e-mail provider.
- Delivery Receipt checkbox – Specify a delivery receipt.
- Read Receipt checkbox – Specify a read receipt.
- Add Email Recipients button – Enable the user to specify the recipients of the email. Please see the Additional Email Address Setup screen section for detailed documentation.
- Fax a Copy checkbox – Specify delivery of the report to an internet fax service.
This feature will only work with Internet fax services like efax.com, myfax.com, etc. It is not for use with windows-based fax services like Winfax® or Rightfax®.
- Fax Provider Info – Enter the domain name of your internet fax provider. (e.g. efax.com).
Report Maintenance Screen - Report Group Option - Printing Preferences Tab
The Printing Preferences tab is used to define delivery options for document specific reports; those associated with a specific form/screen in SAP® Business One.

- Deliver on Print checkbox - Specify that the report will be automatically delivered at the same time it is printed.
- Auto Print on Add checkbox - This feature is available only for certain standard SAP® Business One documents. It is used to specify if the report will automatically print when the document is added.
If you select the Auto Print on Add check box on the Print Preferences window, the Document Editor version of the form will print.
- Auto Deliver On Add checkbox - This feature is available only for document specific reports. It is used to specify that the report will be automatically delivered (e-mail/fax) when the document is added. The feature does not consider any other APP settings, like Auto Print On Add or Deliver On Print.
Report Maintenance Screen - Query Option - General Tab
The General tab is used to set the basic information about the report being registered.

- Report ID - Assigns an ID number to the report definition.
- Name - Assigns a name to the report definition.
- Category - The drop down lists the standard categories pre-defined in APP. This is a required field. APP uses this information to group your reports in a logical fashion in the SAP® Business One APP Reports menu.
To add a new category click Define New in the drop-down list. This will open the Manage Categories screen.
- Select Database - Identifies the target company database for the report definition. If you select a specific company database name, then the report will run only when you are logged in to that company database. APP also gives users the ability to setup a report definition and have it apply across all SAP® Business One companies on the server. To do so, please select the All option from the drop down list.
- Description - Enter a detailed description or any special comments.
- Query - The drop down lists the queries defined in SAP® Business One.
- Query Preferences button - (
 ) - This button will launch a new window that will enable you to set preferences associated with the query. For a detailed description of functionality on this screen, please refer to the Query Preferences Maintenance screen section.
 - Query Parameters button - This button will launch a new window that will enable you to set prompting text for parameters associated with the query. For a detailed description of functionality on this screen, please refer to the Query Parameters Mapping screen section.
- Manage Charts button - (
 ) - This button will launch a new window that will enable you manage chart definitions.

The Manage Charts button is only visible if the Dashboards module component of the APP application is enabled.
- Link To - This drop down list lets you select the Marketing Document to link to your Crystal Report. This selection is relevant only if the Is Document Specific checkbox is checked.
To add a new form click the Define New option in the drop-down list. This will open the Form Registration screen.
- Refresh Time - Designation for the time (in seconds) at which the query data will be refreshed on the TWBS Visual Query Builder screen.
The Refresh Time value will only function when viewing the query results in the TWBS Viewer.
- Create Activity On Delivery checkbox - This feature is available only for document specific reports. If this feature is enabled, APP will create an activity record each time an email is generated. The activity record will also save the attachment in the Attachment folder path specified under the SAP menu option titled General Settings Administration System Initialization menus.
- Create Activity On Print checkbox - This feature is also available for document specific reports. If this feature is enabled, APP will create an activity record each time the report is printed.
- Enabled checkbox - This checkbox is used to enable or disable a report. Only enabled report definitions are displayed on the SAP® Business One menu.
- Do Not Display on RCM checkbox - This checkbox is used to exclude a report definition from appearing on right-click menus.
- B1 Query option - Option to designate that the query will be loaded into the SAP® Business One Query screen.
Clicking the [F2] key while on the SAP® Business One Query screen will open the query in a larger screen.
- APP Query option - Option to designate that the query will be loaded into the TWBS **Visual Query Builder** screen.
- Load Associated Charts checkbox - This option is only available if the query is designated to load in the TWBS Visual Query Builder screen. If this option is selected, any associated charts will be loaded into the screen at the same time that the query is.
- Load Pivot checkbox - This option is only available if the query is designated to load in the TWBS Visual Query Builder screen. If this option is selected, Pivot Grid specific columns will be available on the Query Preferences Maintenance screen to designate which data fields will be used for parameters of the Pivot Grid.
Query Parameters Mapping Screen
The Query Parameters Mapping screen is launched from the Query Parameters button located on the Report Maintenance Screen - Query Option - General Tab.

- Report Name - The name of the report the parameters are associated with.
- Report ID - The ID of the report the parameters are associated with.
- Query Parameter Mapping Grid - This grid is user to display all of the parameters in the selected query so that user can change the prompt text.
- Prompt Text - The text displayed when prompting the use for a parameter value.
- Parameter ID - The designation in the query for the placement of the parameter value substitution on execution of the query.
The format of the parameter in the query must follow this format: [%#] where # is the number of the parameter starting with 0
- OK/Update button - Perform the selected action.
- Delete Param button - Removes the selected mapped parameter from the screen.
- Delete All button - Removes all mapped parameters from the screen.
- Cancel button - Discard the changes and close the form.
Report Maintenance Screen - Query Option - Delivery Preferences Tab
The Delivery Preferences tab is used to define delivery options for your document specific reports; those associated with a specific form/screen in SAP® Business One.

- To Disk File checkbox – Use this checkbox to export the report to a disk file. This option will not appear in Email Only settings.
- File Format – Select the desired export file format for your report. Available options include…
- Adobe PDF
- MS Excel
- MS Word
- SBO-XML
- Save In – Use the … browse button to browse to the folder where you want to save the exported file.
- To Email checkbox – Use this checkbox to deliver the report to an email.
- Email Provider – This is a drop down box to define the email provider. Available options include…
- Outlook
- SMTP
- Send Options – Available options include…
- Save as Draft
- Send
- Message ID – This is a drop down box to specify the Message selected for the delivery. The list contains all the messages defined previously. For defining new message, select Define New from the list.
- Attachment Format – Select the desired email attachment file format for your report. Available options include…
- Adobe PDF
- MS Excel
- MS Word
- SBO-XML
- Email From – Designate the email address which will be used as the sender's address if SMTP is specified as the e-mail provider. The field will be disabled and selected Default Outlook User if Outlook is specified as the e-mail provider.
- Delivery Receipt checkbox – Specify a delivery receipt.
- Read Receipt checkbox – Specify a read receipt.
- Add Email Recipients button – Enable the user to specify the recipients of the email. Please see the Additional Email Address Setup screen section for detailed documentation.
- Fax a Copy checkbox – Specify delivery of the report to an internet fax service.
This feature will only work with Internet fax services like efax.com, myfax.com, etc. It is not for use with windows-based fax services like Winfax® or Rightfax®.
- Fax Provider Info – Enter the domain name of your internet fax provider. (e.g. efax.com).
Report Maintenance Screen - Query Option - Printing Preferences Tab
The Printing Preferences tab is used to define delivery options for document specific reports; those associated with a specific form/screen in SAP® Business One.

- Printer Settings Matrix - The printer settings matrix gives the user information regarding the printers associated with the definitions.
- Printer Name - Used to specify the printer(s) that will be used when the document is printed.
- Copies - Used to specify the number of copies that will be generated when the document is printed.
- Collated checkbox - Specify whether or not the report output is to be collated. This functionality is somewhat printer dependent.
Query Preferences Maintenance Screen

Query Preferences Grid - This grid is used to display all of the fields in the selected query so that user can change the preferences.
- Visible (Y/N) checkbox column - Determines if the field will be visible or not.
Unchecking a field will automatically change the Display Order value to 0 and resort the fields. Selecting a non-visible field will set the Display Order value to the last number in the order.
- Field Name column - The database field name.
- Display Field Name column - The display name for the database field.
- Group (Y/N) checkbox column - Determines if the field will be included in the grouping clause.
- Pivot Group column - Drop down options for specifying qualities of the Pivot Grid. Available options are…
- None
- Column
- Row
- Column (Aggregate)
- Row (Aggregate)
- Set KPI column - A … button will appear when a field is designated as an Aggregate column or row in the Pivot Group column. This button will load the **KPI Details Screen**.
- Sort column - Drop down options for sorting on the field. Available options are…
- None - No sorting
- Ascending - Sorting in ascending order
- Descending - Sorting in descending order
- Data Type column - The data type of the database field.
- Display Column Total checkbox column - Determines if a total will be displayed for the field.
- Set Format column - Provides the user with the ability to set the formatting for the data column.
- None
- Currency
- Decimal (2)
- Decimal (3)
- Decimal (4)
- Display Average checkbox column - Determines if an average will be displayed for the field.
- Display Count checkbox column - Determines if a count will be displayed for the field.
- Display Minimum checkbox column - Determines if a minimum value will be displayed for the field.
- Display Maximum checkbox column - Determines if a maximum value will be displayed for the field.
- Display Order column - Numerical value indicating the order in which the field will be displayed.
Changing the Display Order value will automatically resort the fields and change the values of all fields after in the sort order.
- OK/Update button - Perform the selected action Cancel button - Discard the changes and close the form.
KPI Details Screen

- Operator column - The mathematical operator being used to evaluate the Aggregate column/row the key performance indicators are being designated for.
- Less Than
- Greater Than
- Between
- Value1 column - The first condition for the Operator being used to evaluate the key performance indicator.
- Value2 column - The second condition, if needed, for the Operator being used to evaluate the key performance indicator.
- Icon Type column - Indicate the color of the KPI indicator
- Red
- Yellow
- Green
- Show Column Value column - Indicates if the value, the KPI icon, or both will be displayed within the Pivot Grid cell.
- Value Only
- Icon Only
- Both Value and Icon
- Aggregate Function column - Indicates the function being used to evaluate the Aggregate column/row against the KPI Operator, Value1, & Value2 fields.
- OK/Update button - Performs the selected action.
- Cancel button - Discard the changes and closes the form.
Report Maintenance Screen - Email Only Option - General Tab
The General tab is used to set the basic information about the report being registered.

- Report ID - Assigns an ID number to the report definition.
- Name - Assigns a name to the report definition.
- Category - The drop down lists the standard categories pre-defined in APP. This is a required field. APP uses this information to group your reports in a logical fashion in the SAP® Business One APP Reports menu.
To add a new category click Define New in the drop-down list. This will open the Manage Categories screen.
- Select Database - Identifies the target company database for the report definition. If you select a specific company database name, then the report will run only when you are logged in to that company database. APP also gives users the ability to setup a report definition and have it apply across all SAP® Business One companies on the server. To do so, please select the All option from the drop down list.
- Description - Enter a detailed description or any special comments.
- Link To - This drop down list lets you select the Marketing Document to link to your Crystal Report. This selection is relevant only if the Is Document Specific checkbox is checked.
To add a new form click the Define New option in the drop-down list. This will open the Form Registration screen.
- Default for all Business Partners checkbox - This indicates that this is the default report for the assigned Marketing Document. The default report will be executed each time the user clicks the Print or Preview buttons when the SAP® Business One Marketing Document form is the active form. This report will also be used with the Document Printing function.
- Create Activity On Delivery checkbox - This feature is available only for document specific reports. If this feature is enabled, APP will create an activity record each time an email is generated. The activity record will also save the attachment in the Attachment folder path specified under the SAP menu option titled General Settings Administration System Initialization menus.
- Enabled checkbox - This checkbox is used to enable or disable a report. Only enabled report definitions are displayed on the SAP® Business One menu.
- Do Not Display on RCM checkbox - This checkbox is used to exclude a report definition from appearing on right-click menus.
Report Maintenance Screen - Email Only Option - Delivery Preferences Tab
The Delivery Preferences tab is used to define delivery options for your document specific reports; those associated with a specific form/screen in SAP® Business One.

- To Email checkbox – Use this checkbox to deliver the report to an email.
- Email Provider – This is a drop down box to define the email provider. Available options include…
- Outlook
- SMTP
- Send Options – Available options include…
- Save as Draft
- Send
- Message ID – This is a drop down box to specify the Message selected for the delivery. The list contains all the messages defined previously. For defining new message, select Define New from the list.
- Email From – Designate the email address which will be used as the sender's address if SMTP is specified as the e-mail provider. The field will be disabled and selected Default Outlook User if Outlook is specified as the e-mail provider.
- Delivery Receipt checkbox – Specify a delivery receipt.
- Read Receipt checkbox – Specify a read receipt.
- Add Email Recipients button – Enable the user to specify the recipients of the email. Please see the Additional Email Address Setup screen section for detailed documentation.
- Fax a Copy checkbox – Specify delivery of the report to an internet fax service.
This feature will only work with Internet fax services like efax.com, myfax.com, etc. It is not for use with windows-based fax services like Winfax® or Rightfax®.
- Fax Provider Info – Enter the domain name of your internet fax provider. (e.g. efax.com).
Form Registration Screen
Selecting the Define New option at the bottom of the Link To drop down list on the Report Maintenance screen will launch the Form Registration screen. APP allows you to attach custom crystal reports to any SAP® Business One or add-on screen built in the SAP® Business One User Interface (i.e. you can launch a report from any SAP® Business One window by clicking the Print or Preview buttons). The first step in this process is to register the window in APP using the Form Registration screen.
The Form Registration screen is also accessible through the Form Registration menu option under the Administration  Setup APP Configuration menus.

- Form Registration Grid - This grid is used to display all the forms registered under the report maintenance.
- ID column - Unique ID of the forms.
- Form column - Name of the forms.
Clicking on the line for a record in the Form Registration Grid will load the appropriate data for the selected form into the fields below for editing.
- ID - Enter the Unique ID of the form that you want to register with APP.
- Name - Enter the descriptive name of the form that you are registering (e.g. Production Order).
- Form Object Type - Select the type of data the form is based on. Available options include…
- Standard SAP Objects - For standard SAP forms.
- User Data Objects - For forms based on SAP user data objects.
- User Data Tables - For forms based on SAP data tables.
- SQL Tables - For forms based on standard SQL queries.
If it is unclear if the form is based on a data tables object or on a standard SQL query, select the User Data Tables option.
- Object Code - Enter the SAP® Business One object type of the form (e.g. Sales Order - 17).
- Linked Columns - Enter any columns from your query that require Link To arrows.
Other User Form Details Fields
Here the user can enter valid entries which should be the corresponding mapping fields from the form and the database.
- Table Name - Enter the primary database table name (e.g. ORDR for Sales Order).
- Record Key
- Item UID - Enter the Unique ID of the control that contains the Record Key value in the form (e.g. 8 for DocNum field on Sales Order).
- DB Field - Enter the Field Name from the table (#1) that stores the Record Key value in the above specified table.
- Business Partner
- Item UID - Enter the Unique ID of the item which contains the Business Partner in the form. Leave this blank if the window does not have a BP field.
- DB Field - Enter the Field Name of the item that stores the Business Partner in the above specified Table. Leave this blank if not relevant.
- Contact Person DB Field - Enter the Field Name of the item which keeps the Contact Person Code in the above specified Table. Leave this blank if not relevant.
- Use Emails from the DB Field - Enter the Field name of the item which stores the Email recipients (email addresses) in the above specified Table. APP will use the value entered in this field while delivering the report. The recipients found here will be added to the “Mail To” list.
- Add button - Saves the information in the database.
- Cancel button - Closes the window without saving information.
- Delete button - Deletes the selected form.
Manage Categories Screen
Selecting the Define New option at the bottom of the Category drop down list on the Report Maintenance screen will launch the Manage Categories screen. This form is used to add, modify, or delete Categories from Report Maintenance.

- Categories Grid - This grid is used to display all the categories available in the report maintenance.
- ID column - The IDs of categories.
- Category column - Names of categories.
Clicking on the line for a record in the Categories Grid will load the appropriate data for the selected category into the fields below.
- ID - The ID of the selected category.
- Name - Name of the selected category.
- Add button - Add a new category. The Name must be filled before adding new categories. ID will be calculated automatically.
- Delete button - Delete the selected category. Select a category from the grid before pressing this button.
- Cancel button - Discard the changes and close the window.
Map Report Parameters Screen
Clicking on the Map Parameters button on the Report Maintenance screen will launch the Map Report Parameters screen. This window is used to map the fields on the SAP® Business One screen to the parameters in the specified Crystal Report. The benefit is that APP will dynamically pass the values from the specified field into the report’s parameters. The result is, the user will only need one click to run the report.
A valid report file (.rpt extension) must be specified in the File Path field of the Report Maintenance screen.

- Report Name - Displays the name of the report selected in the Report Definitions window.
- Report ID - Displays the ID of the report selected in the Report Definitions window.
- Map Parameters Matrix
- Parameter Name column - This column lists all the parameters from the Crystal Report specified on the Report Definitions window. This will be populated by APP each time the screen is launched.
- B1 Field ID column - For each parameter on the reports, enter the SAP Business One field ID from the screen. The value in this field will be passed into the parameter each time the report is executed.
When you enter a value in this field, the value in the Alternate Action column is changed to None. If you want to pass a hard coded value into the parameter, you enter the value in this column prefixed by the letter v.
- Alternate Action column - This column is to be used when the value that needs to be passed into the report parameters is not an SAP Business One Field value. The possible selections in this field are…
- None - This is selected if a B1 Field name value is specified in the preceding column.
- Pass NULL Value - Selecting this option will pass a null value to that parameter. This will clear out any values in the B1 Field Name column.
- Pass Blank Value - Selecting this option will pass a blank value to that parameter. This will clear out any values in the B1 Field Name column.
- Prompt User - Selecting this option, will prompt the user to enter the parameter value each time the report is executed. This will clear out any values in the B1 Field Name column.
You cannot directly execute the APP Report Print Operation with this option set. You will need to click the Preview button to launch the report, enter parameter values, preview the report, and then click the Print button to print the report.
- Update button - Saves all values in the matrix to the TWBS_CW_MapParam table.
- Delete button - This will delete selected parameters from the database.
- Delete All button - This will delete all parameter entries from the database.
- Cancel button - Clicking this button closes the window without saving values.
Additional Email Address Setup Screen
Clicking on the Add Email Recipients button on the Delivery Preferences tab of the **Report Maintenance** screen will launch the Additional Email Address Setup screen. This window is used to define email recipients for a report definition.
APP supports both BP Contacts and BP Addresses for Email Delivery.

- Use Recipients from Form Item option -Select this option if the email/fax number for emails To address is stored in any field on the screen. This can be a standard B1 field in the database or a User Defined Field.
The Use Emails from DB Field on the APP Form Registration window must be filled in with the database field name.
- Get Recipients from Query option - Select a field from the fields list. The fields are from the query specified in message editor.
- Use Business Partner Ship To Addresses option - Select this option if the user wishes to deliver the emails as specified in the Addresses fields. In Business Partners Addresses Tab, APP enables three fields to specify the Email Address, Fax number and Preferences to record the user preference. This field will be visible for Ship-To addresses only.
- Use Contact Persons Information of Business Partners option - Select this option if the user wishes to deliver the emails as specified in the BP Contacts fields. This system was used in the earlier versions of APP.
- Mail Address Type column - Use this field to indicate whether you want the email address to be pulled into the To, CC or Bcc field of the email.
- Specify Contact column - Choose between a BP or a Consolidated BP contact.
- Use Email Address of column - This column has 6 available options…
- Master Bill To
- Master Ship To
- Document Bill To
- Document Ship To
- Document Contact - This pulls in the contact on the document.
- Sales Person - This pulls in the email of the Sales Person on the document.
- Values 1 - 4 are linked to the APP Contact Type field on the Contacts tab in the Business Partners Master Data screen. When a report is delivered, APP will look for the Contact Type, specified in the above mentioned field, in the Business Partner contacts and pull in the correct email address.
- Email CC List - The email addresses specified in this field will always be pulled into the CC field of the resulting email.
Example Business Case: The sales manager in a company should always be carbon copied on any mails sent to customers.
- Email BCC List - The email addresses specified in this field will always be pulled into the BCC field of the resulting email.
- Save button - Save the settings defined in the window and close.
- Cancel button - Discard the changes and close.
Message Editor Screen
Selecting the Define New option at the bottom of the Message ID drop down list on the Delivery Preferences tab of the Report Maintenance screen will launch the Message Editor screen. This window is used to define the complete email message with attachments.

- Message ID - This is the unique identifier for the message. This value is assigned by the user.
- Message Description - The value in this field is only for reference purposes. This value will be displayed on the Message List window for selection. This will not get pulled into the generated emails.
- Email Subject - Specify the Subject of the Email message. You can now personalize the Subject Text.
- Attachment Name - Specify the name that the attached file should have. Do not specify the file extension (e.g. - .pdf, .xls) at the end of the file name. APP will automatically determine this for you based on your selection of the Attachment Format field. You can now personalize the Attachment Name.
Message Editor Tab
The user can compose the message here.
- Customization Type - Standard option - This is the standard method used in the previous versions of APP. When using this method, the user will be limited to a set of commonly used fields/tags that they can use to customize the message.
- Customization Type - Query option - This allows the user to customize the messages with any field from the database. This is done by allowing the user to select from a list of saved B1 queries. Once a query is selected, the fields/tags from the query list will be available for the user to add to the message. APP will personalize the texts while sending the emails, by replacing the Tags with the corresponding values from the Database. The query list contains all the queries used in the company. This list will be refreshed when launching the Message Editor form every time.
- Select Tag - This is a drop down list field to specify the customization tag. The tags are explained in Message Personalization section.
- Insert button - Insert the selected tag to the message body.
- Copy button - Copy the selected tag to the clip board.
For more information on how to use queries within APP, please refer to the Suggested Approach for Using Queries with APP section of the User Guide.
Additional Attachments Tab
This feature allows the user to add attachments to the email message. Any attachment to be sent can be selected from the browse window opened by clicking file open dialogue box..

- Attachments matrix - User can add / modify the filenames here.
- File Name column - User can specify a valid filename here. A filename with full path can be used to specify the file.
- Browse … button column - Browse for a file.
- Type column - The type of the file specified in the row.
- Size column - The size of the file specified in the row.
- Path column - The full file path with out filename.
- Add Row button - This button is used to add an attachment to the list.
- Delete Row button - This button is used to remove an attachment from the list
APP does not allow individual file size more than 5 MB and the total attachment file size for the email should not exceed 10 MB.
- Save button - Save the email settings and close the window.
- Cancel button - Discard the changes and close the window.
- Delete button - Delete the message settings.
Menu Position Tool Screen
The Menu Position tool in the APP Report Definition allows you to position reports anywhere within the SAP® Business One menu structure. This includes folders created with the Menu Structure tool available in SAP® Business One v8.8. Only reports that are not document specific should be positioned in the menu structure.
A basic APP report definition must be created and saved before using the Menu Placement tool. Once the report definition has been saved, click the Menu Position button.

A dialog directing you to select the menu item is displayed. Open the SAP® Business One menu structure to display an existing menu item. The menu item must be at the lowest level of the menu structure. A folder-level item cannot be selected.
Click on the desired menu item. A dialog box is presented.

Select one of the Menu Before or Menu After option buttons. The Menu Before option means that the new item will be placed above the selected menu item. The Menu After option means that the new item will be placed below. Do not change the Menu ID value. This is presented for information only.
Click the Save button to save the new menu item or the Cancel button to terminate the menu position processing.
Click the Refresh APP Menu button to force the new menu item to be displayed.
Advanced Delivery Definition Screen
Selecting the Define New option at the bottom of the Category drop down list on the Report Maintenance screen will launch the Manage Categories screen. This form is used to add, modify, or delete Categories from Report Maintenance.

- Name - Name of the advanced delivery definition.
- Select Form - The form associated with the advanced delivery definition.
- Use Default Report option - Assign the default report for the SAP® Business One form to the advanced delivery definition.
- Use Specific Report option - Assign a specific report to the advanced delivery definition.
- Select Report option - Selection of the specific report to the advanced delivery definition.
Additional Query Filters Grid - This grid is used to define the conditions for the delivery definition.
- Field column - The field from the object to be used in the filter.
- Condition column - The condition option to be used in the filter.
- Equal - Is equal to
- Not Equal - Is not equal to
- Greater Than - Is greater than
- Smaller Than - Is smaller than
- Greater or Equal - Is greater than or equal to
- Smaller or Equal - Is smaller than or equal to
- Between - Between
- Value #1 column - The first value to be evaluated by the condition.
- Value #2 column - The second value to be evaluated by the condition.
Value #2 is not required for all conditions.
- Relationship column -
- And - Specifies that multiple conditions must be satisfied if they exist.
- Or - Specifies that one of multiple conditions must be satisfied if they exist.
- Update/OK button - Add/Update the advanced delivery definition.
- Cancel button - Discard the changes and close the window.
Chart Definition Screen
Creating a New Chart Definition
Select the SAP menu option for the query that you want to create the Chart for under the Tools Queries User Queries menus to load the selected query into the SAP Query screen.
This example is for the Open A/R Summary by Customer query.

The button to the immediate right of the Close button will allow the user to view existing charts associated with the query or to create a new chart associated with the query.

Click the Create Ad-Hoc Chart button option to create a new chart. This will load the Chart Definition form.

- Query Display - Displays the query on which the chart is based.
- Y Axes Grid - Displays any y-axis's defined for the chart.
- Define New button - Option for the definition of a new y-axis for the chart.
- Chart Title - Assigns a title to the chart definition.
- Legend Text - Assigns the title text displayed at the top of the chart legend.
- Dimension drop down - Option for the type of chart dimensions for the chart.
- 2D - Displays a 2-dimensional chart.
- 3D - Displays a 3-dimensional chart.
- Axis X Text - Assigns the text displayed on the x-axis.
- X-Value drop down - Option for the selection of the field from the query that is designated as the data for the x-axis of the chart.
- Refresh Time - The value of time (in seconds) that the user wants the chart data to refresh.
Setting the Refresh Time value to 0 will indicate that the Chart data will not refresh. Third Wave recommends that if you plan to use the refresh time property, that you use a value greater than or equal to 300 seconds (5 minutes).
- Chart Type drop down - Option for the type of chart format.
- Pie
- Bar
- Lines
- Doughnut
- Area
- Bubble
- Candlestick
- Horizontal Bar
- Horizontal Stacked Bar
- Horizontal Stacked Bar 100
- Range
- Spline
- Spline Area
- Stacked Area
- Stacked Area 100
- Stacked Bar
- Stacked Bar 100
- Stacked Line
- Stacked Spline
- Stacked Spline Area
- Stacked Spline Area 100
- Stick
- Funnel 3D
- Pyramid 3D
- Axis Y Text - Assigns the text displayed on the y-axis.
- Axis Y Format - Option for the data type formatting to be applied to the y-axis chart data.
- No Format - No specific formatting will be applied to the data.
- Percentage - Percentage formatting will be applied to the data.
- Currency - Currency formatting will be applied to the data.
Legend Series
- Y-Value drop down - Option for the selection of the field from the query that is designated as the data for the y-axis of the chart.
- Legend drop down - Option for the selection of the field from the query that is designated as the value for the legend of the chart.
- Label drop down - Option for the selection of the field from the query that is designated as the value for the data label of the chart.
- Tool Tip drop down - Option for the selection of the field from the query that is designated as the value for the tool tip of the chart.
- Default Filter drop down - Option for the selection of the field from the query that is designated as the default filter for the chart.
Clicking on the Manage Charts button ( ) on the Report Maintenance screen will launch the Chart Definition screen for an existing chart.
Loading an Existing Chart Definition
This example is for the Open A/R Summary by Customer query.
Clicking on the Define New option in the Charts Grid will allow the user to define a new chart for the query.
Clicking the Chart Name value from the Charts Grid will load the data associated with that chart into the definition form and allow the user to modify or view the information.

User Roles Screen
TWBS Advanced Productivity Pack (APP) creates a screen through the SAP® Business One User Interface (UI) that allows for the administrative maintenance of security settings for Crystal reports. APP follows the User Roles security model. This is very similar to SQL Server security setup.
Select the User Roles menu option under the Administration Setup APP Configuration menus to load the configuration screen.

- Roles Matrix - User can add/modify/remove User Roles using this.

- Role Title column - This column contains all the roles defined in the database. Double click on the role title to modify the details.

Double clicking on the Define New option will allow the addition of new roles. Double clicking on an existing role allow the editing of existing roles. The addition of new roles or the editing of existing roles is performed on the User Roles Properties screen.
- Add button - Add a new role. This is the same as double clicking the Define New item.
- Remove button - Remove the selected Role from the database.
- Close button - Close the User Roles Window.
By default, upon new installation, all reports are accessible to everyone. You will need to setup permissions to restrict the reports.
User Roles Properties Screen
Double clicking on the Define New option or double clicking on an existing role on the User Roles screen will launch the User Roles Properties screen. This window is used to define security level for each roles. Users can modify the security level for an existing role.
- Role ID - The ID assigned for the current role. This is a locked field. The system will be assigning the value while adding new role.
- Role Name - The name of the role. User can enter the name here. User can modify the name whenever needed.

General Tab
Select the users who are the members of this Role
- User Matrix - This is used to add/ remove members to the role
- User Code column - The username of the user defined in the database.
- User ID column - The ID of the selected user in the database.
- User Name column - The Full name of the user selected.
- Add button - Add new users to the list through the User Roles Members screen.
- Remove button -Remove the selected users from the list.
- Add/Update/OK button - Save the details to the database and close.
- Cancel button -Discard the changes and close.

Permissions Tab
Define the security level for each and every report defined in the database.
- Report Security Matrix - This is used to specify reports associated with the role.
- Report ID column - The ID of the report defined in report definition window.
- Report Name column - The name of the report selected.
- Allow check box column - This is a check box to allow/block the report for the role. Check the box if the report is allowed. Uncheck to block.
User Roles Members Screen
Clicking on the Add button on the General tab of the User Roles Properties screen will launch the User Roles Members screen. This window is used to select members to be added to roles.

- User matrix -This is used to add/remove members to the role. Select the users to add to the role. Multiple selections can be made by clicking while holding the CTRL + SHIFT keys while selecting.
- ID column - The ID of the selected user in the database.
- User Code column - The User Name of the user defined in the database.
- User Name column - The Full name of the user selected.
- OK button -Select the users to the role and closes the window.
- Cancel button -Discard the changes and closes the window.
Report Options Screen
TWBS Advanced Productivity Pack (APP) creates a screen that allows for the specification of options related to individual reports or report groups. The Report Options screen can be used to specify the action associated with this report (e.g. Print, Preview, Email etc.) or can be used as an entry point into the Default By BP functionality.
Utilizing the right-click menu on any form and selecting an APP report or report group from the menu will launch the Report Options screen.

- Report Name - The selected report name. This is a read only field.
- Report ID - The selected report ID. This is a read only field.
- Customer - The Customer associated with the document/window.
- Set as Default button - Set the current report as the default report. Options include
- Business Partner
- BP Group
- Range of Business Partners
Choose Report Action options
- Preview - Preview the report to screen
- Print - Send report to printer. Delivery will also be performed if the Deliver on Print checkbox is checked on the Print Options window.
- Print & Deliver - Both the Print action and Deliver action will be performed.
- Deliver Email - Sends email only to the recipients. Fax settings are ignored.
- Deliver Fax - Sends fax only. Email settings are ignored.
- OK button - Perform the selected action and close the window.
- Cancel button - Cancel the action and close the window.
BP Properties Screen
Clicking on the Set as Default button on the Report Options screen will launch the BP Properties screen. This screen is used to specify the default Business Partner settings for the selected report.

These settings will be valid during the Document Printing process as well.
- Set as default for Current BP Only option - Select this option if the default setting is valid only for the selected business partner.
- Code - The card code of the selected business partner. This is a read only field.
Default by BP for a single BP/ range will supersede the setting for BP Group. For example, there are 2 versions of a Sales Order – SO1 and SO2. BP code C20000 belongs to BP Group “Construction”. Let’s assume we set SO1 as the default report for BP Group “Construction” and set SO2 as the default report for BP code C20000.When the user prints a sales order with C20000 as the BP, SO2 will be printed.
- Set as default for Specified BPs option - Select this option if the default setting is valid for a range of business partners.
- Code From - The card code range starting value. If this is missing, the first business partner will be selected as default.
- Code To - The card code range ending value. If this is missing, the last business partner will be selected as default.
- BP Group option option - Select this option if the default setting is valid for an entire business partner group.
- BP Group - This is a drop down list from which the user can select the business partner group.
- OK button - Perform the selected action and close the window.
- Cancel button - Cancel the action and close the window.
Document Actions Screen
The Document Action screen is used to select an action to perform while doing a Document Printing from SAP® Business One.
Click the SAP menu option titled Document Printing under any of the SAP® Business One menus to load the Document Printing - Selection Criteria screen.
Click the Ok button on the Document Printing - Selection Criteria screen to launch the APP Document Action screen.

- Contact Preferences option - Select this option to perform the actions preferred by the contacts persons/ship to addresses. More about this is explained in the How To section.
- Print option - Select this option to print the default reports to the preferred printers.
- Deliver option - Select this option to deliver the default reports.
- Fax options - Select this option to fax the default reports.
- OK button - Perform the selected action
- Cancel button - Discard the changes and close the form.
Deliver BP Statements Screen
The Deliver BP Statements screen allows users to perform Print/Deliver/Fax BP Statements to Business Partners.
Click the SAP menu option titled APP - Deliver BP Statements under the Business Partner menu to load the Business Partner Master Data screen.
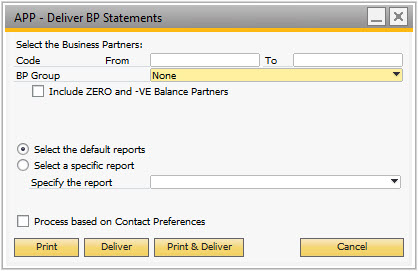
Select the Business Partners:
- Code From - The card code range starting value. If this is missing, the first business partner will be selected as default.
- Code To - The card code range ending value. If this is missing, the last business partner will be selected as default.
The range of card codes selected here will be processed in batch.
- BP Group - This is a drop down list from which the user can select the business partner group.
- Include ZERO and -VE Balance Partners checkbox - Check this to include all the business partners with a zero or negative balance.
- Select the Default Reports option - If this option is chosen APP will execute the default report (by BP, BP group) associated with each record that is part of the delivery definition.
- Select a Specific Report option - This drop down will last all report definitions associated with the selected form that can be executed via Batch processing (i.e. all report definitions that have a query associated with it).
- Specify the Report - If the user chooses the Select a Specific Report option, they need to select the report definition that they want to use. Selecting a specific report will execute that report for all records in the delivery definition.
- Process based on Contact Preferences checkbox - Select this option to perform the actions preferred by the contacts persons.
- Print button - Print the reports selected in the window.
- Deliver button - Deliver the reports selected in the window.
- Print & Deliver button - Perform both Print and Deliver actions.
- Cancel button - Cancel the action and close the window.
Visual Query Builder Screen
TWBS Advanced Productivity Pack (APP) incorporates a Visual Query Builder screen that allows the user to have a dynamic method to create and edit queries which can be used for reporting, query execution, or dashboards.
Load the Visual Query Builder window through one of the following methods…
- How To Load a Blank Query into Visual Query Builder
- How To Load an Existing Query into Visual Query Builder

- SQL Tables List Pane - The pane on the far right of the Visual Query Builder screen will list all of the available tables that the user can incorporate into the query. Tables can be added to the query by clicking on the table name and dragging the table into the SQL Graphical Display Pane.
With focus in the SQL Tables List Pane, you can begin typing the table name and the tables list will locate the table.
- SQL Graphical Display Pane - Once a table has been added to the graphical display, the fields for that table will be listed and will be available to be added to the selection part of the SQL query by clicking the check box to the left of the field name.
- SQL Summary Pane - Fields and tables added to the query will be shown in summary form in this pane.
- SQL Query Text Pane - Fields and tables added to the query will be shown in query form in this pane.
The Query can be directly edited in the SQL Query Text Pane and those changes will be reflected in the SQL Graphical Display Pane once the Save button has been clicked.
- Save & Close button - Save the SQL Query and close the Visual Query Builder screen.
- Save button - Save the SQL Query.
- Cancel button - Close the Visual Query Builder screen.
Chart Viewer Screen
TWBS Advanced Productivity Pack (APP) incorporates a Chart Viewer screen for the display and manipulation of charts or their associated data.
- Click the SAP menu option for the query that you want to create the Chart for under the Tools Queries User Queries menus to load the selected query into the SAP Query screen.
This example is for the Sales by Customer query.

The button to the immediate right of the Close button will allow the user to view existing charts associated with the query or to create a new chart.

Click the Total Sales by Customer button option to create a new chart.
This will load the Chart Viewer form for the selected chart.
Chart Tab
Visual display of the chart for the query data.

Data Tab
Clicking on the Data tab will give visibility to the data set that is used for the chart.

Grouping the Chart Data
To group any data on the chart data tab, click and drag the column title of the data that you wish to group by into the area above the column titles.

The data view will be refreshed and the data will be grouped according to the field selected.

Clicking on the down  or up
or up  arrows will expand or contract the data group.
Information on both the Data and Chart tabs will update in real-time as columns are selected for grouping.
Filtering the Chart Data
To filter any data on the chart data tab, click the  icon to the right of the column title of the data that you wish to filter.

A form will be displayed which will list all values of that field in the data set. This will allow the user to select only those values that will be displayed either by selecting the individual values or a range of values. The user will also be able to clear any existing filters through the Clear Filter button.

Select the data that you want to filter for the column.
Information on both the Data and Chart tabs will update in real-time as values are selected for filtering.
Any columns for which the data has been filtered will display the  icon colored to indicate filtering has been applied.
Clicking on the Chart tab will display the updated chart.
Advanced Delivery Processing Screen
While processing either an existing or new advanced delivery definition, the user will be prompted with the Advanced Delivery Processing screen.
Refer to the How To Execute APP Advanced Delivery Definitions section of the user guide.

- Adv. Del. Definition - The ID/name of the advanced delivery definition.
The ID/name of the advanced delivery definition will only be populated if the user is executing a previously defined definition.
- Select Form - The form associated with the advanced delivery definition.
- Select Default Report option - Assign the default report for the SAP® Business One form to the advanced delivery definition.
- Select Specific Report option - Assign a specific report to the advanced delivery definition.
- Additional Query Filters Grid - This grid is used to define the conditions for the delivery definition.
- Field column - The field from the object to be used in the filter.
- Condition column - The condition option to be used in the filter.
- Equal - Is equal to
- Not Equal - Is not equal to
- Greater Than - Is greater than
- Smaller Than - Is smaller than
- Greater or Equal - Is greater than or equal to
- Smaller or Equal - Is smaller than or equal to
- Between - Between
- Value #1 column - The first value to be evaluated by the condition.
- Value #2 column - The second value to be evaluated by the condition.
Value #2 is not required for all conditions.
- Relationship column -
- And - Specifies that multiple conditions must be satisfied if they exist.
- Or - Specifies that one of multiple conditions must be satisfied if they exist.
- Update/OK button - Clicking this button will load the form that will display the definition results set.
- Cancel button - Discard the changes and close the window.
- Save As Config button - Allows the user to save the definition.


