Table of Contents
Building a Workflow
A workflow is constructed by sequentially connecting the various Bizweaver tools. This is done in the Workflow Design pane. For this discussion, this area will be called the “design pane.”
Start the process with an empty design pane. Click the file option in the menu bar, then a new workflow. You can also use the shortcut Ctrl-N anywhere in the Bizweaver main application.

Related Pages
The following pages contain additional information about the specific components used to construct Bizweaver workflows.
General Workflow Rules
- Each workflow should have a unique name.
- The application will assign a default name, “Untitled,” but we recommend that you change the name to something that helps you understand the step's purpose.
- Each workflow step must have a unique name.
Basic Information
2.6

- See the General Workflow Rules above.
- It is not necessary to have the workflow-enabled initially. The workflow can be executed in test mode during the development process. However, it will need to be enabled to use the “Run” or scheduled options.
- Enter any Notes about the workflow. This information can be updated at any time.
- Click the “Save” button
 at the bottom of the workflow designer

2.7

2.9

* See the General Workflow Rules above.
- It is not necessary to have the workflow-enabled initially. The workflow can be executed in test mode during the. development process. However, it will need to be enabled to use the “Run” or scheduled options.
- Enter any Notes about the workflow by clicking
 . Will open a new window, clicking “X” will close the window and save all options. Clicking cancel will discard all changes.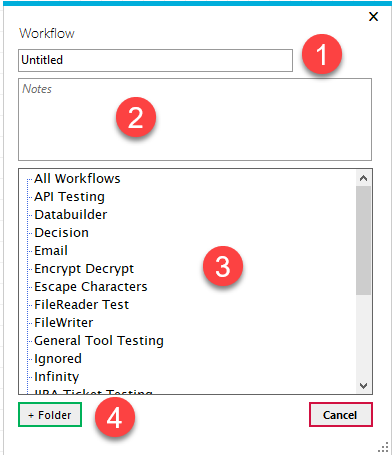
- 1. Workflow Name: The name of the workflow, can be modified on the ribbon or in this window.
- 2. Notes: Workflow notes.
- 3. Folder: The folder a workflow is saved in, double click on the folder to select it.
- 4. + Folder: Creates a new folder
- Click the “Save” button
 at the bottom of the workflow designer.


Build a New Workflow
Workflows are constructed using drag-and-drop functionality. Click and hold the left mouse button on the tool icon you want to place on the design pane. Drag the icon to the point where you want it and release the mouse button to “drop” it in place. This same process is used to re-order icons in a workflow on the canvas.
- Begin by dragging the next tool onto the design pane.
- A connector line is automatically added to show the link between the two steps.
- Continue adding tools as needed.
- The workflow should always contain a Stop/Endpoint.
- You can no longer drag and drop to add a tool to a workflow with an End tool present.
- There are two ways to add a tool to a workflow if an End tool is present
- Right-click on the tool in the design canvas and select “Create Link From,” and when the next tool is dropped into the design area, it will be linked from that tool.
- Delete the End tool in the workflow and add it once the modifications are finished.
New in Bizweaver version 2.4 Use the horizontal and vertical scroll bars on the design area to expose more work areas as needed.
Bizweaver Tools Pane

The tools used to construct Bizweaver workflows are found in this area. They are added to a workflow by dragging them from the Tools area into the Design area. See the Workflow Tools page for descriptions of the tools. Details on each of the tools are found in other Bizweaver documents.
Saving Workflows
Save the workflow as you work. Information on saving a workflow is found here
Workflow Design
Starting with Bizweaver version 2.6, the workflow designer is a separate window from the Bizweaver application. This allows users to open multiple workflows at once.
This area is the “design area” where a workflow is constructed. See the following sections of this document for more information.
Bizweaver version 2.5 and above, the ability to click and drag within the design pane grid was added.

Adding Steps to an Existing Workflow
Adding additional steps to a workflow follows the same process as described above, with one additional action.
- Right-click on the workflow step that will precede the new one.
- Select the “Create Link From” option.
- The step name changes to bold.
- Drag the new tool onto the design pane.
- The “linking” line now connects the selected starting point to the new step.
Manually Linking Workflow Steps
- Hover over the new step, and you will see a blue “dot” icon in the lower right corner.

- Left-click on the icon, and a marker icon is displayed.
- Drag the marker to the next step in the workflow and drop it anywhere on the step.
- The “linking” line now connects the new step to the next step.
Removing Workflow Steps
- Right-click on the workflow step to be removed.
- Select the “Remove” option.
- Confirm that the step is to be removed in the dialog presented.
- Reset the workflow links as needed using the “Manually Linking Workflow Steps” process described above.
Examining & Resetting Step-To-Step Links
In Bizweaver version 2.3 (build 2.3.3), a new feature is added to assist with step-to-step links. Right-click on the small, blue link icon found at the lower right corner of a step.
 Two options are displayed: Links Info and Reset Links
Links Info

“Links Info” shows the source (incoming) step(s) into the current step and the target (outgoing) step from the current step. This can help diagnose errors where links seem to be in place but are not functioning.
Reset Links
“Reset Links” will clear any links coming into the current step. Again, this can be helpful if “ghost” link lines are appearing in the design area. Keep in mind that if you use this function, you will need to recreate the links.
Alternate View of Workflow Steps
On some occasions, it is necessary to view the workflow steps in a hierarchical view rather than the design (canvas) view. This is done on the “List View” tab. This tab is found on the top of the design area.

Click the “List View” tab to switch the view. You can switch between the two views at any time. However, you can only make changes to the workflow on the design canvas.
Here is a simple workflow on the design canvas.

Here is the same workflow in the ListView tab.

In this view, the workflow steps are presented in the sequence in which they will be executed.
Continue On Error
Continue on error if selected will allow a workflow to process past a step that had an error.
Breakpoint
More information on Breakpoints **here**
Workflow Variables
“Variables” are data values that are held in memory during the execution of a workflow. There are two types of variables in Bizweaver: User Variables and Step Variables.
To access these variables while in any workflow tool, press F4. This will display the variables menu flyout in the tool window. Workflow steps will be displayed on the right, appearing in the order they are in the workflow. Workflow variables will be displayed under the tool name once the tool is clicked on in the flyout alphabetical order.
In Bizweaver 2.6.10 and before, the variables selector will be a separate window, but the functionality remains when selecting workflow steps and then associated variables.
To select variables, select the desired tool, click the tool name. This will expand the list and show all available variables from that tool in alphabetical order. Double click on the variable, and it will automatically be inserted into the last place the cursor was in the tool. To close the variable flyout, press the collapse button to the top right of the panel.

User Variables are defined by the user. These values can be defined in the Variables tool or they can be created using the VBScript tool.
Step Variables are special references created by the Bizweaver application. Most Bizweaver workflow tools create these variables as the step is executed. An example of this would be a reference to an output column from a SQL/HANA Tool or File Reader step.
Bizweaver variables are available to other workflow steps that follow the step where they are created.
More information is found on the Using Variables page.
String Manipulation
Starting in Bizweaver 2.7.2, the functionality to modify variables was introduced. This allows a user to manipulate all variables that are inserted in a specific step.
- Escape: Selecting this checkbox will enable or disable the escaping functionality.
- Only one of these can be selected at once, and they only apply in the step in which they are enabled.
- JSON: Selecting this will escape reserved characters for a JSON file. See the table below for more information.
- This will generally be used in a Databuilder step
- XML: Selecting this will escape any reserved characters for an XML file. See the table below for more information.
- This will generally be used in a Databuilder step
- SQL: Selecting this will escape reserved characters for SQL Server see table below for more information
- Replace empty values with NULL: This will take any empty strings or blanks ex '' and replace it with NULL
- This works independently of the Escape functions.
| JSON Reserved Character | Explanation | Escaped Value |
|---|---|---|
| Backspace | A backspace in any text in a string | \b |
| Form feed | Advanced to the next page | \f |
| Newline | A new line in a string | \n |
| Carriage return | A carriage return in a string | \r |
| Tab | A tab in a string | \t |
| “ | A double quote | \” |
| \ | A backslash | \\ |
| XML Reserved Character | Explanation | Escaped Value |
|---|---|---|
| < | Less than sign | < |
| > | Greater than sign | > |
| & | Ampersand | & |
| “ | Double quote | " |
| ' | Single quote | ' |
| SQL Reserved Character | Explanation | Escaped Value |
|---|---|---|
| ' | Single quote | \' |