
This is an old revision of the document!
Table of Contents
Using TWBS Credit Card Processing
How To Access the Credit Card Processing Configuration Screen
Access to the Credit Card Configuration screen requires that the user has been assigned sufficient authorization privileges.
- Click the Credit Card Configuration menu option under the Administration
 Setup Banking menu groups to load the Credit Card Configuration screen.


- TWBS Credit Card Processing creates a screen through the SAP® Business One User Interface (UI) that allows for the administration of configuration options that are critical to the performance of the application.

How To Set Credit Card Processing Authorization Levels
Access to the Credit Card Configuration screen requires that the user has been assigned sufficient authorization privileges.
- Click the Credit Card Configuration menu option under the Administration Setup Banking menu groups to load the Credit Card Configuration screen.
- Check the Authorization levels to be active. Available options include…
- Sales Order
- Delivery
- A/R Down Payment Invoice
- A/R Invoice (includes A/R Reserve Invoice)
At least one authorization level must be active at all times.
Credit Memo functionality is always active and does not need to be enabled.
- Click the Update button.
How To Set Credit Card Processing Markup Defaults
Access to the Credit Card Configuration screen requires that the user has been assigned sufficient authorization privileges.
Markup functionality is only available at the Sales Order or Delivery Note levels.
- Click the Credit Card Configuration menu option under the Administration Setup Banking menu groups to load the Credit Card Configuration screen.
- Select the markup type desired as the configuration default.
- None - No markup will be applied to the authorization amount.
- Amount - A flat rate will be added to the authorization amount.
- Percent - A percentage of the document total will be added to the authorization amount.
- If Amount or Percent were selected, enter the flat amount or percentage value desired into the field to the right of the markup options.
Enter desired percentage value as a whole #. For example, 6% markup should be entered as “6.00”, not “0.06”
- If you would like to allow the user to have the ability to override the markup default values at the time of authorization, then select the option for Allow Editing of Markup Type at Authorization.
- Click the Update button.
How To Configure Dynamic Descriptors - CyberSource gateway
Dynamic Descriptors are available only through the CyberSource payment gateway.
Access to the Gateway Profile Maintenance screen requires that the user has been assigned sufficient authorization privileges.
- Click the Gateway Profile Maintenance menu option under the Administration Setup Banking TWBS Credit Card Processing menu groups.
Clicking on the line of a gateway profile account on the upper grid list will display the profile account settings in the field below.

- Select the line for a Gateway Profile account set up with the CyberSource processing gateway. The data for the selected Gateway Profile will display in the fields below.
- Select the Enable Dynamic Descriptors checkbox.
- Click the Update button.
Not all Dynamic Descriptor fields are available for all payment processing centers through the CyberSource payment gateway.
Dynamic Descriptor functionality is optional and must be set up in advance with the payment processor to be configured correctly for your account.
- Open the TWBS_CC_Cyber_Descriptor_VW view in the database console.
- Customize the TWBS_CC_Cyber_Descriptor_VW view to meet your dynamic descriptor data requirements.
- Apply the changes to your database view.
Customizing the TWBS_CC_Cyber_Descriptor_VW view for Dynamic Descriptor Data
The TWBS Credit Card Processing application will create a view in the SAP® Business One company database. This view is responsible for the designation of the values that will be passed to the payment provider as dynamic descriptors.
Because of the customizable nature of this feature and the requirements of the specific customer, Third Wave Business Systems is not responsible for the administration of the content of this view. Please contact your SAP® Business One partner for support in customizing this feature.
- Here is the default TWBS_CC_Cyber_Descriptor_VW file installed by the application.
The aliases used to identify all fields in the default view must be maintained when the content of the View is customized in order for the application to pass the data correctly. Fields added to the View in addition to the default fields will not be utilized by the application.
Object Type (ObjType), Document Entry Number (DocEntry), and Document Number (DocNum) are required fields.
The following is a sample of the content of a customized TWBS_CC_Cyber_Descriptor_VW view that is looking at Sales Orders, Delivery Notes, and A/R Invoices that are of Open status in SAP® Business One.
Dynamic Descriptor data is passed only at time of authorization, capture of funds, and/or credit of funds for the documents supported by the TWBS Credit Card Processing application. The View should be coded only to those documents (Sales Order, Delivery Note, A/R Invoice, A/R Credit Memo, and A/R DownPayment Invoice) that you use for your business process to perform these actions.
For additional information on the Dynamic Descriptors available for specific CyberSource supported Payment Providers, please refer to the Provider Specific Dynamic Descriptors page of the User Guide.
How To Configure Soft Decline Response Table - CyberSource gateway
Incorporation of a response user table to deal with “soft decline” scenarios where the Merchant bank on the account accepts the authorization but CyberSource has concerns because of information passed at the time of authorization. This feature allows for the designation, by CyberSource response code assigned to the transaction, to dictate the actions of the TWBS Credit Card Processing application to automatically accept the authorization, automatically not accept the authorization and initiate the reversal of the authorization, or to prompt the user to manually decide if the authorization should be accepted or reversed.
Response table functionality is available only through the CyberSource payment gateway.
- Click the TWBS_CC_CYBER_RESP user table option under the Tools User-Defined Windows menu groups. This will load the records in the CyberSource Response table onto the screen.
- The table will contain records for CyberSource response codes #200 and #230 on installation. The default CyberSource Response Action value at the time of installation will be R for Reverse. Valid values for this column are:
- R - Reverse the authorization automatically
- A - Accept the authorization automatically
- P - Prompt the SAP user via message box to accept or reverse the authorization
Use of an invalid CyberSource Response Action value will negate the CyberSource response table functionality.
The TWBS_CC_CYBER_RESP user table can be manually edited to add new records in the event that any other CyberSource response codes are determined to cause the same “soft decline” behavior. Any new codes added to the user table will then be subject to the rules of the response table functionality.
- Set the desired CyberSource Response Action value for each of the listed CyberSource Response Code values.
- Click the Update button.
Automatic Acceptance of the Authorization
- If the CyberSource response code is set up for automatic acceptance of the authorization, the user will not notice any differences in the application from an authorization accepted that was not based on a response code set up in the table. A successful SAP status bar message will be observed.
Automatic Reversal of the Authorization
- If the CyberSource response code is set up for automatic reversal of the authorization, the user will notice a unique text value on the error SAP status bar message. This message indicates the type and number for the document the reversal occurred on.
User Prompted Decision for Acceptance/Reversal of the Authorization
- If the CyberSource response code is set up for prompting the SAP user to manually decide on the acceptance/reversal of the authorization, an SAP message box will be presented to the SAP user. The message text includes the CyberSource Response description value and can be changed to the desired description through editing the value on the user table.
- If the user chooses to reverse the text value on the error SAP status bar message will reflect that this was a manual choice to reverse the authorization.
If a user is prompted on either the TWBS CC Authorization screen or the SAP Payment Means screen and chooses to reverse the authorization, the screen will remain open so that the card data can be altered or a new card can be chosen. The user can then resubmit the authorization request.
Use of the response action to prompt the user will interrupt the processing of the Batch Authorization, Sales Order Re-authorization, and Batch Processing screens until a button has been selected for each document being processed that receives a code in the response table.
How to Set the Default Credit Card Gateway for a Business Partner
- Click the Business Partner Master Data menu option under the Business Partner menu to load the Business Partner Master Data screen.
- Load the existing Business Partner that you want to assign the default credit card gateway profile to.
If you are importing credit card information from a previous non-profile version of TWBS Credit Card processing, the TWBS CC Gateway Profile drop down UDF field must be assigned a value or the card migration will fail and the encrypted credit card # will be removed.
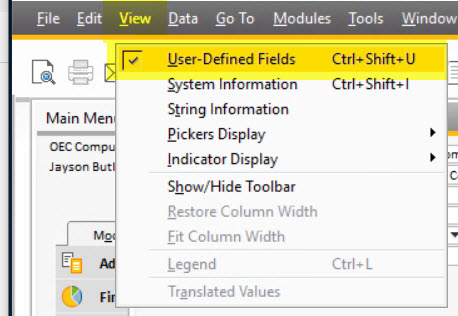
- Make sure that the SAP B1 User Defined Fields area is visible on the Business Partner Master Data screen.
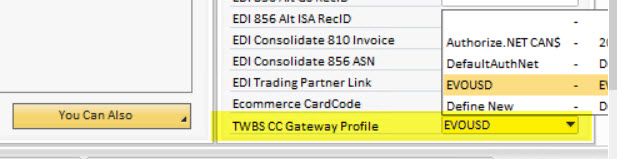
- Select the value from the TWBS CC Gateway Profile drop down UDF field for the gateway to be assigned as the default gateway profile for the business partner.
- Click the Update button.
A new user query has been added to the General group named TWBS CC Gateway from BP. This query can be used in a formatted search to assign the BP default gateway value to a marketing document on the change of the customer/vendor code. Any formatted searches will need to be set up manually on the marketing documents.
How To Create a Customer Profile for a Business Partner - EVO/PayFabric gateway
- Click the Business Partner Master Data menu option under the Business Partner menu to load the Business Partner Master Data screen.
- Load the existing Business Partner that you want to create the profile for.
You cannot create customer or payment profiles at the same time that you are adding a new business partner. Profiles can only be created on an existing business partner record. You can add multiple new payment profiles at the same time.
- Click the Credit Card tab
- Select an option from the Gateway Profiles drop down.
Selection of the gateway profile will populate the tab with fields for card data entry based on the gateway assigned to the profile.
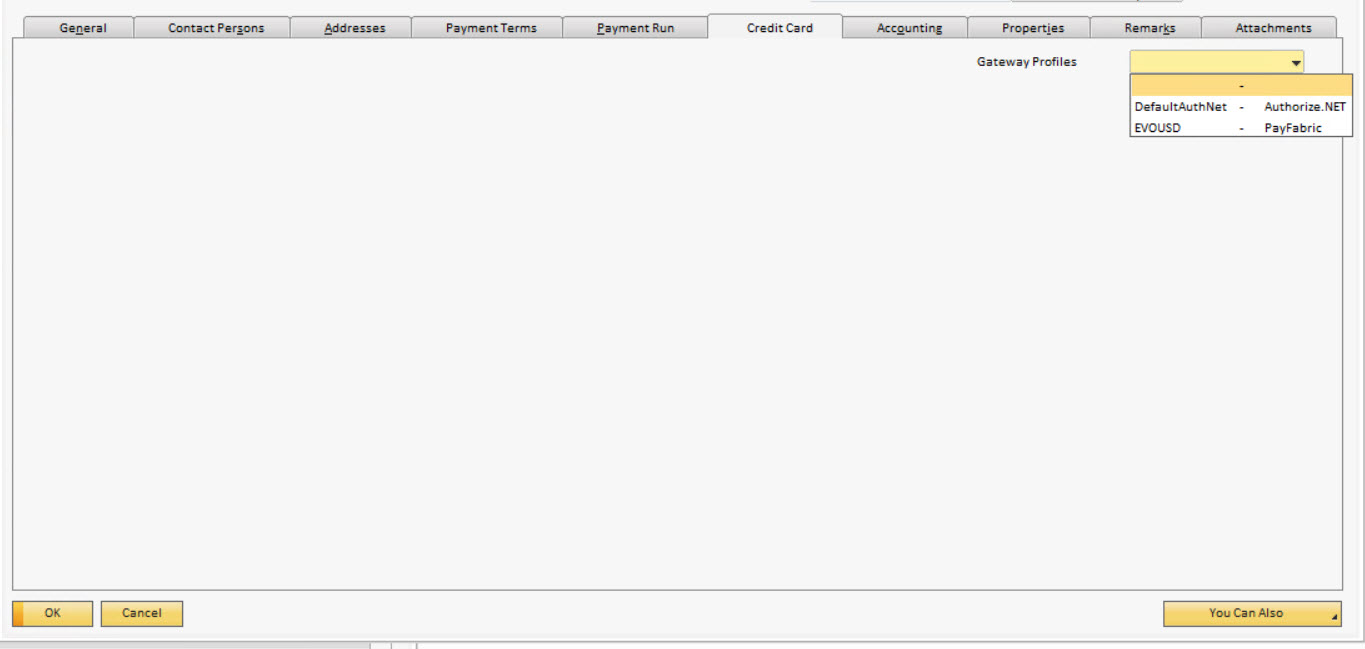
Selection of an EVO/PayFabric gateway profile from the Gateway Profiles drop down will load a secure hosted page on the tab. This hosted page is directly linked to the EVO/PayFabric gateway and all data is being entered and saved directly to their system.
Payment Profiles on the gateway account will be listed in the matrix. The data for the default card will be displayed in the fields on the right hand side of the tab.
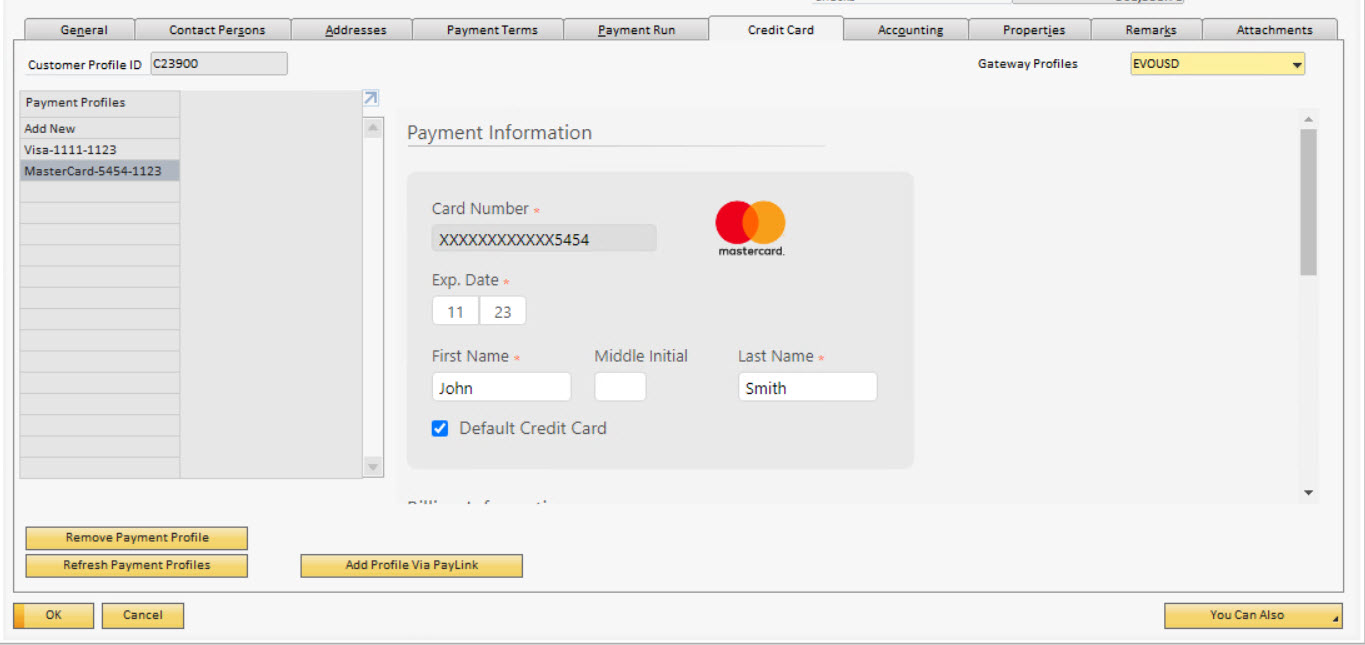
Payment Profiles on the gateway account will be listed in the matrix. Payment profiles are listed by card type - last 4 digits of the card - expiration date.
- Click the Add New option in the payment profiles listing on the left side of the tab. This will clear the fields on the hosted page to allow for the entry of the card information.
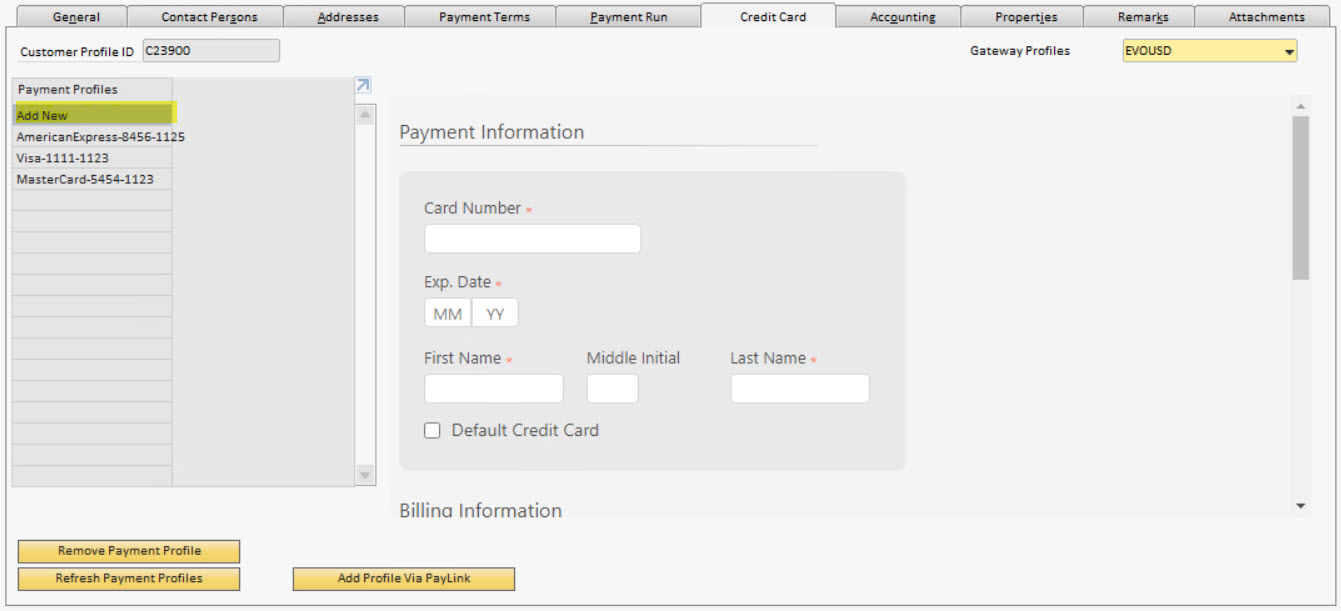
- Enter the data in the required and optional fields as needed. Required fields will be marked with an asterisk (*).
- When you've completed the data entry, click the Update button at the bottom of the hosted page.
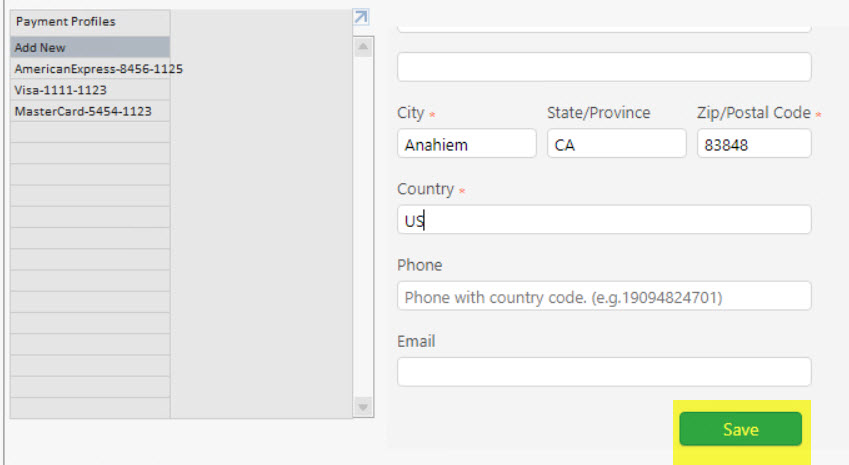
- If the card is successfully added to the EVO/PayFabric system, a message will be displayed at the top of the hosted page.
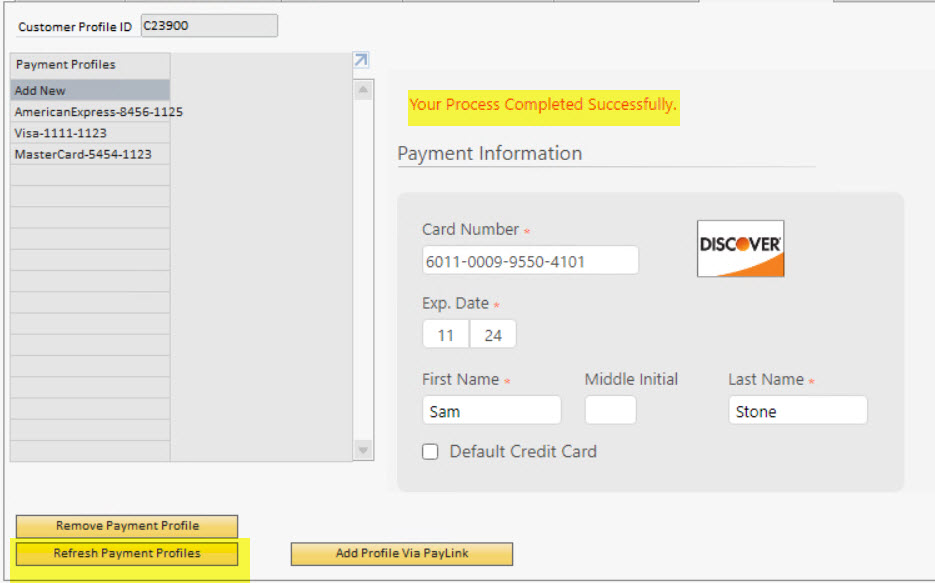
- Clicking the Refresh Payment Porfiles button at the bottom left of the tab will refresh the profiles list to display the new payment profile associated with the business partner.
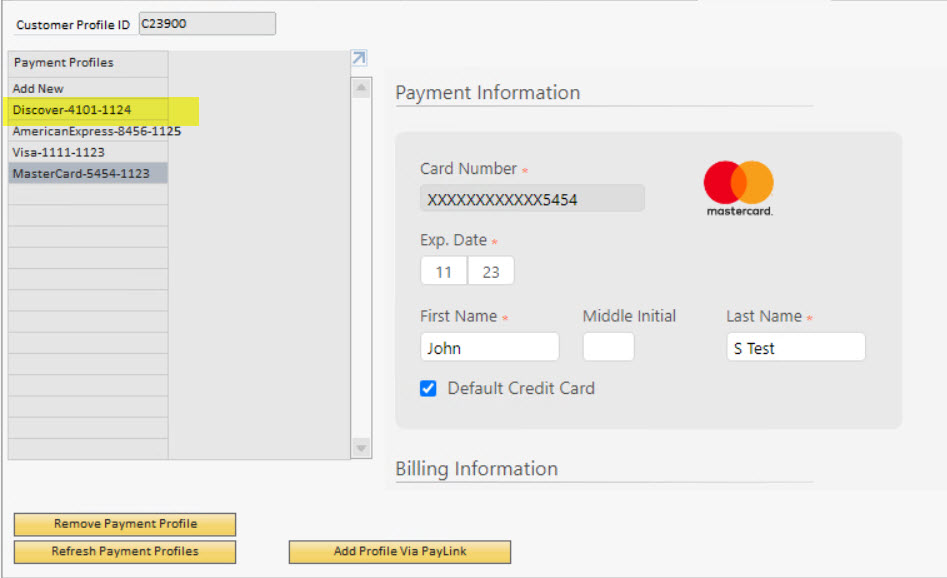
- The new payment profile will be listed and can be selected to display data.
How To Create a Customer Profile for a Business Partner - Other gateways
- Click the Business Partner Master Data menu option under the Business Partner menu to load the Business Partner Master Data screen.
- Load the existing Business Partner that you want to create the profile for.
You cannot create customer or payment profiles at the same time that you are adding a new business partner. Profiles can only be created on an existing business partner record. You can add multiple new payment profiles at the same time.
- Click the Credit Card tab
- Select an option from the Gateway Profiles drop down.
Selection of the gateway profile will populate the tab with fields for card data entry based on the gateway assigned to the profile.
Selection of an Authorize.Net, CyberSource, or PayEezy gateway profile from the Gateway Profiles drop down will load SAP B1 UI controls on the tab.
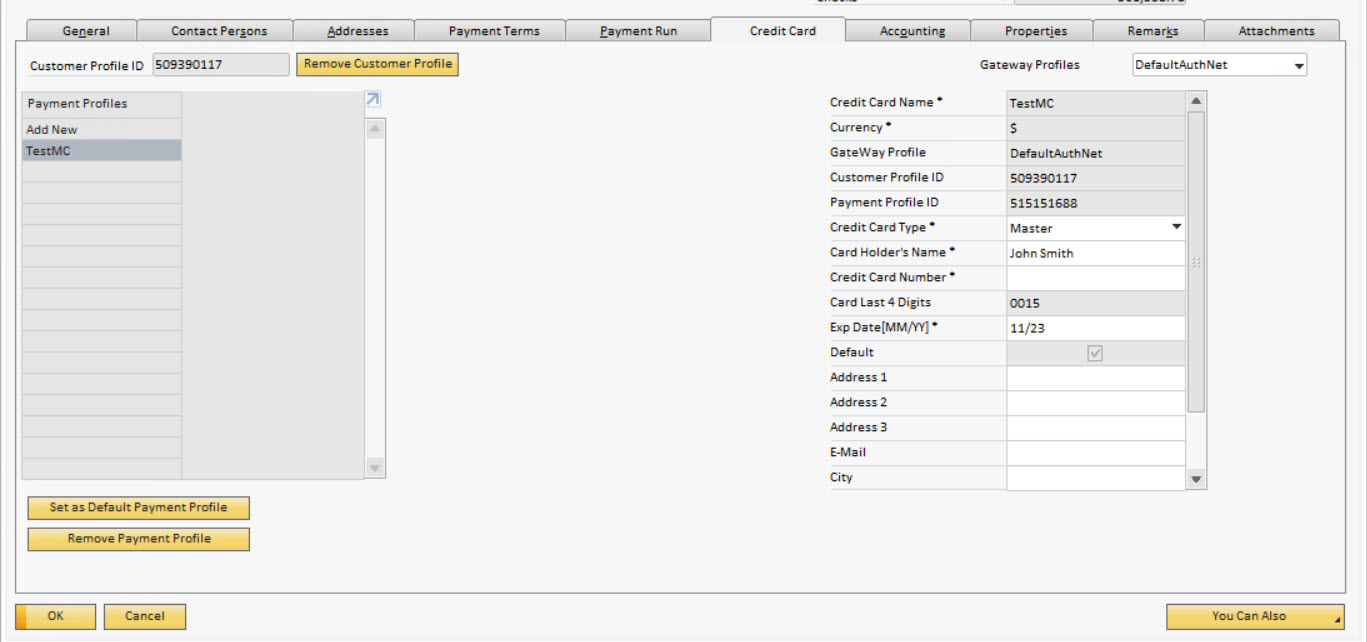
If the customer does not already have a profile ID # associated with them at the gateway, one will be automatically created for them during the process of adding the first payment profile for the business partner. Please refer to the How To Add a Business Partner Payment Profile page of the user guide.
Payment Profiles on the gateway account will be listed in the matrix. The data for the default card will be displayed in the fields on the right hand side of the tab.
- Click the Add New option in the payment profiles listing on the left side of the tab. This will clear the fields on the right side of the tab to allow for the entry of the card information.
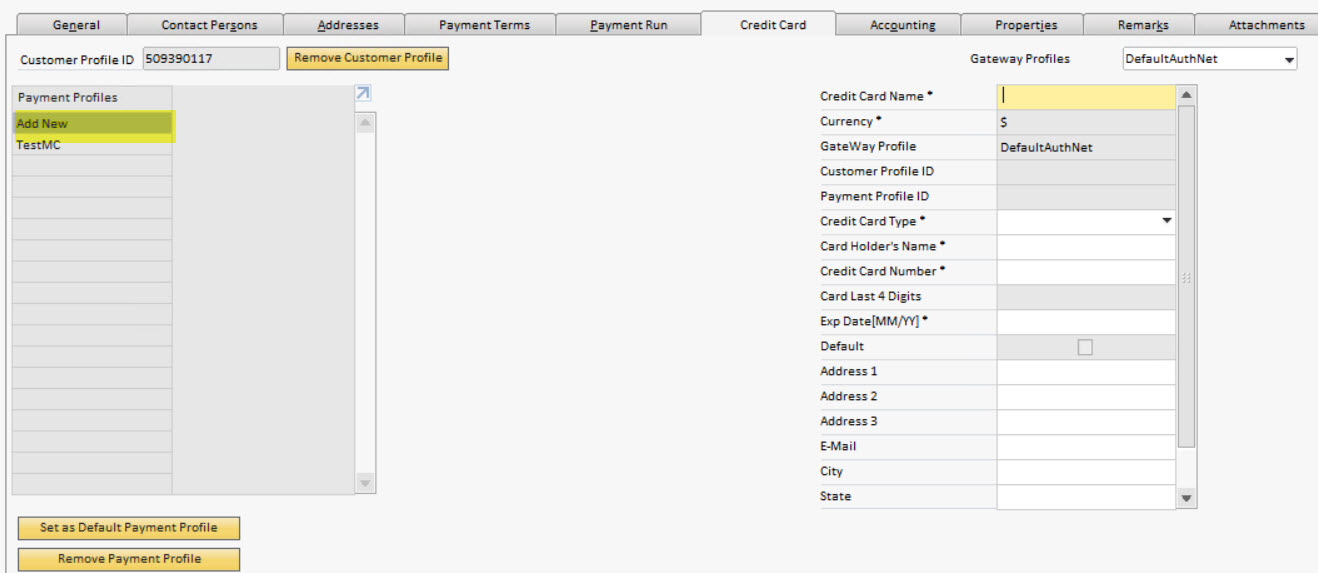
- Enter the data in the required and optional fields as needed. Required fields will be marked with an asterisk (*).
- When you've completed the data entry, click the Update button at the bottom of the Business Partner Master Data screen.
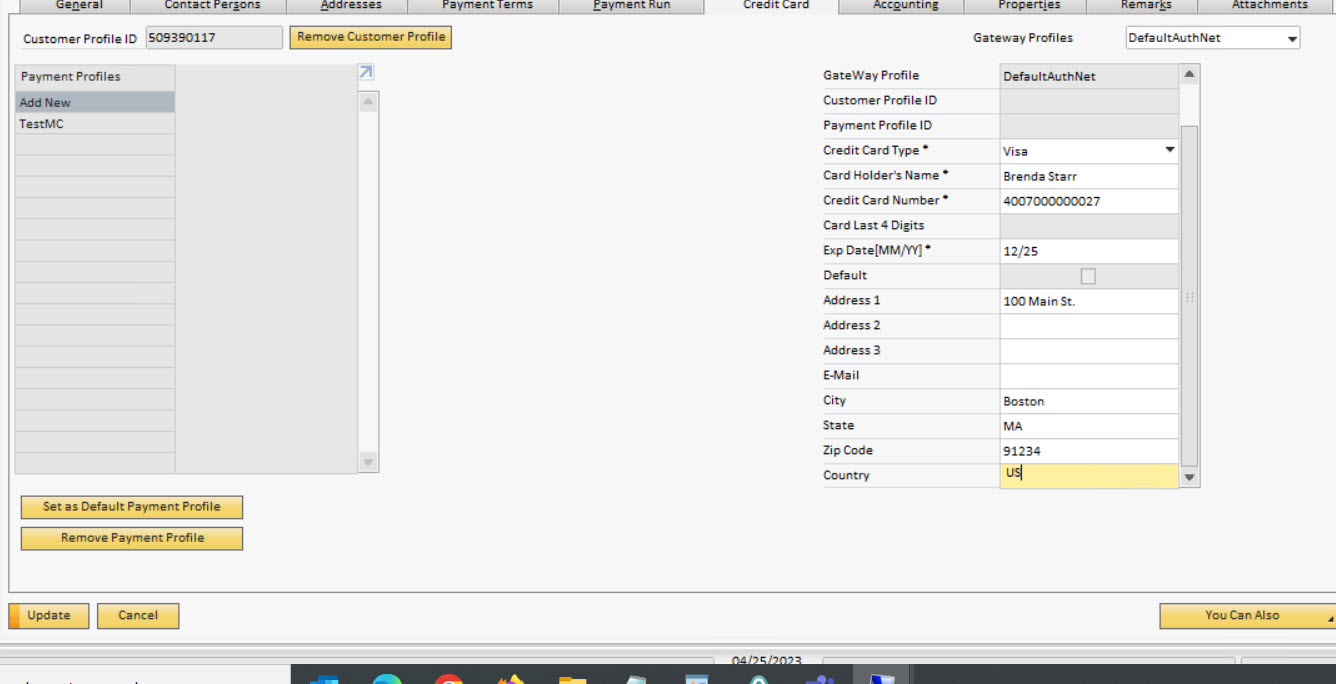
- If the card is successfully added to the gateway account, the new payment profile will be listed and can be selected to display data.
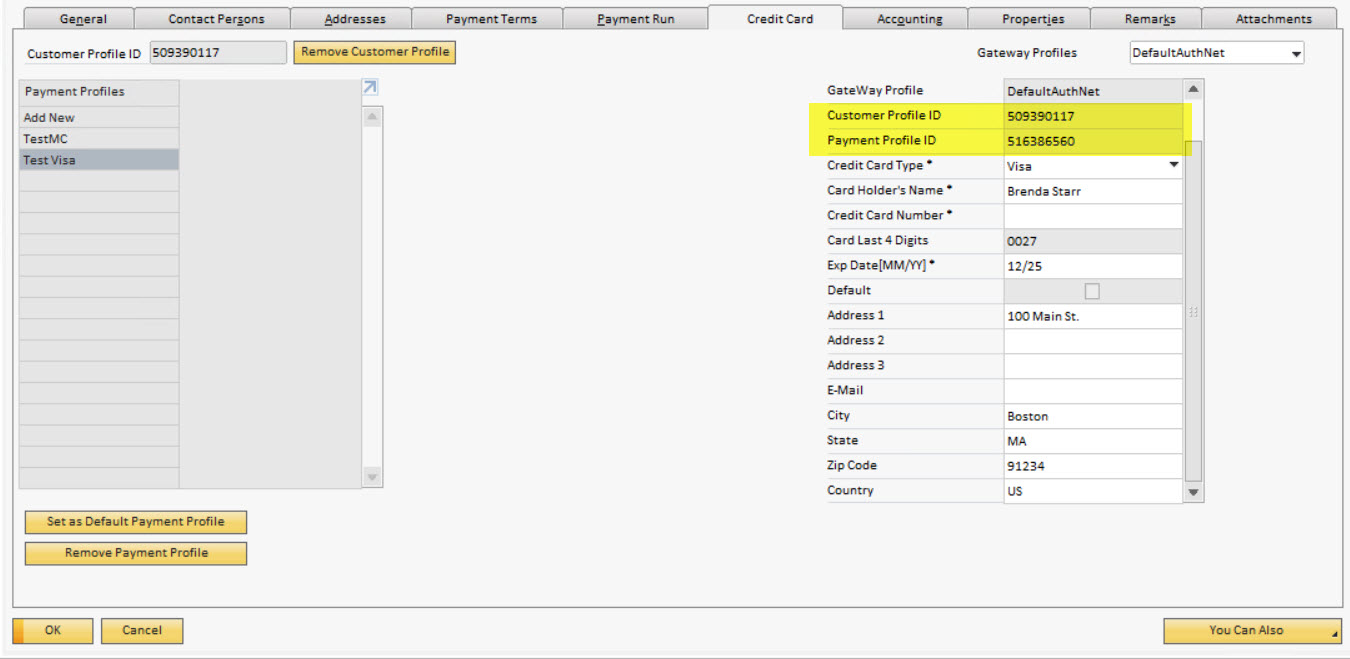
- The Customer Profile ID and Customer Profile ID fields will display the identifying information for the payment profile on the gateway account.
How To Update Payment Profile - EVO/PayFabric gateway
- Click the Business Partner Master Data menu option under the Business Partner menu to load the Business Partner Master Data screen.
- Load the existing Business Partner that you want to update the profile for.
- Click the Credit Card tab
- Select an option from the Gateway Profiles drop down.
Selection of the gateway profile will populate the tab with fields for card data entry based on the gateway assigned to the profile.
Selection of an EVO/PayFabric gateway profile from the Gateway Profiles drop down will load a secure hosted page on the tab. This hosted page is directly linked to the EVO/PayFabric gateway and all data is being entered and saved directly to their system.
The payment profile information for the default card assigned to the business partner will be initially displayed.
Payment Profiles on the gateway account will be listed in the matrix. Payment profiles are listed by card type - last 4 digits of the card - expiration date.
- Select the name of the payment profile you wish to update on the left side of the tab. This will load the data for the selected profile on the hosted page.
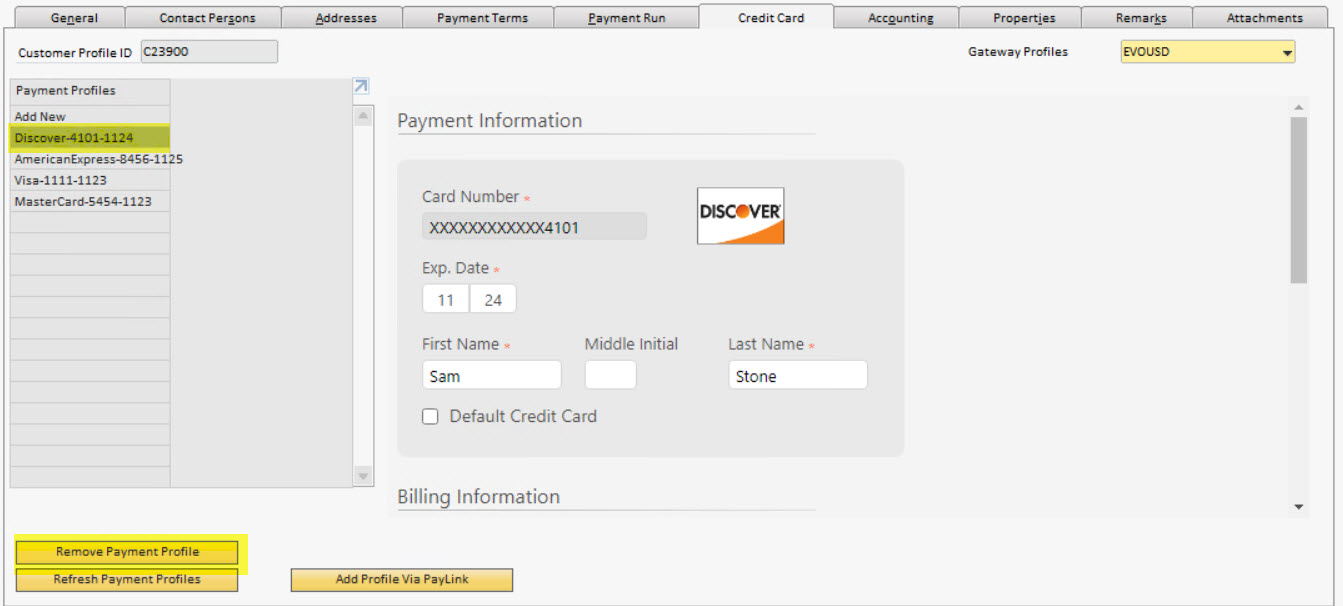
- Update the information for the payment profile in the fields on the hosted page.
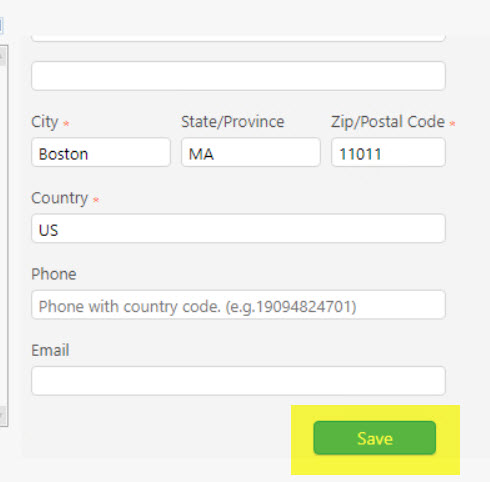
- Click the Save button at the bottom of the hosted page.
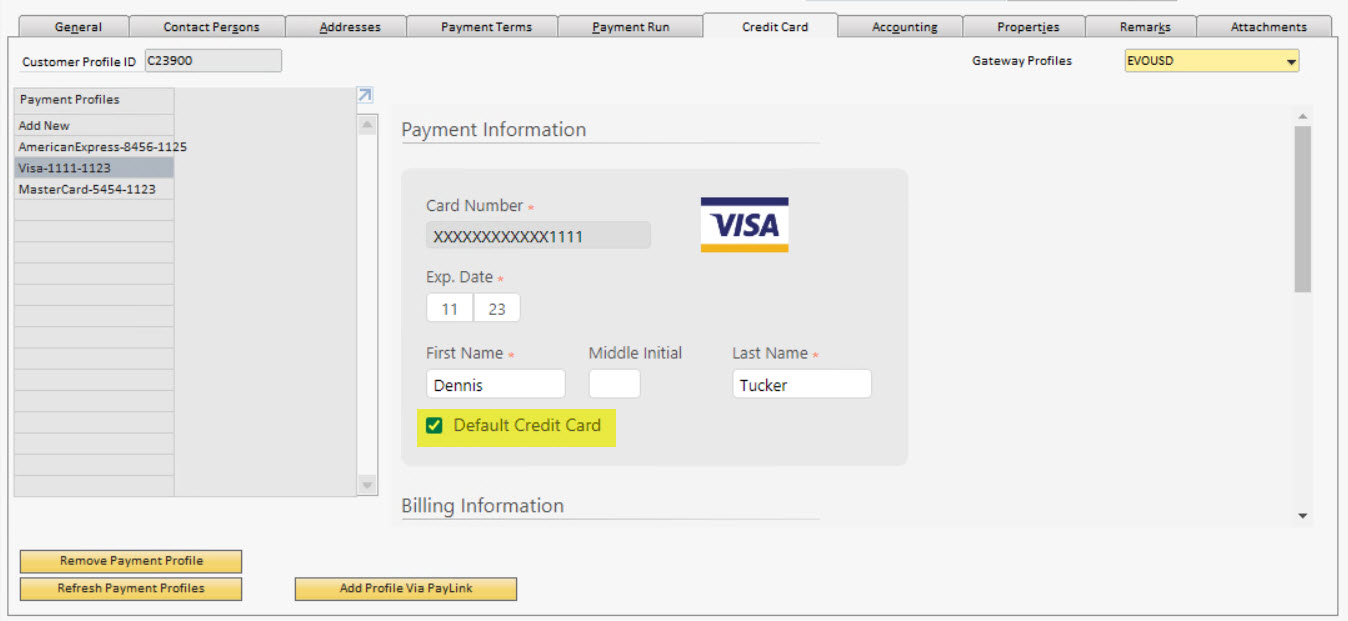
- Click the Refresh Payment Profiles button at the bottom left of the tab.
How To Update Payment Profile - Other gateways
- Click the Business Partner Master Data menu option under the Business Partner menu to load the Business Partner Master Data screen.
- Load the existing Business Partner that you want to update the profile for.
- Click the Credit Card tab
- Select an option from the Gateway Profiles drop down.
Selection of the gateway profile will populate the tab with fields for card data entry based on the gateway assigned to the profile.
Selection of an Authorize.Net, CyberSource, or PayEezy gateway profile from the Gateway Profiles drop down will load SAP B1 UI controls on the tab.
The payment profile information for the default card assigned to the business partner will be initially displayed.
- Select the name of the payment profile you wish toupdate on the left side of the tab. This will load the data for the selected profile in the fields on the right hand side of the tab.
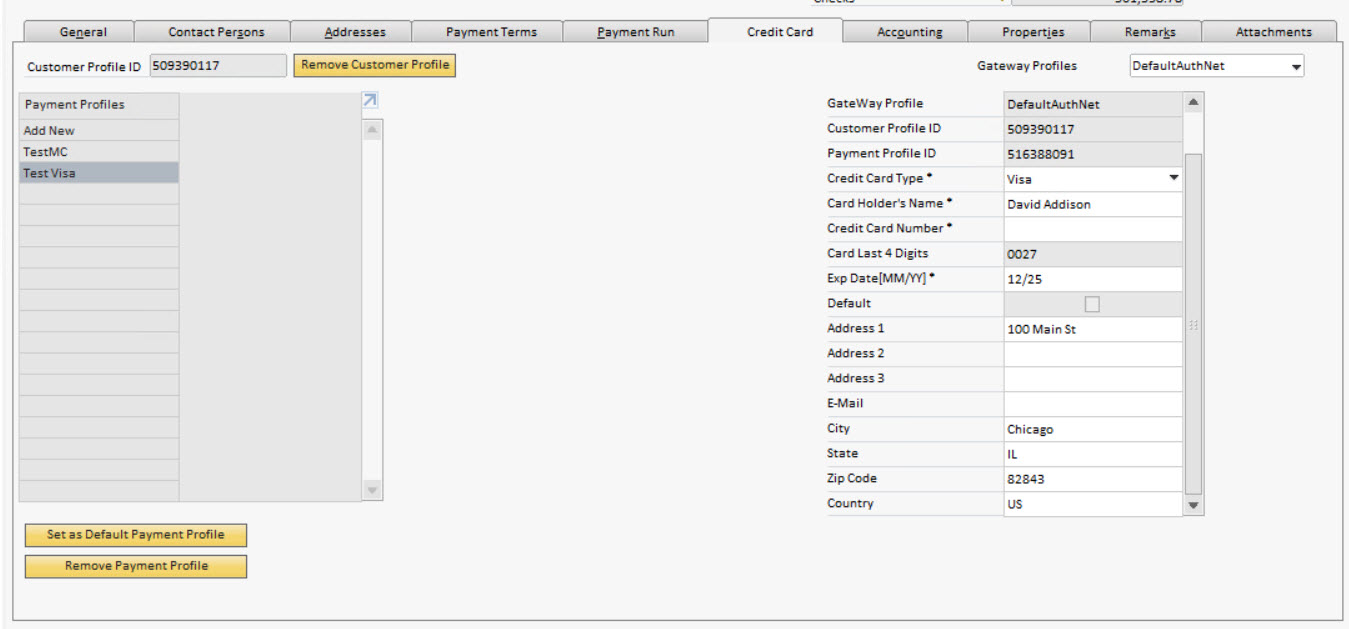
- Update the payment profile information in the fields on the right hand side of the tab.
For the Authorize.Net gateway, in order to update the Card Type, Card Number, or Card Expiration Date fields, the card number will need to be re-entered in order to update the profile information at the gateway.
- Click the Update button on the Business Partner Master Data screen to save the payment profile information on the gateway.
How To Set A Default Business Partner Payment Profile - EVO/Payfabric gateway
- Click the Business Partner Master Data menu option under the Business Partner menu to load the Business Partner Master Data screen.
- Load the existing Business Partner that you want to change the default profile for.
- Click the Credit Card tab
- Select an option from the Gateway Profiles drop down.
Selection of the gateway profile will populate the tab with fields for card data entry based on the gateway assigned to the profile.
Selection of an EVO/PayFabric gateway profile from the Gateway Profiles drop down will load a secure hosted page on the tab. This hosted page is directly linked to the EVO/PayFabric gateway and all data is being entered and saved directly to their system.
The payment profile information for the default card assigned to the business partner will be initially displayed.
Payment Profiles on the gateway account will be listed in the matrix. Payment profiles are listed by card type - last 4 digits of the card - expiration date.
- Select the name of the payment profile you wish to assign as the new default card on the left side of the tab. This will load the data for the selected profile on the hosted page.
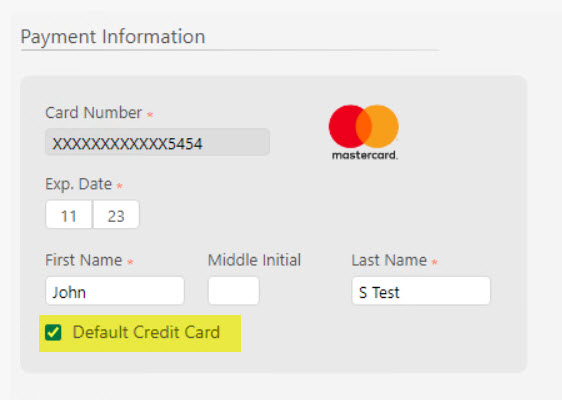
- Click the Default Credit Card checkbox for the selected card on the hosted page.
- Click the Save button at the bottom of the hosted page.
The default payment profile is noted by the Default Credit Card checkbox being selected/checked when viewing the profile information on the hosted page.
How To Set A Default Business Partner Payment Profile - other gateways
- Click the Business Partner Master Data menu option under the Business Partner menu to load the Business Partner Master Data screen.
- Load the existing Business Partner that you want to change the default profile for.
- Click the Credit Card tab
- Select an option from the Gateway Profiles drop down.
Selection of the gateway profile will populate the tab with fields for card data entry based on the gateway assigned to the profile.
Selection of an Authorize.Net, CyberSource, or PayEezy gateway profile from the Gateway Profiles drop down will load SAP B1 UI controls on the tab.
The payment profile information for the default card assigned to the business partner will be initially displayed.
- Select the name of the payment profile you wish to assign as the new default profile on the left side of the tab. This will load the data for the selected profile in the fields on the right hand side of the tab.
- Click the Sat as Default Payment Profile button underneath the Payment Profiles listing.
- Click the Yes button on the confirmation message box.
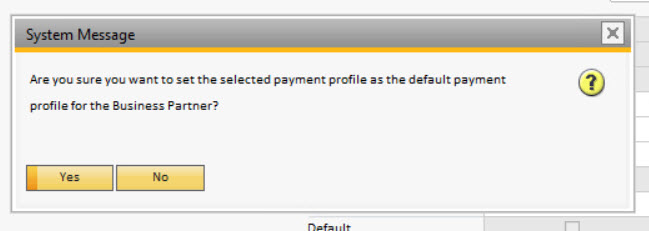
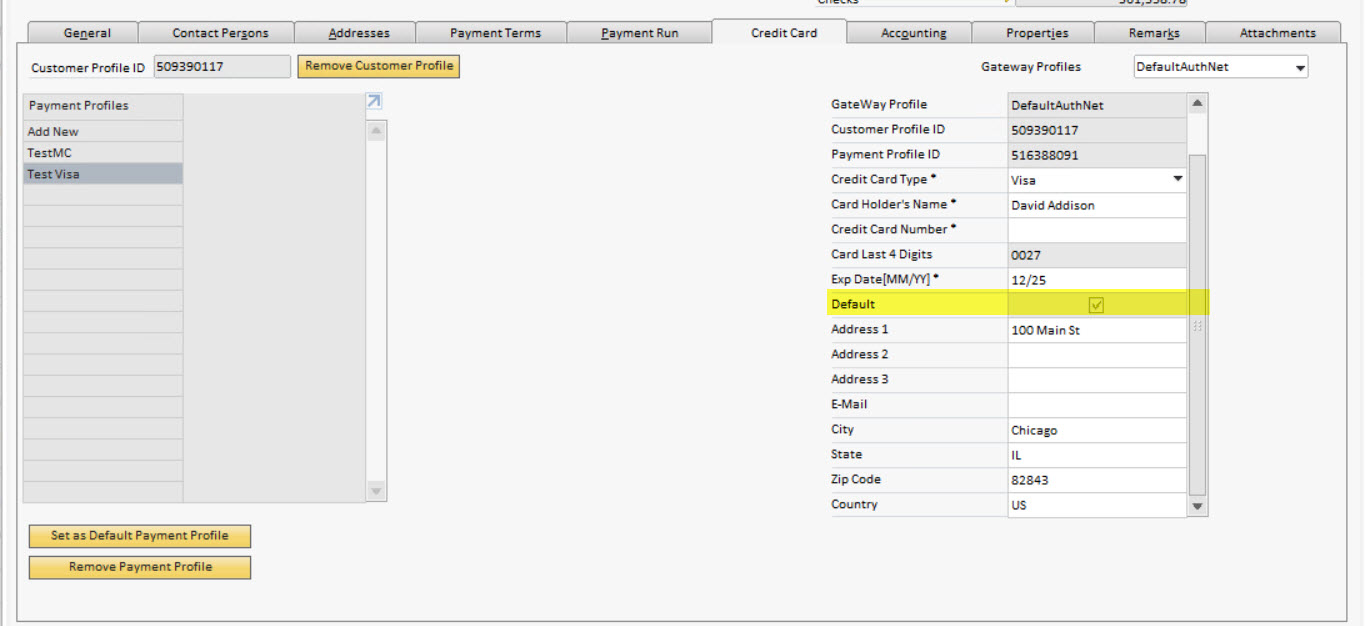
- The gateway payment profile information will refresh automatically and the new default card information will be displayed.
The default payment profile is noted by the default field being selected/checked when viewing the profile information in the right matrix on the Credit Card tab of the Business Partner Master Data screen.
How To Remove a Customer Profile from a Business Partner - EVO/PayFabric gateway
- Click the Business Partner Master Data menu option under the Business Partner menu to load the Business Partner Master Data screen.
- Load the existing Business Partner that you want to remove the profile from.
- Click the Credit Card tab
- Select an option from the Gateway Profiles drop down.
Selection of the gateway profile will populate the tab with fields for card data entry based on the gateway assigned to the profile.
Selection of an EVO/PayFabric gateway profile from the Gateway Profiles drop down will load a secure hosted page on the tab. This hosted page is directly linked to the EVO/PayFabric gateway and all data is being entered and saved directly to their system.
The payment profile information for the default card assigned to the business partner will be initially displayed.
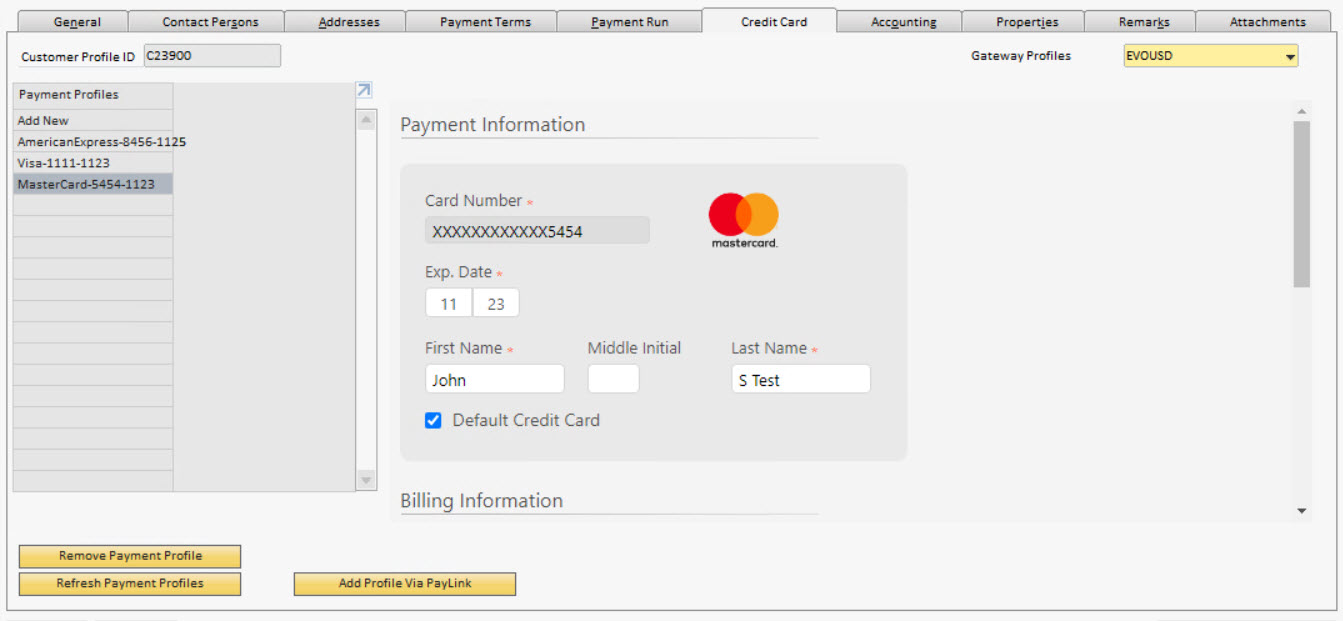
Payment Profiles on the gateway account will be listed in the matrix. Payment profiles are listed by card type - last 4 digits of the card - expiration date.
- Select the name of the payment profile you wish to remove on the left side of the tab. This will load the data for the selected profile on the hosted page.
- Click the Remove Payment Profile button underneath the Payment Profiles listing.
Removal of the payment profile, once confirmed, cannot be reversed. If you remove a payment profile accidentally, you will have to contact the customer and re-enter the information.
- Click the Yes button on the confirmation message box.
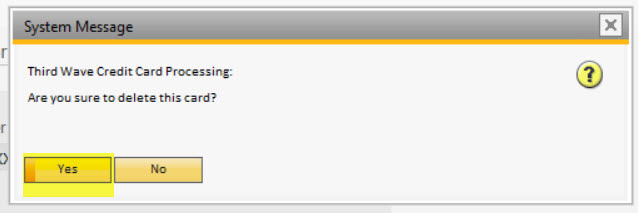
- The gateway payment profile information will refresh automatically and the profile will no longer be available.
How To Remove a Customer Profile from a Business Partner - Other gateways
- Click the Business Partner Master Data menu option under the Business Partner menu to load the Business Partner Master Data screen.
- Load the existing Business Partner that you want to remove the profile from.
- Click the Credit Card tab
- Select an option from the Gateway Profiles drop down.
Selection of the gateway profile will populate the tab with fields for card data entry based on the gateway assigned to the profile.
Selection of an Authorize.Net, CyberSource, or PayEezy gateway profile from the Gateway Profiles drop down will load SAP B1 UI controls on the tab.
The payment profile information for the default card assigned to the business partner will be initially displayed.
- Select the name of the payment profile you wish to remove on the left side of the tab. This will load the data for the selected profile on the hosted page.
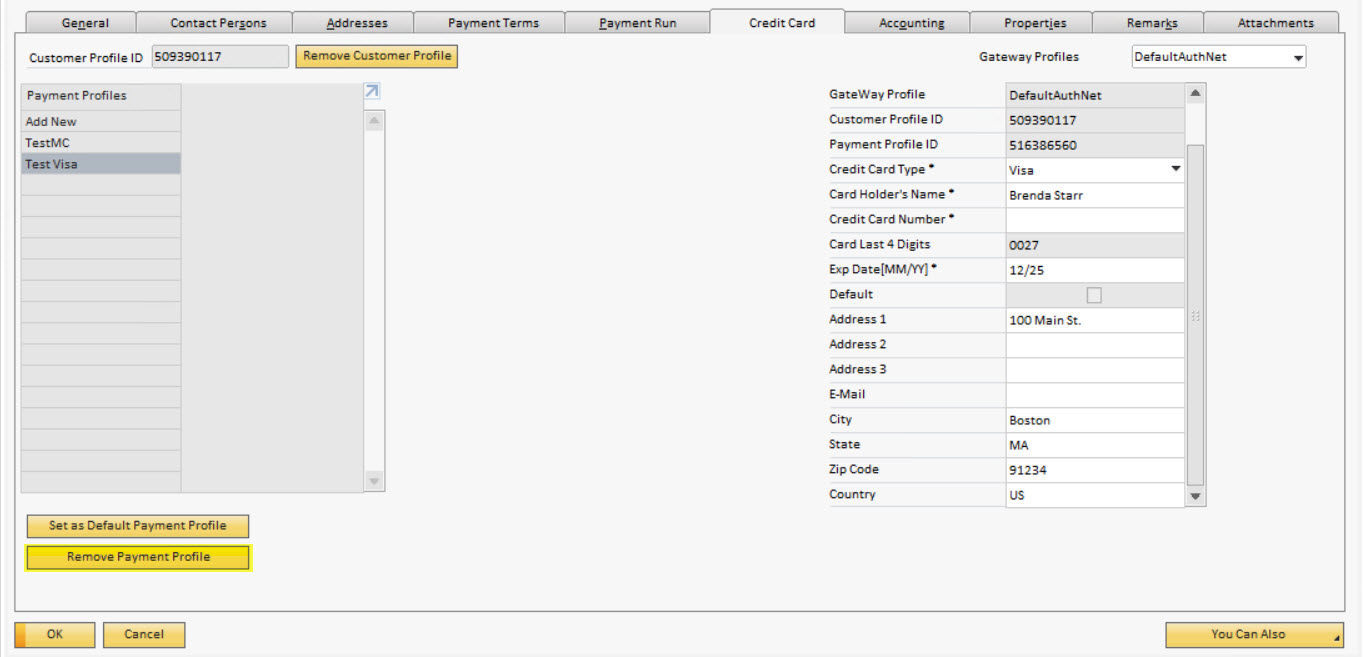
- Click the Remove Payment Profile button underneath the Payment Profiles listing.
Removal of the payment profile, once confirmed, cannot be reversed. If you remove a payment profile accidentally, you will have to contact the customer and re-enter the information.
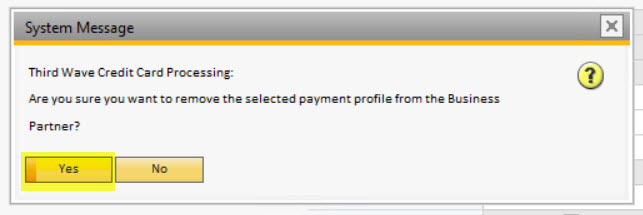
- Click the Yes button on the confirmation message box.
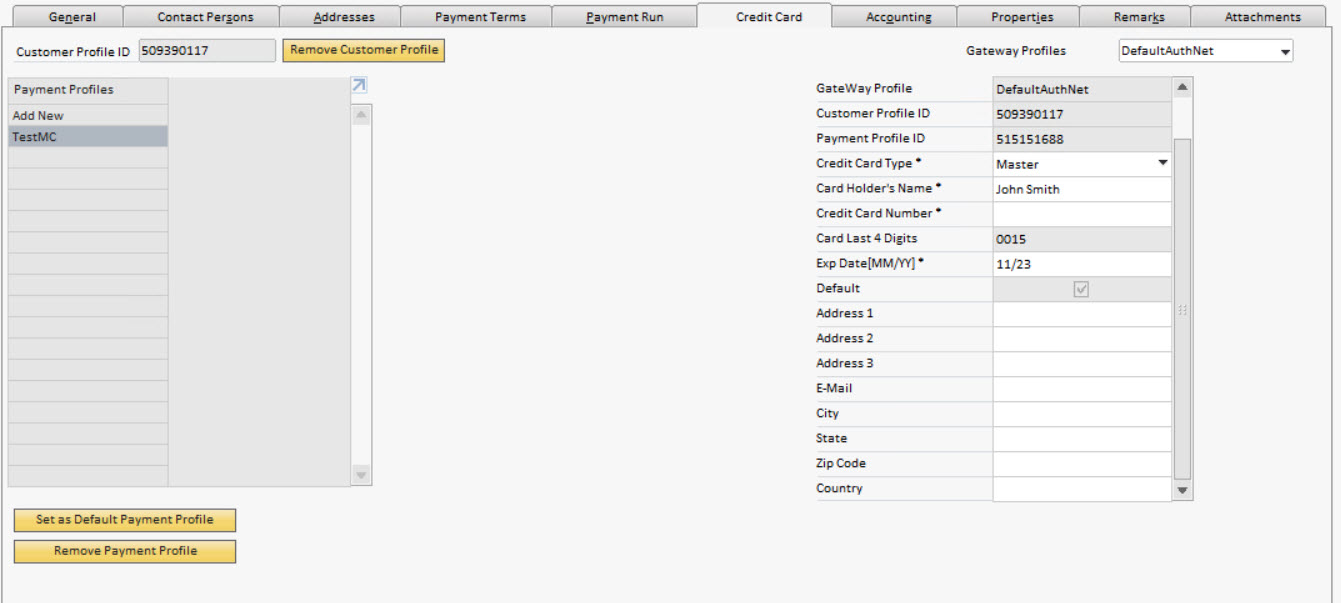
- The gateway payment profile information will refresh automatically and the profile will no longer be available.
How To Update the Business Partner Payment Terms
The TWBS Credit Card Processing application allows for the updating of the Business Partner default Payment Terms code on the Business Partner Master Data record.
Access to the Payment Terms Update Utility screen requires that the user has been assigned sufficient authorization privileges.
- Click the Payment Terms Update Utility menu option under the Administration Setup Banking menu groups to load the Payment Terms Update Utility screen.
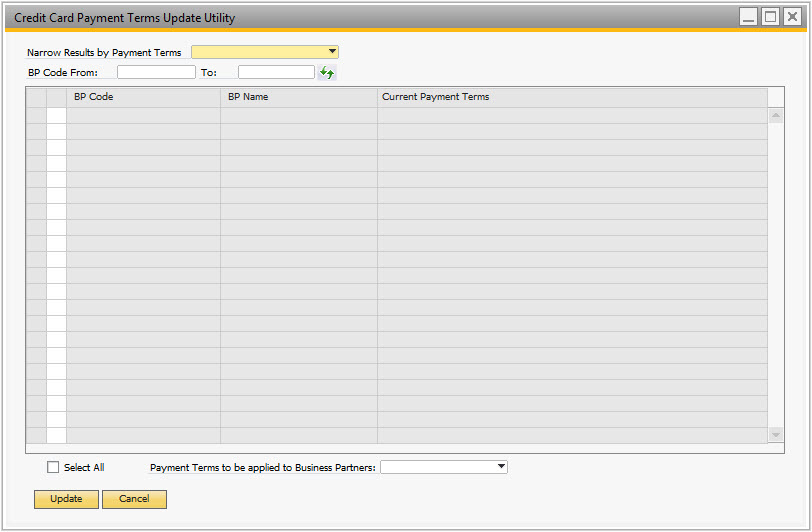
- Select the payment terms code from the Narrow Results by Payment Terms drop down that you want to update Business Partners for.
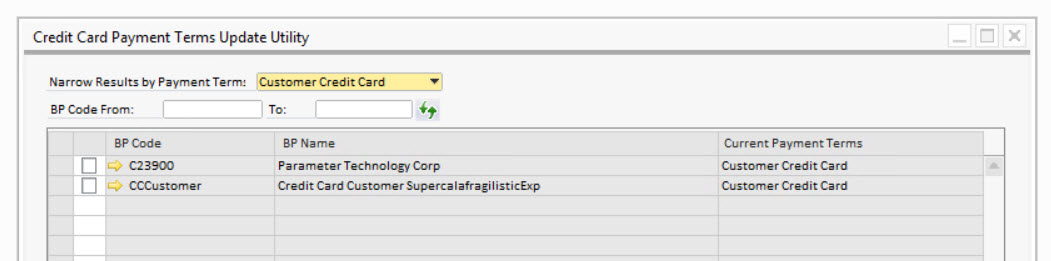
On selection of the Narrow Results by Payment Terms value, the list will display all SAP B1 customers who are assigned to that Payment Terms code.
- Enter a range of Business Partner codes to narrow the data selection (optional).
- Click the refresh button () to load the data for Business Partners to the screen.
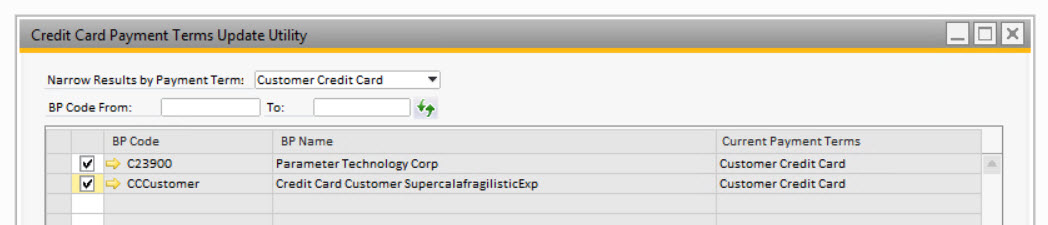
- Select the Business Partners that will have their default Payment Terms code updated.
- Select the payment terms code from the Payment Terms to be Applied to Business Partners drop down.
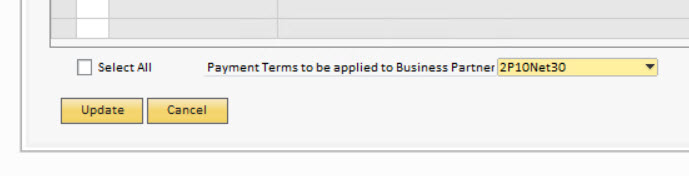
- Click the Update button.
How To Authorize a New Marketing Document
The TWBS Credit Card Processing application will prompt the user for authorization only on documents meeting the criteria entered in SAP® Business One. If an order is imported via the DI API or other external tools, it will be ignored by the application, however these orders can be authorized manually.
- Click the SAP menu option titled Sales Order, Delivery, or A/R Invoice under the Sales-A/R menu to load the appropriate marketing document screen.
- Enter the information for the marketing document.
- Verify that the document you wish to authorize is using the Payment Terms code designated on the TWBS Credit Card processing Credit Card Configuration screen.
- Verify that a value has been selected on the document's TWBS CC Gateway Prodile user defined field.

A TWBS CC Gateway Profile must be selected prior to loading the Credit Card Authorization screen. The TWBS CC Gateway Profile value will determine which payment profiles are available to be selected on the form.
- Click the Add & New, Add & View, or Add & Close button.
- Click the Yes button on the message box prompt.
The authorization level must be activated on the TWBS Credit Card configuration screen in order to be prompted for authorization.
- The Credit Card Authorization screen will load.
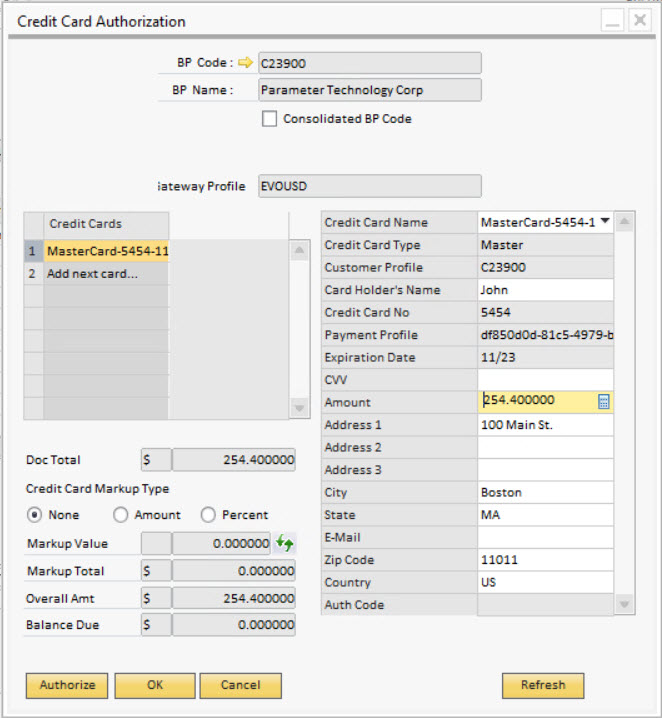
If there is a default credit card selected for the Business Partner of the marketing document, that card's data will be loaded into the Authorization screen. This card can be changed to any other card associated with the Business Partner before authorization.
- Select the business partner's credit card that you wish to authorize by selecting the unique name assigned to the card in the Credit Card Name field on the right side.
- Selection of the Credit Card Name field will populate the Credit Card Authorization screen fields with all the data for that card.
- Enter the amount value for authorization in the Amount field on the right side.
With focus on the Amount field, clicking the “b” key will populate the field with any remaining balance requiring authorization.
- If you want to enter the card security code for the card in question, you can enter it into the CVV Code field on the right side.
The card security code is not required to complete the authorization. The presence of the card security code in the transaction may result in a difference in processing fees for the transaction. Any questions regarding those rates should be directed to the bank behind your gateway processing account.
- Click the Authorize button.
The latest version of the TWBS Credit Card application no longer requires that a document authorization be for the full amount of the document. Partial amount authorizations are allowed.
- Once the authorization is complete, the authorization code from the payment provider will be visible in the Auth Code field at the bottom of the right matrix.

How To Authorize an Existing Marketing Document
The TWBS Credit Card Processing application will prompt the user for authorization only on documents meeting the criteria entered in SAP® Business One. If an order is imported via the DI API or other external tools, it will be ignored by the application, however these orders can be authorized manually.
- Click the SAP menu option titled Sales Order, Delivery, or A/R Invoice under the Sales-A/R menu to load the appropriate marketing document screen.
- Load the existing marketing document.
- Verify that the document you wish to authorize is using the Payment Terms code designated on the TWBS Credit Card processing Credit Card Configuration screen.
- Verify that a value has been selected on the document's TWBS CC Gateway Prodile user defined field.
A TWBS CC Gateway Profile must be selected prior to loading the Credit Card Authorization screen. The TWBS CC Gateway Profile value will determine which payment profiles are available to be selected on the form.
- Select the Credit Card Authorization menu option from the right-click menu on the marketing document screen.
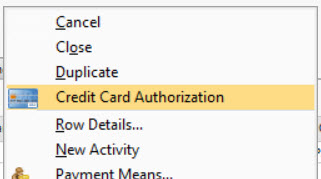
The authorization level must be activated on the Credit Card Configuration screen in order for the right-click menu options to be available.
- The Credit Card Authorization screen will load.
If there is a default credit card selected for the Business Partner of the marketing document, that card's data will be loaded into the Authorization screen. This card can be changed to any other card associated with the Business Partner before authorization.
- Select the business partner's credit card that you wish to authorize by selecting the unique name assigned to the card in the Credit Card Name field on the right side.
- Selection of the Credit Card Name field will populate the Credit Card Configuration screen fields with all the data for that card.
- Enter the amount value for authorization in the Amount field on the right side.
With focus on the Amount field, clicking the “b” key will populate the field with any remaining balance requiring authorization.
- If you want to enter the card security code for the card in question, you can enter it into the CVV Code field on the right side.
The card security code is not required to complete the authorization. The presence of the card security code in the transaction may result in a difference in processing fees for the transaction. Any questions regarding those rates should be directed to the bank behind your gateway processing account.
- Click the Authorize button.
The latest version of the TWBS Credit Card application no longer requires that a document authorization be for the full amount of the document. Partial amount authorizations are allowed.
- Once the authorization is complete, the authorization code from the payment provider will be visible in the Auth Code field at the bottom of the right matrix.
How To Batch Authorize Marketing Documents
TWBS Credit Card Processing creates a screen through the SAP® Business One User Interface (UI) that allows for the authorizing of multiple documents at one time with the payment terms code specified in the Credit Card Configuration screen that have not been fully authorized.
Document partial amount authorization functionality is not available on the Batch Authorization screen.
Multiple card authorization functionality is not available on the Batch Authorization screen.
Markup editing functionality is not available. Sales Orders and Delivery Notes authorized through the Batch Authorization screen will include the default Markup type and value.
In order to chose a document and card for authorization, the document must have a TWBS CC Gateway Profile value selected prior to loading the Batch Authorization screen. The GW Profile value on the document line will determine which payment profiles are available to be selected for authorization.
- Click the Batch Authorization menu option under the Banking Incoming Payments TWBS Credit Card Processing menu groups to load the Batch Authorization screen.
Tabs of each document type will only be displayed on the screen if the authorization level is activated on the Credit Card Configuration screen.
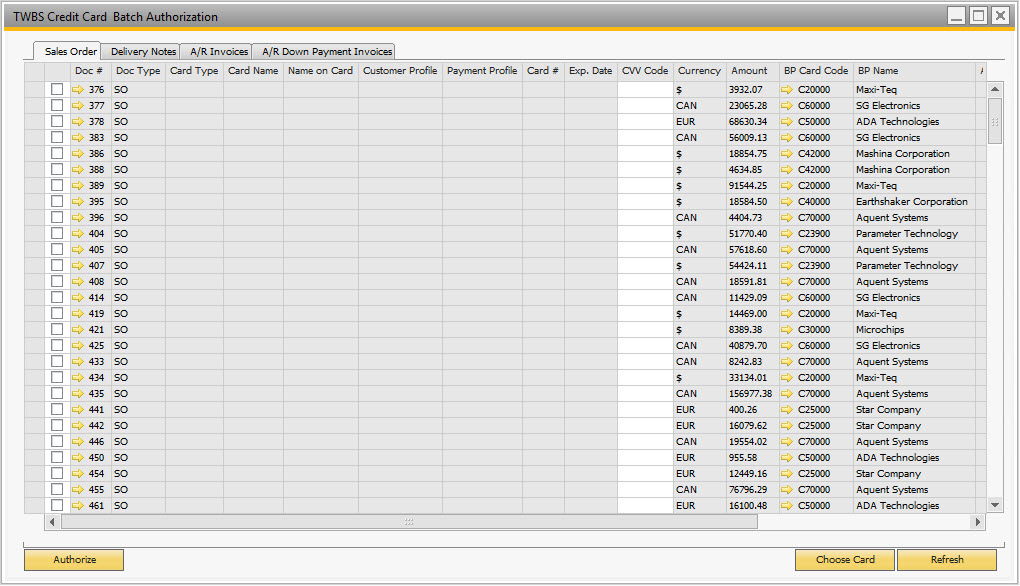
- Click on the Sales Order tab.
- Click the checkbox to the left of the Sales Order document # that you want to authorize.
- Click the Choose Card button to launch the screen which lists the credit cards associated with the business partner/gateway account of the selected so that a card may be chosen for the authorization.
- Select the credit card associated with the business partner/gateway account that you want to use for the authorization. Highlight the row and click the OK button.
- The data for the selected credit card will be populated to the Batch Authorization screen fields.
- Repeat this process for each Sales Order you want to authorize.
- Click on the Delivery Notes tab.
- Click the checkbox to the left of the Delivery Note document # that you want to authorize.
- Click the Choose Card button to launch the screen which lists the credit cards associated with the business partner/gateway account of the selected so that a card may be chosen for the authorization.
- Select the credit card associated with the business partner/gateway account that you want to use for the authorization. Highlight the row and click the OK button.
- The data for the selected credit card will be populated to the Batch Authorization screen fields.
- Repeat this process for each Sales Order you want to authorize. * Repeat this process for each Delivery Note you want to authorize.
- Click on the A/R Invoices tab.
- Click the checkbox to the left of the Invoice document # that you want to authorize.
- Click the Choose Card button to launch the screen which lists the credit cards associated with the business partner/gateway account of the selected so that a card may be chosen for the authorization.
- Select the credit card associated with the business partner/gateway account that you want to use for the authorization. Highlight the row and click the OK button.
- The data for the selected credit card will be populated to the Batch Authorization screen fields.
- Repeat this process for each Sales Order you want to authorize. * Repeat this process for each Invoice you want to authorize.
- Click on the A/R Down Payment Invoices tab.
- Click the checkbox to the left of the Down Payment Invoice document # that you want to authorize.
- Click the Choose Card button to launch the screen which lists the credit cards associated with the business partner/gateway account of the selected so that a card may be chosen for the authorization.
- Select the credit card associated with the business partner/gateway account that you want to use for the authorization. Highlight the row and click the OK button.
- The data for the selected credit card will be populated to the Batch Authorization screen fields.
- Repeat this process for each Sales Order you want to authorize. * Repeat this process for each Down Payment Invoice you want to authorize.
- Click the Authorize button.
How To View an Existing Card Authorization - Authorization Screen
- Click the Batch Authorization menu option under the Banking Incoming Payments TWBS Credit Card Processing menu groups to load the Batch Authorization screen.
- Load the document with the authorization that you want to view.
- Select the Credit Card Authorization menu option from the right-click menu on the marketing document screen.
- The authorization information will be visible on the screen.
- Click the OK button.
How To View an Existing Card Authorization - Credit Card Log Tab
- Click the Batch Authorization menu option under the Banking Incoming Payments TWBS Credit Card Processing menu groups to load the Batch Authorization screen.
- Load the document with the authorization that you want to view.
- Click the Credit Card Log tab on the marketing document screen.
- The authorization information will be visible on the tab.
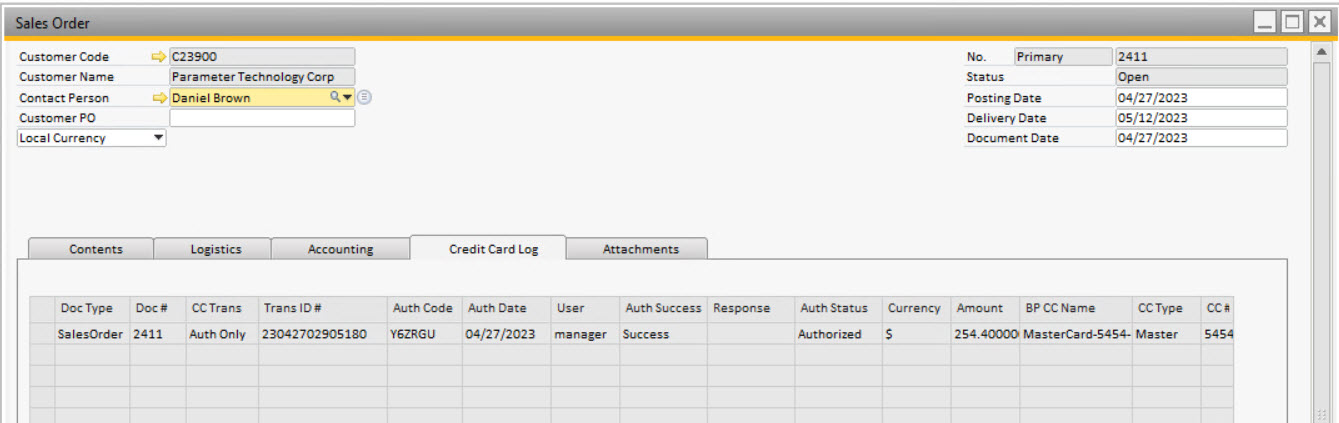
- Click the OK button.
How To Manually Void All Open Document Authorizations - Right Click from Document Screen
- Click the SAP menu option titled Sales Order, Delivery, or A/R Invoice under the Sales-A/R menu to load the appropriate marketing document screen.
- Load the existing marketing document with the payment authorization.
- Select the Void Open Authorizations menu option from the right-click menu on the marketing document screen.
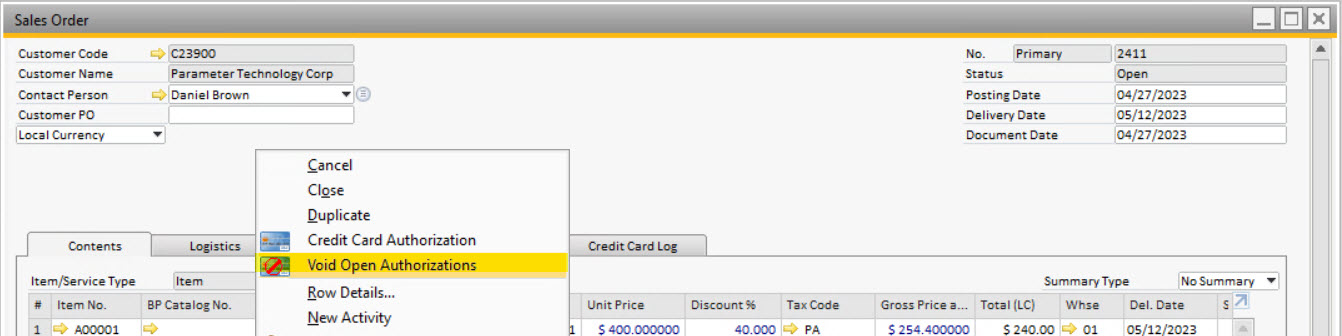
- Click the Yes button on the message box prompt confirming you want to void all existing open authorizations for the document.
Once confirmed, the voiding of all open authorizations against the document will be transmitted to the credit card payment gateway. This process cannot be undone or reversed.
- Void of the authorizations on the document will be listed on the Credit Card Log tab once the document data has been refreshed.
How To Manually Void All Open Document Authorizations - Right Click from Authorization Screen
- Click the SAP menu option titled Sales Order, Delivery, or A/R Invoice under the Sales-A/R menu to load the appropriate marketing document screen.
- Load the existing marketing document with the payment authorization.
- Select the Credit Card Authorization menu option from the right-click menu on the marketing document screen.
- Select the Credit Card entry from the left side grid for the authorization that you want to void.
- The data for the authorization will load in the fields on the right side.
- Right click on the # area to the left of the Credit Card name.
- Select the Void All Authorizations menu option from the right-click menu on the the Credit Card Authorization screen.
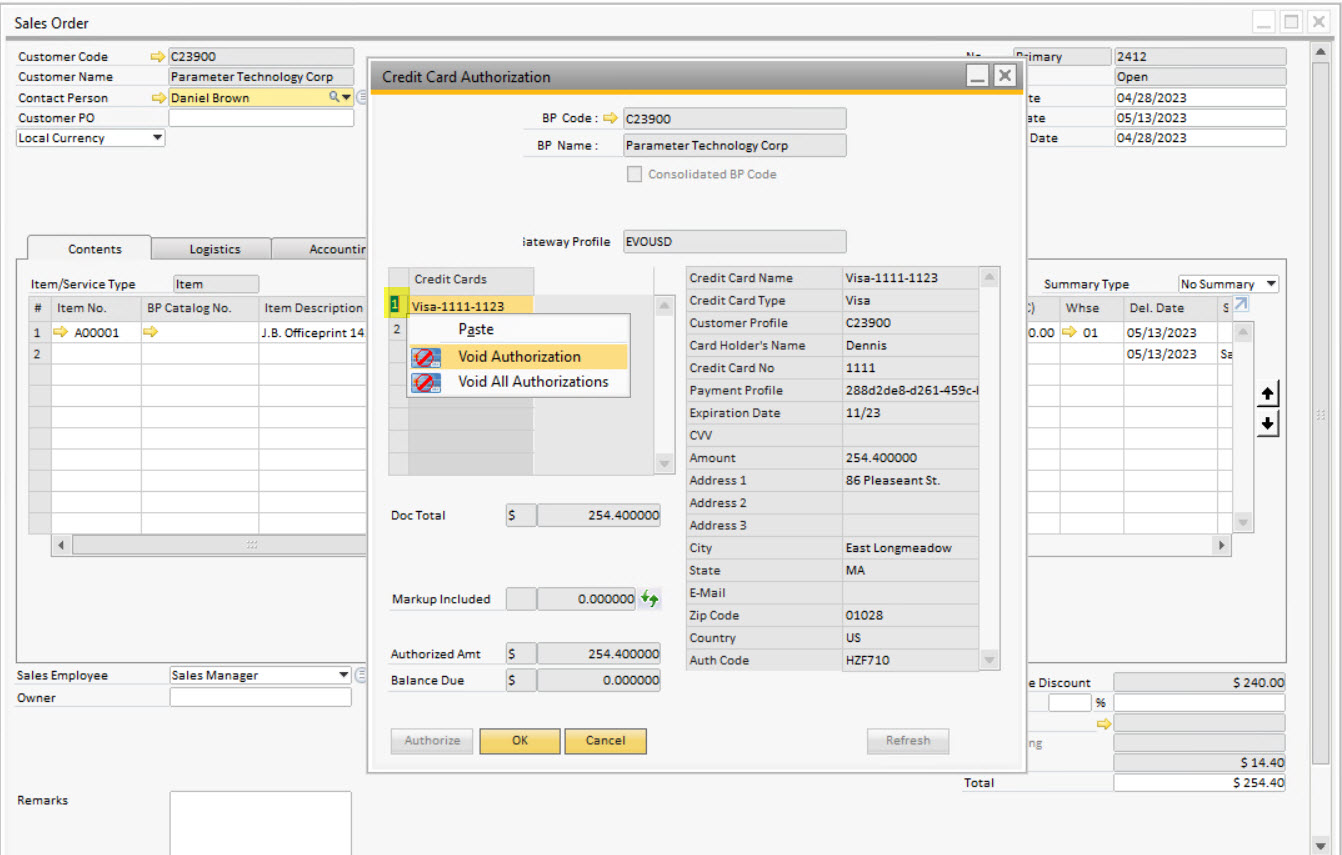
- Click the Yes button on the message box prompt confirming you want to void all existing open authorizations for the document.
Once confirmed, the voiding of all open authorizations against the document will be transmitted to the credit card payment gateway. This process cannot be undone or reversed.
- Void of the authorizations on the document will be listed on the Credit Card Log tab once the document data has been refreshed.
How To Manually Void A Single Document Authorization - Right Click from Authorization Screen
- Click the SAP menu option titled Sales Order, Delivery, or A/R Invoice under the Sales-A/R menu to load the appropriate marketing document screen.
- Load the existing marketing document with the payment authorization.
- Select the Credit Card Authorization menu option from the right-click menu on the marketing document screen.
- Select the Credit Card entry from the left side grid for the authorization that you want to void.
- The data for the authorization will load in the fields on the right side.
- Right click on the # area to the left of the Credit Card name.
- Select the Void Authorization menu option from the right-click menu on the the Credit Card Authorization screen.
- Click the Yes button on the message box prompt confirming you want to void all existing open authorizations for the document.
Once confirmed, the voiding of all open authorizations against the document will be transmitted to the credit card payment gateway. This process cannot be undone or reversed.
- Void of the authorizations on the document will be listed on the Credit Card Log tab once the document data has been refreshed.
How To Void All Open Document Authorizations - Cancelling Sales Order
- Click the SAP menu option titled Sales Order under the Sales-A/R menu to load the Sales Order marketing document screen.
- Load the existing Sales Order data for the document with the payment authorization(s).
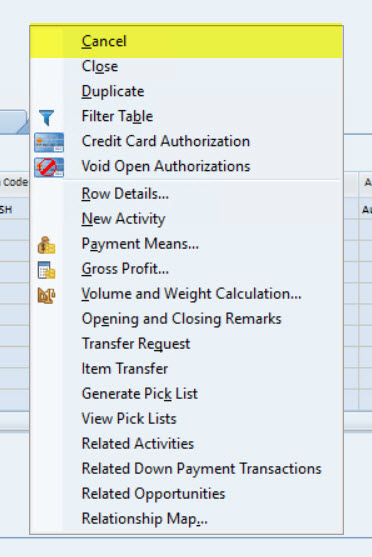
- Select the Cancel menu option from the right-click menu on the marketing document screen.
- Click the Yes button on the message box prompt to confirm voiding of the existing open authorizations.
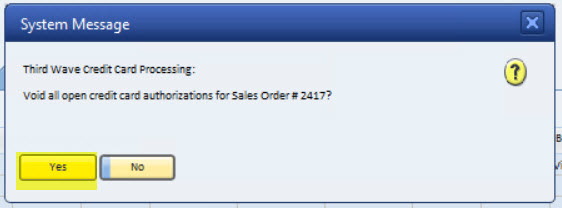
- Click the Yes button on the message box prompt to confirm cancellation of the Sales Order.
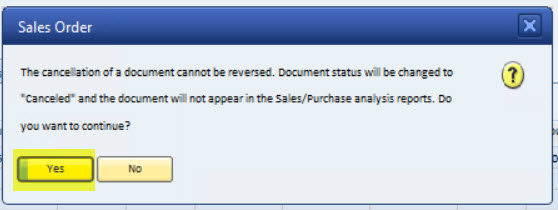
- Voiding of the authorizations applied to the Sales Order can be viewed by loading the Sales Order into the screen and clicking on the Credit Card Log tab.

How To Void All Open Document Authorizations - Closing Sales Order
- Click the SAP menu option titled Sales Order under the Sales-A/R menu to load the Sales Order marketing document screen.
- Load the existing Sales Order data for the document with the payment authorization(s).
- Select the Close menu option from the right-click menu on the marketing document screen.
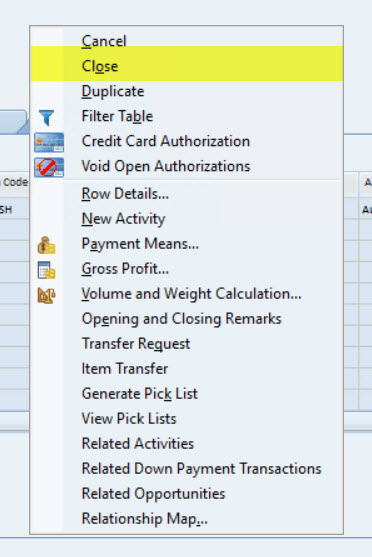
- Click the Yes button on the message box prompt to confirm voiding of the existing open authorizations.
- Click the Yes button on the message box prompt to confirm cancellation of the Sales Order.
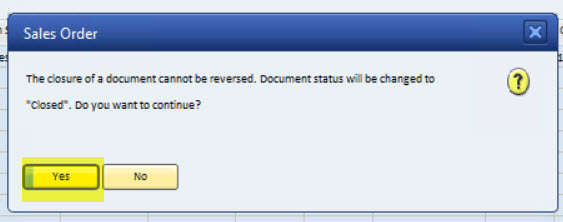
- Voiding of the authorizations applied to the Sales Order can be viewed by loading the Sales Order into the screen and clicking on the Credit Card Log tab.
How To Authorize an A/R Down Payment Invoice
The TWBS Credit Card Processing application enables the user to authorize or directly charge a credit card through the SAP® Business One A/R Down Payment Invoice marketing document. This can be used to link a down payment directly to a Sales Order/Invoice or to place an unlinked down payment against the Business Partner for application to any Invoice the user chooses associated with that partner.
Authorizations and direct charges performed against A/R Down Payment Invoices are not accounted for when authorizations are performed against Sales Orders, Delivery Notes, or A/R Invoices. Authorizing these documents will be in addition to any authorizations or charges applied as down payments. Once the down payment is applied to the A/R Invoice, the Invoice will be settled against the outstanding authorization(s) only for the remaining balance due on the Invoice.
If you are authorizing or charging against the A/R Down Payment Invoice, it is recommended that the Sales Order and any other documents created from the Order not be coded to the SAP B1 payment terms code assigned for TWBS Credit Card processing. This will prevent the users from being prompted for additional authorizations.
The unlinking of any automatically applied down payments or the failure to manually apply any unlinked down payments cannot be adjusted once the A/R Invoice has been added to the SAP® Business One system.
How To Authorize a Down Payment Invoice
The TWBS Credit Card Processing application will facilitate the authorization of the SAP® Business One A/R Down Payment Invoice marketing document as a way to apply a partial payment in the form of a down payment. This can be performed for both Down Payment Invoices linked to a Sales Order or Down Payment Invoices which are not linked and will be associated with the Business Partner.
How To Authorize Linked to a Sales Order - Authorize the Business Partner credit card and associate the Down Payment Invoice with a Sales Order. Once the Down Payment Invoice authorization has been settled and an Incoming Payment created, the down payment will be automatically applied when the order is moved to an A/R Invoice in SAP® Business One. How To Authorize Unlinked on the Business Partner - Authorize the Business Partner credit card and associate the Down Payment Invoice with the partner. Once the Down Payment Invoice authorization has been settled and an Incoming Payment created, the down payment can be manually applied when the order is moved to an A/R Invoice in SAP® Business One. Warning – Authorizations and direct charges performed against Down Payment Invoices are not accounted for when authorizations are performed against Sales Orders, Delivery Notes, or A/R Invoices. Authorizing these documents will be in addition to any authorizations or charges applied as down payments. Once the down payment is applied to the A/R Invoice, the Invoice will be settled against the outstanding authorization(s) only for the remaining balance due on the Invoice. The unlinking of any automatically applied down payments or the failure to manually apply any unlinked down payments cannot be adjusted once the A/R Invoice has been added to the SAP® Business One system.
Warning – The TWBS Credit Card Processing application should only be used for authorizing documents set to use the SAP® Business One defined local currency code.
How To Authorize Linked to a Sales Order
The TWBS Credit Card Processing application will facilitate the authorization of the SAP® Business One A/R Down Payment Invoice marketing document as a way to apply a partial payment in the form of a down payment.
Authorizing the Business Partner credit card and associating the Down Payment Invoice with a Sales Order allows the down payment will be automatically applied when the order is moved to an A/R Invoice in SAP® Business One. The authorization must be settled and an Incoming Payment created before this automatic application will occur.
Warning – The TWBS Credit Card Processing application should only be used for authorizing documents set to use the SAP® Business One defined local currency code.
Warning – Authorizations and direct charges performed against Down Payment Invoices are not accounted for when authorizations are performed against Sales Orders, Delivery Notes, or A/R Invoices. Authorizing these documents will be in addition to any authorizations or charges applied as down payments. Once the down payment is applied to the A/R Invoice, the Invoice will be settled against the outstanding authorization(s) only for the remaining balance due on the Invoice. The unlinking of any automatically applied down payments or the failure to manually apply any unlinked down payments cannot be adjusted once the A/R Invoice has been added to the SAP® Business One system.
Click the Sales Order menu option under the Sales - A/R menu to load the Sales Order screen. Enter the information for the Sales Order. Verify that the Sales Order is using the Payment Terms code designated on the TWBS Credit Card processing configuration screen. Click the Add button on the Sales Order screen.
Click the Copy To button on the bottom right of the Sales Order screen and select the A/R Down Payment option to copy the Sales Order information to an A/R Down Payment Invoice. The screen will launch automatically.
Change the Down Payment % (highlighted in yellow above) to the % of the Sales Order that you wish to charge as a down payment. Click the Add button.
Click the Yes button on the message box prompt. Note – The authorization level must be activated on the TWBS Credit Card Processing configuration screen in order to be prompted for authorization.
The Credit Card Authorization screen will load. Note – If there is a default credit card selected for the Business Partner of the marketing document, that card's data will be loaded into the Authorization screen. This card can be changed to any other card associated with the Business Partner before authorization.
Select the Business Partner's credit card that you wish to authorize. Selection of a card will pre-populate the Authorization screen fields with all data from the Business Partner Master Data screen's Credit Card tab for that card. Edit or enter any information required before authorization. You will need to enter the amount value for authorization. Tip – With focus on the amount field, clicking the b key will populate the field with any remaining balance requiring authorization.
Click the Authorize button. Warning – You must authorize the entire Overall Amount of the marketing document.
Once the authorization is complete, the Authorization Code from the payment provider will be viewable at the bottom of the right matrix. Note – Authorizations for Down Payment Invoices must be settled and paid either through the TWBS Credit Card Batch Processing screen or the SAP® Business One Incoming Payment screen before they can be automatically linked or manually applied to an A/R Invoice. For more information on the process of settling the authorization and creating the Incoming Payment, refer to the How To Settle Credit Card Authorizations section of the User Guide.
How To Authorize Unlinked on the Business Partner
The TWBS Credit Card Processing application will facilitate the authorization of the SAP® Business One A/R Down Payment Invoice marketing document as a way to apply a partial payment in the form of a down payment. This can be performed for both Down Payment Invoices linked to a Sales Order or Down Payment Invoices which are not linked and will be associated with the Business Partner.
Authorize the Business Partner credit card and associate the Down Payment Invoice with the partner allows the down payment to be manually applied when the order is moved to an A/R Invoice in SAP® Business One. The authorization must be settled and an Incoming Payment created before this manual application can occur.
Warning – The TWBS Credit Card Processing application should only be used for authorizing documents set to use the SAP® Business One defined local currency code.
Warning – Authorizations and direct charges performed against Down Payment Invoices are not accounted for when authorizations are performed against Sales Orders, Delivery Notes, or A/R Invoices. Authorizing these documents will be in addition to any authorizations or charges applied as down payments. Once the down payment is applied to the A/R Invoice, the Invoice will be settled against the outstanding authorization(s) only for the remaining balance due on the Invoice. The unlinking of any automatically applied down payments or the failure to manually apply any unlinked down payments cannot be adjusted once the A/R Invoice has been added to the SAP® Business One system.
Click the A/R Down Payment Invoice menu option under the Sales - A/R menu to load the Down Payment Invoice screen. Enter the information for the Down Payment Invoice . Verify that the Down Payment Invoice is using the Payment Terms code designated on the TWBS Credit Card Processing configuration screen.
Change the Down Payment % (highlighted in yellow above) to the % of the Sales Order that you wish to charge as a down payment. Click the Add button.
Click the Yes button on the message box prompt. Note – The authorization level must be activated on the TWBS Credit Card Processing configuration screen in order to be prompted for authorization.
The Credit Card Authorization screen will load. Note – If there is a default credit card selected for the Business Partner of the marketing document, that card's data will be loaded into the Authorization screen. This card can be changed to any other card associated with the Business Partner before authorization.
Select the Business Partner's credit card that you wish to authorize. Selection of a card will pre-populate the Authorization screen fields with all data from the Business Partner Master Data screen's Credit Card tab for that card. Edit or enter any information required before authorization. You will need to enter the amount value for authorization. Tip – With focus on the Amount field, clicking the b key will populate the field with any remaining balance requiring authorization.
Click the Authorize button. Warning – You must authorize the entire Overall Amount of the marketing document.
Once the authorization is complete, the authorization code from the payment provider will be viewable at the bottom of the right matrix. Note – Authorizations for Down Payment Invoices must be settled and paid either through the TWBS Credit Card Batch Processing screen or the SAP® Business One Incoming Payment screen before they can be automatically linked or manually applied to an A/R Invoice. For more information on the process of settling the authorization and creating the Incoming Payment, refer to the How To Settle Credit Card Authorizations section of the User Guide.
How To Charge A Sales Order - Linked through A/R Down Payment Invoice
The TWBS Credit Card Processing application will facilitate the SAP® Business One functionality to access the Payment Means screen from an A/R Down Payment Invoice and directly charge an amount to a specified credit card.
Directly charging the Business Partner credit card and associating the Down Payment Invoice with a Sales Order allows the down payment to be automatically applied when the order is moved to an A/R Invoice in SAP® Business One.
In order to utilize the direct charge against the A/R Down Payment Invoice , the Down Payment Invoice authorization level must be activated on the Credit Card Processing configuration screen.
The transaction record created by the direct charge will be associated with the A/R Down Payment Invoice that the system creates and links to the Sales Order. Addition/update of the Sales Order may also cause the user to be prompted for authorization or reauthorization of the Sales Order.
Authorizations and direct charges performed against Down Payment Invoices are not accounted for when authorizations are performed against Sales Orders, Delivery Notes, or A/R Invoices. Authorizing these documents will be in addition to any authorizations or charges applied as down payments. Once the down payment is applied to the A/R Invoice, the Invoice will be settled against the outstanding authorization(s) only for the remaining balance due on the Invoice. The unlinking of any automatically applied down payments or the failure to manually apply any unlinked down payments cannot be adjusted once the A/R Invoice has been added to the SAP® Business One system.
The TWBS Credit Card Processing application will only support the SAP® Business One Payment Means screen to directly charge a single credit card in a document transaction. Support for multiple card transactions is only for prior authorization settlements.
- Click the Sales Order menu option under the Sales - A/R menu to load the Sales Order screen.
- Enter the information for the Sales Order.
- Verify that the Sales Order is using the Payment Terms code designated on the TWBS Credit Card processing configuration screen.
- Click the Add button on the Sales Order screen.
- Reload the data for the Sales Order that you just added.
- Click the Copy To button on the bottom right of the Sales Order screen and select the A/R Down Payment option to copy the Sales Order information to an A/R Down Payment Invoice. The screen will launch automatically.
- Change the Down Payment % (field highlighted in yellow above) to the percentage of the Sales Order that you wish to charge as a down payment.
- Click the Payment Means icon from the SAP icons bar above.
- Click the Credit Card tab on the Payment Means screen if its not selected.
- Click the Choose Credit Cards button.
- Select the credit card associated with the Business Partner that you want to use for the direct charge. Highlight the row and click the OK button.
- The data for the selected credit card will be populated to the Payment Means screen fields.
- Enter the amount of the funds capture in the Amount Due field.
With focus on the Amount Due field, clicking the Ctrl and b keys will populate the field with any remaining overall amount balance to be captured.
- Click the OK button on the Payment Means screen.
- The Voucher No. field will display the authorization code from the payment provider.
- Confirm the SAP message boxes to return to the Down Payment Invoice screen.
- Click the Add button on the Down Payment Invoice screen.
- To view the Incoming Payment information, you can re-click the Payment Means icon from the SAP icons bar. The Payments List screen will launch.
- Click the Link To arrow next to the Payment # to launch the Incoming Payments screen and load the data for the Incoming Payment created associated with the direct charge to the Down Payment Invoice.
- The Direct Charge to the Down Payment Invoice amount will have the following effects in the SAP® Business One system…
- Authorize and settle the charged amount with the payment provider.
- Create an Incoming Payment for the A/R Down Payment Invoice.
When the Sales Order is moved through the SAP® Business One system to an A/R Invoice, the directly charged amount will be linked to the A/R Invoice as a Down Payment visible on the screen. Removing this discount from the A/R Invoice before adding the document is not recommended. Once the A/R Invoice has been added to the system, it cannot be changed.
How To Charge Unlinked on the Business Partner
The TWBS Credit Card Processing application will facilitate the SAP® Business One functionality to access the Payment Means screen from an A/R Down Payment Invoice and directly charge an amount to a specified credit card.
Directly charging the Business Partner credit card and associating the Down Payment Invoice with the partner allows the payment to be manually applied when the order is moved to an A/R Invoice in SAP® Business One.
Warning – The TWBS Credit Card Processing application should only be used for charging documents set to use the SAP® Business One defined local currency code.
Note – In order to utilize the direct charge against the A/R Down Payment Invoice , the Down Payment Invoice authorization level must be activated on the Credit Card Processing configuration screen.
Warning – Authorizations and direct charges performed against Down Payment Invoices are not accounted for when authorizations are performed against Sales Orders, Delivery Notes, or A/R Invoices. Authorizing these documents will be in addition to any authorizations or charges applied as down payments. Once the down payment is applied to the A/R Invoice, the Invoice will be settled against the outstanding authorization(s) only for the remaining balance due on the Invoice. The unlinking of any automatically applied down payments or the failure to manually apply any unlinked down payments cannot be adjusted once the A/R Invoice has been added to the SAP® Business One system.
Warning – The TWBS Credit Card Processing application will only support the SAP® Business One Payment Means screen to directly charge a single credit card in a document transaction. Support for multiple card transactions is only for prior authorization settlements.
Click the A/R Down Payment Invoice menu option under the Sales - A/R menu to load the Down Payment Invoice screen. Enter the information for the Down Payment Invoice. Verify that the document you wish to authorize is using the Payment Terms code designated on the TWBS Credit Card Processing configuration screen.
Change the Down Payment % (field highlighted in yellow above) to the percentage of the Sales Order that you wish to charge as a down payment. Click the Payment Means icon from the SAP icons bar above.
Click the Credit Card tab on the Payment Means screen if its not selected. Click the Choose Credit Cards button.
Select the Credit Card associated with the Business Partner that you want to use for the direct charge. Highlight the row and click the OK button.
The data for the selected credit card will be populated to the Payment Means screen fields. Enter the amount of the funds capture in the Amount Due field. Tip – With focus on the Amount Due field, clicking the Ctrl and b keys will populate the field with any remaining overall amount balance to be captured.
Click the OK button on the Payment Means screen. The Voucher No. field will display the authorization code from the payment provider. Confirm the SAP message boxes to return to the Down Payment Invoice screen. Click the Add button on the Down Payment Invoice screen. To view the Incoming Payment information, you can re-click the Payment Means icon from the SAP icons bar. The Payments List screen will launch.
Click the Link To arrow next to the Payment # to launch the Incoming Payments screen and load the data for the Incoming Payment created associated with the direct charge to the Down Payment Invoice.
The Direct Charge to the Down Payment Invoice amount will have the following effects in the SAP® Business One system… Authorize and settle the charged amount with the payment provider. Create an Incoming Payment for the A/R Down Payment Invoice.
Note – When the Sales Order is moved through the SAP® Business One system to an A/R Invoice, the directly charged amount will be not be linked to the A/R Invoice. Before the A/R Invoice is added to the SAP® Business One system, the user will need to apply the down payment from the Business Partner to the A/R Invoice. Once the A/R Invoice has been added to the system, it cannot be changed.
How To Directly Charge a Sales Order
The TWBS Credit Card Processing application will facilitate the SAP® Business One functionality to access the Payment Means screen from a Sales Order and directly charge an amount to a specified credit card.
Warning – The TWBS Credit Card Processing application should only be used for charging documents set to use the SAP® Business One defined local currency code.
Note – In order to utilize the direct charge against the Sales Order, the Sales Order authorization level must be activated on the Credit Card Processing configuration screen.
Note – The transaction record created by the direct charge will not be associated with the Sales Order. It will be associated with the A/R Down Payment Invoice that the system creates and links to the Sales Order. Addition of the Sales Order may also cause the user to be prompted for authorization of the Sales Order.
Warning – Direct charges performed against Sales Orders are not accounted for when authorizations are performed against Sales Orders, Delivery Notes, or A/R Invoices. Authorizing these documents will be in addition to any charges applied as down payments. Once the down payment is applied to the A/R Invoice, the Invoice will be settled against the outstanding authorization(s) only for the remaining balance due on the Invoice. The unlinking of any automatically applied down payments or the failure to manually apply any unlinked down payments cannot be adjusted once the A/R Invoice has been added to the SAP® Business One system.
Warning – The TWBS Credit Card Processing application will only support the SAP® Business One Payment Means screen to directly charge a single credit card in a document transaction. Support for multiple card transactions is only for prior authorization settlements.
Click the Sales Order menu option under the Sales - A/R menu to load the appropriate marketing document screen. Enter the information for the Sales Order.
Verify that the document you wish to authorize is using the Payment Terms code designated on the TWBS Credit Card processing configuration screen.
Click the Payment Means icon from the SAP icons bar above. Click the Credit Card tab on the Payment Means screen if its not selected.
Click the Choose Credit Cards button.
Select the credit card associated with the Business Partner that you want to use for the direct charge. Highlight the row and click the OK button.
The data for the selected credit card will be populated to the Payment Means screen fields. Enter the amount of the funds capture in the Amount Due field. Tip – With focus on the Amount Due field, clicking the Ctrl+ b key combination will populate the field with any remaining overall amount balance to be captured.
Click the OK button on the Payment Means screen. The Voucher No. field will display the authorization code from the payment provider. Confirm the SAP message boxes to return to the Sales Order screen.
Click the Add button on the Sales Order screen.
The Direct Charge to the Sales Order amount will have the following effects in the SAP® Business One system… Authorize and settle the charged amount with the payment provider. Create and link a Down Payment Invoice as noted in the Remarks field of the Sales Order. Create an Incoming Payment for the A/R Down Payment Invoice.
Note – When the Sales Order is moved through the SAP® Business One system to an A/R Invoice, the directly charged amount will be linked to the A/R Invoice as a Down Payment visible on the screen. Removing this discount from the A/R Invoice before adding the document is not recommended. Once the A/R Invoice has been added to the system, it cannot be changed.
How To Directly Charge Installment Payments
The TWBS Credit Card Processing application will facilitate the direct charging of installment payments through the SAP® Business One Incoming Payments screen.
Warning – The TWBS Credit Card Processing application should only be used for charging documents set to use the SAP® Business One defined local currency code.
Warning – Use of an installment based payment terms code cannot be done through the Credit Card Processing Authorization screen. Payment terms codes set up for installments should not be used as the default payment terms code in the Credit Card Processing application.
In order to utilize this feature, you will need to establish a payment terms code in the SAP® Business One system with the installments breakdown that satisfies your needs.
Click the Payment Terms menu option under the Administration a Setup a Business Partners menus to load the Payment Terms - Setup screen.
Click the Add icon from the SAP icons bar. Enter the Payment Terms Code and all other information for the new Payment Terms code for installments. Click on the Link To arrow for the No. of Installments to launch the Installments screen.
Enter the number of installments that you want for the Payment Terms code and set up the scheduling for the installments. Click the Update button on the Installments screen. Click the Add button on the Payment Terms - Setup screen.
Click the SAP menu option titled Sales Order under the Sales - A/R menu to load the Sales Order screen. Enter the information for the document.
Verify that the Order is using a Payment Terms code designated with installment payments.
Click the Add button on the Sales Order screen. Once the Order has been moved to the A/R Invoice stage, you will be able to see the Installments breakdown on the Incoming Payments screen. Click the SAP menu option titled Incoming Payments under the Banking → Incoming Payments menus to launch the SAP® Business One Incoming Payments screen. Enter the Code for the Business Partner for the transaction.
Click the Payment Means icon from the SAP icons bar above. Click the Credit Card tab if it isn't the selection when the Payment Means screen loads.
Click the Choose Credit Cards button to launch the following screen which lists the Credit Cards associated with the selected Business Partner so that a card may be selected for the authorization.
Select the credit card associated with the Business Partner that you want to use for the authorization of the installment payment. Highlight the row and click the OK button. The data for the selected credit card will be populated to the Payment Means screen fields. Enter the amount of the installment payment in the Amount Due field. Tip – With focus on the Amount Due field, clicking the Ctrl and b keys will populate the field with any remaining overall amount balance to be captured.
Click the OK button on the Payment Means screen.
The Voucher No. field will display the authorization code from the payment provider. Confirm the SAP message boxes to return to the Incoming Payment screen. Click the Add button to complete the creation of the Incoming Payment. Note – Any amount charged in excess of the installment amount will not automatically be applied to the document. The SAP® Business One system will apply any excess funds to the Business Partner. The excess amount will need to be manually reconciled.
Remaining installments can be processed at any time through the Incoming Payments screen.
How To Partially Pay an Unauthorized Document
Selection of a document with no existing authorizations and the application of partial payments funds capture with the payment provider during the creation of an Incoming Payment in SAP® Business One.
Click the Incoming Payments menu optionunder the Banking a Incoming Payments menus to launch the SAP® Business One Incoming Payments screen. Enter the code for the Business Partner for the transaction. Select the document for which you want to create the partial pay Incoming Payment. Note – Documents using the Payment Terms code defined on the TWBS Credit Card Processing configuration screen can only be processed one at a time through the Incoming Payments screen.
Warning – The TWBS Credit Card Processing application should only be used for charging documents set to use the SAP® Business One defined local currency code.
Warning – Selecting multiple documents not set to the Credit Card Processing Payment Terms code for a combined Incoming Payment will correctly capture the funds for the documents and disperse them in the SAP® Business One system. However, the application transaction and log tables will not reflect the distribution between the documents. It is recommended that you process one document at a time.
Adjust the Total Payment amount to reflect the total of the partial payment that you want to process. Click the Payment Means icon from the SAP icons bar above. Click the Credit Card tab if it isn't the selection when the Payment Means screen loads.
Click the Choose Credit Cards button to launch the following screen which lists the credit cards associated with the selected Business Partner so that a card may be selected for the capture of funds.
Select the credit card associated with the Business Partner that you want to use for the capture of funds. Highlight the row and click the OK button.
The data for the selected credit card will be populated to the Payment Means screen fields. Enter the amount of the partial payment in the Amount Due field. Tip – With focus on the Amount Due field, clicking the Ctrl and b keys will populate the field with any remaining overall amount balance to be captured.
Click the OK button on the Payment Means screen. Warning – Once the OK button on the Payment Means screen has been clicked, the capture of funds will be completed. Failure to complete the Incoming Payment will not cancel or void these transactions.
Confirm the SAP message boxes to return to the Incoming Payment screen. Click the Add button on the Incoming Payment screen to complete the creation of the Incoming Payment. Open the document. The amount total from the Incoming Payment will now be reflected as an Applied Amount on the document.
Clicking the Credit Card Log tab will give visibility to the card charge details.
To apply a second partial payment to the document…
Click the SAP menu option titled Incoming Payments under the Banking → Incoming Payments menus to launch the SAP® Business One Incoming Payments screen. Enter the code for the Business Partner for the transaction. Select the document for which you want to create the partial pay Incoming Payment. Note – Documents using the Payment Terms code defined on the TWBS Credit Card Processing configuration screen can only be processed one at a time through the Incoming Payments screen.
Adjust the Total Payment amount to reflect the total of the partial payment that you want to process. Click the Payment Means icon from the SAP icons bar above. Click the Credit Card tab if it isn't the selection when the Payment Means screen loads.
Click the Choose Credit Cards button to launch the following screen which lists the credit cards associated with the selected Business Partner so that a card may be selected for the capture of funds.
Select the credit card associated with the Business Partner that you want to use for the capture of funds. Highlight the row and click the OK button.
The data for the selected credit card will be populated to the Payment Means screen fields. Enter the amount of the partial payment in the Amount Due field. Tip – With focus on the Amount Due field, clicking the Ctrl and b keys will populate the field with any remaining overall amount balance to be charged.
Click the OK button on the Payment Means screen. Warning – Once the OK button on the Payment Means screen has been clicked, the capture of funds will be completed. Failure to complete the Incoming Payment will not cancel or void these transactions.
Confirm the SAP message boxes to return to the Incoming Payment screen. Click the Add button on the Incoming Payment screen to complete the creation of the Incoming Payment. Open the document. The amount total from the Incoming Payment will now be reflected as an Applied Amount on the document.
Clicking the Credit Card Log tab will give visibility to the card charge details.
Note – The partial payment process can be repeated as many time as needed until the document has been paid in full.
How To Reauthorize an Existing Marketing Document
The TWBS Credit Card Processing application will facilitate the reauthorization of marketing documents to accommodate the following scenarios.
Warning – The TWBS Credit Card Processing application should only be used for authorizing documents set to use the SAP® Business One defined local currency code.
How To Reauthorize for Document Total Increase
TWBS Credit Card Processing will track any increases to the document total at the Sales Order or Delivery Note level will cause the application to prompt for reauthorization. This can include quantity increases, price increases, addition of freight, and addition of taxes.
Warning – The TWBS Credit Card Processing application should only be used for authorizing documents set to use the SAP® Business One defined local currency code.
How To Reauthorize on Document Increase
Warning – The TWBS Credit Card Processing application should only be used for authorizing documents set to use the SAP® Business One defined local currency code.
Note - Reauthorization will be triggered by increasing values (qty, price, adding freight) for a marketing document that has been previously authorized.
Click the SAP menu option titled Sales Order, Delivery, or A/R Invoice under the Sales - A/R menu to load the appropriate marketing document screen. Load an existing marketing document into the screen. Update the information on the marketing document.
Click the Update button.
Click the Yes button on the message box prompt. Note - The authorization level must be activated on the TWBS Credit Card configuration screen in order to be prompted for reauthorization.
The Credit Card Authorization screen will load. Data from the original authorization(s) will be loaded into the Authorization screen. The additional amount that needs to be authorized will be displayed in the Balance Due field. Note - The user has the option of adding this balance due amount either to credit cards already listed on the Authorization screen or by adding new cards to be authorized. If the user chooses to add any of the additional balance due to an existing authorization, the original authorization for the card will be voided and a new authorization for the increased amount will be obtained.
Warning - You must authorize the entire Overall Amount of the marketing document at the time of reauthorization.
To add the balance due to an existing authorization, change the amount value to reflect the new amount that you wish to authorize. Click the Authorize button.
The original authorization code from the payment provider will be replaced by the authorization code for the new amount.
The progression of the authorizations can be viewed by clicking on the Credit Card Log tab on the marketing document screen.
How To Reauthorize on Document Copy
Warning – The TWBS Credit Card Processing application should only be used for authorizing documents set to use the SAP® Business One defined local currency code.
Note - Reauthorization will be triggered by increasing values (qty, price, adding freight) for a new target document copied from an existing authorized source document (ex. copying a Sales Order to a Delivery).
Click the SAP menu option titled Sales Order or Delivery under the Sales - A/R menu to load the appropriate marketing document screen. Load an existing source marketing document into the screen.
Click the Copy To button and select the Delivery or A/R Invoice as your copy target document. Note - Copying a Sales Order to an A/R Down Payment Invoice and applying a partial payment as a down payment is covered in the How To Authorize or Directly Charge a Down Payment Invoice section of the User Guide.
Update the information on the target marketing document. Click the Add button on the Delivery screen.
Click the Yes button on the message box prompt. Note - The authorization level for the target document must be activated on the TWBS Credit Card configuration screen in order to be prompted for reauthorization.
The Credit Card Authorization screen will load. Data from the original authorization(s) of the source document will be loaded into the Authorization screen. The additional amount that needs to be authorized will be displayed in the Balance Due field. Note - The user has the option of adding this balance due amount either to credit cards already listed on the Authorization screen or by adding new cards to be authorized. If the user chooses to add any of the additional balance due to an existing authorization, the original authorization for the card will be voided and a new authorization for the increased amount will be obtained.
Warning - You must authorize the entire Overall Amount of the marketing document at the time of reauthorization.
To add the balance due to an existing authorization, change the amount value to reflect the new amount that you wish to authorize. Click the Authorize button.
The original authorization code from the payment provider will be replaced by the authorization code for the new amount.
The progression of the authorizations can be viewed by clicking on the Credit Card Log tab on the target marketing document screen.
How To Reauthorize for Partial Delivery
TWBS Credit Card Processing application will track any partial deliveries in the SAP® Business One system from Orders that have had authorizations performed against them. Subsequent deliveries will need to be reauthorized if there are not sufficient unassigned authorizations.
Warning – The TWBS Credit Card Processing application should only be used for authorizing documents set to use the SAP® Business One defined local currency code.
How To Reauthorize by SO Reauthorization Screen
Warning – The TWBS Credit Card Processing application should only be used for authorizing documents set to use the SAP® Business One defined local currency code.
Note - Reauthorization will be triggered by the partial delivery of an order. If there is a remaining balance on the Sales Order to be delivered at a future date.
Click the Sales Order Reauthorization menu option under the Sales - A/R menu to load the Sales Order Re-Authorization screen.
Click the Partial Shipped Orders tab. Select the Sales Order(s) to be reauthorized. Enter the credit card's CVV security code in the column titled CVV Code if needed. Click the Authorize button. Note - The Sales Orders selected will be reauthorized for the designated Reauthorize Amt.
The SAP status bar will prompt the user for a successful reauthorization. The reauthorized Sales Orders will be removed from the list when the screen refreshes. Authorizations applied to the Sales Order can be viewed by loading the Sales Order and clicking on the Credit Card Log tab.
How To Reauthorize on Document Copy
Warning – The TWBS Credit Card Processing application should only be used for authorizing documents set to use the SAP® Business One defined local currency code.
Note - Reauthorization will be triggered by the partial delivery of an order, if there are not sufficient multiple authorizations to handle the remaining deliveries created.
Click the Sales Order menu option under the Sales - A/R menu to load the Sales Order screen. Load an existing source Sales Order into the screen.
Click the Copy To button and select the Delivery option as your copy target document.
Update the information to reflect the partial delivery, adjusting the quantities or removing items not included from the original order. Click the Add button on the Delivery screen.
Authorizations applied to the first partial delivery can be viewed by clicking on the Credit Card Log tab on the target Delivery screen. Note - While the applied authorization amount may exceed the total for the partial Delivery Note, the application will only settle the authorization for the total of the Invoice marketing document that the Delivery is used to create.
Return to the source Sales Order document. Click the Copy To button again and select the Delivery option as your copy target document.
Click the Add button on the Delivery screen.
Click the Yes button on the message box prompt. Note - The authorization level for the Delivery must be activated on the TWBS Credit Card configuration screen in order to be prompted for authorization.
The Credit Card Authorization screen will load. Note - If there is a default credit card selected for the Business Partner of the marketing document, that card's data will be loaded into the Authorization screen. This card can be changed to any other card associated with the Business Partner before authorization.
Select the Business Partner's Credit Card that you wish to authorize. Selection of a card will pre-populate the Authorization screen fields with all data from the Business Partner Master Data screen's Credit Card tab for that card.
Edit or enter any information required before authorization. You will need to enter the amount value for authorization. Tip - With focus on the amount field, clicking the b key will populate the field with any remaining balance requiring authorization.
Click the Authorize button. Warning - You must authorize the entire Overall Amount of the marketing document.
Once the authorization is complete, the authorization code from the payment provider will be viewable at the bottom of the right matrix.
Authorizations applied to the second partial delivery can be viewed by clicking on the Credit Card Log tab on the target Delivery screen.
How To Reauthorize for Expired Authorization
TWBS Credit Card Processing application allows for the reauthorization of expired authorizations through the Sales Order Reauthorization screen. The factor used to determine if an authorization has expired is if the authorization date exceeds the Reauthorization Threshold configuration period. The Batch Processing screen will also determine if an authorization has expired and the user will be prompted for reauthorization at the time of attempted settlement.
Warning – The TWBS Credit Card Processing application should only be used for authorizing documents set to use the SAP® Business One defined local currency code.
How To Reauthorize by SO Reauthorization Screen
Warning – The TWBS Credit Card Processing application should only be used for authorizing documents set to use the SAP® Business One defined local currency code.
Note - Reauthorization will be triggered if the date of the authorization has exceeded the Reauthorization Threshold configuration period.
Click the SAP menu option titled Sales Order Reauthorization under the Sales - A/R menu to load the Sales Order Re-Authorization screen.
Click the Expired Authorizations tab. Select the Sales Order(s) to be reauthorized. Enter the credit card's CVV security code in the column titled CVV Code if needed. Click the Authorize button. Note - The Sales Orders will be reauthorized for the designated Reauthorize Amt.
The SAP status bar will prompt the user for a successful reauthorization. The reauthorized Sales Orders will be removed from the list when the screen refreshes. Authorizations applied to the Sales Order can be viewed by loading the Sales Order into the screen and clicking on the Credit Card Log tab.
How To Reauthorize through Batch Processing
Warning – The TWBS Credit Card Processing application should only be used for authorizing documents set to use the SAP® Business One defined local currency code.
Note - Reauthorization will be triggered if the date of the authorization has exceeded the Reauthorization Threshold configuration period.
Click the SAP menu option for Batch Processing under the Banking a Incoming Payments a TWBS Credit Card Processing menus to load the Batch Processing screen.
Click the Unsettled Authorizations tab. Select the documents to be processed. Enter the credit card's CVV security code in the column titled CVV Code if needed. Click the Process button. The TWBS Credit Card Processing application will prompt for reauthorization if the original authorization has expired.
How To Authorize Refunds for Credit Memos
In order to process a refund to a credit card in the TWBS Credit Card Processing application, you must process the transaction through the Credit Memo document.
Credit Memo functionality is always active and does not need to be enabled on the Credit Card Configuration screen.
How To Process A Linked Credit Refund from A/R Invoice Charge
- Click the SAP menu option titled A/R Credit Memo under the Sales-A/R menu to load the A/R Credit Memo screen.
- Enter the document number for the A/R Invoice you want to link the Credit Memo to in the Originating CC Invoice user defined field.
- Click the Add button.
In order for the card information from the originating Invoice to be transferred to the Credit Memo, the user defined field must be populated with the A/R Invoice document number before being added to the system. If this is not done, the updating of the user defined field will not create the link. The credit memo should be cancelled and a new one created with the user defined field value populated at time of add.
In order for the card information from the originating Invoice to be transferred to the Credit Memo, the originating A/R Invoice cannot be in Open status. If the originating Invoice is in Open status, the information will not be transferred.
Click the SAP menu option for Batch Processing under the Banking → Incoming Payments → TWBS Credit Card Processing menus to load the Batch Processing screen. Click the Unsettled Authorizations tab. Select the Credit Memo to be processed using the checkbox and click the Choose Card button.
Select the credit card associated with the Business Partner that you want to use for the authorization. Highlight the row and click the OK button. The data for the selected credit card will be populated to the Batch Processing line fields. Clicking the Process button credits the funds to the card with the payment provider and creates the Incoming Payment for the document.
How To Process A Linked Credit Refund from A/R Down Payment Invoice Charge
Warning - The TWBS Credit Card Processing application should only be used for refunding documents set to use the SAP® Business One defined system currency code.
Click the SAP menu option titled A/R Credit Memo under the Sales - A/R menu to load the appropriate marketing document screen. Enter the information for the Credit Memo.
Enter the document number for the A/R Invoice you want to link the Credit Memo to in the Originating CC Invoice user defined field. Click the Add button. Note - In order for the card information from the originating Invoice to be transferred to the Credit Memo, the originating Invoice cannot be in Open status. If the originating Invoice is in Open status, the information will not be transferred.
Click the SAP menu option for Batch Processing under the Banking → Incoming Payments → TWBS Credit Card Processing menus to load the Batch Processing screen. Click the Unsettled Authorizations tab. Select the Credit Memo to be processed using the checkbox and click the Choose Card button.
Select the credit card associated with the Business Partner that you want to use for the authorization. Highlight the row and click the OK button. The data for the selected credit card will be populated to the Batch Processing line fields. Clicking the Process button credits the funds to the card with the payment provider and creates the Incoming Payment for the document.
How To Process An Unlinked Credit Refund
Warning - The TWBS Credit Card Processing application should only be used for refunding documents set to use the SAP® Business One defined system currency code.
Note - In order to process Credit Memos that are not linked to A/R Invoices, the option for Process Credits Not Linked to an Invoice must be selected on the Credit Card Processing configuration screen.
Click the SAP menu option titled A/R Credit Memo under the Sales - A/R menu to load the appropriate marketing document screen. Enter the information for the Credit Memo.
Click the Add button.
Click the SAP menu option for Batch Processing under the Banking → Incoming Payments → TWBS Credit Card Processing menus to load the Batch Processing screen. Click the Unsettled Authorizations tab. Select the Credit Memo to be processed using the checkbox and click the Choose Card button.
Select the credit card associated with the Business Partner that you want to use for the authorization. Highlight the row and click the OK button. The data for the selected credit card will be populated to the Batch Processing line fields. Clicking the Process button credits the funds to the card with the payment provider and creates the Incoming Payment for the document.
How To Directly Charge/Refund a Payment on Account
The use of the Payment On Account feature in SAP® Business One to directly charge/refund a credit card during the creation of an Incoming Payment.
Warning - The TWBS Credit Card Processing application should only be used for charging/refunding documents set to use the SAP® Business One defined system currency code.
Click the SAP menu option titled Incoming Payments under the Banking a Incoming Payments menus to launch the SAP® Business One Incoming Payments screen. Enter the code for the Business Partner for the transaction. Click the Payment on Account check box. Enter the Payment on Account amount in the field to the right of the check box option. Note - A positive Payment on Account amount value will charge the credit card while a negative Payment on Account amount value will refund the credit card.
Warning - Selecting any documents in conjunction with the payment on account option for a combined Incoming Payment will correctly capture the funds and disperse them in the SAP® Business One system. However, the application transaction and log tables will not reflect the distribution between the document and the payment on account. It is recommended that you not process any documents while using payment on account.
Click the Payment Means icon from the SAP icons bar above. Click the Credit Card tab if it isn't the selection when the Payment Means screen loads. If an authorization processed through the TWBS Credit Card Processing application does not exist, the Choose Credit Cards button will be enabled. Click the Choose Credit Cards button to launch the following screen which lists the credit cards associated with the selected Business Partner so that a card may be selected for the authorization.
Select the credit card associated with the Business Partner that you want to use for the authorization. Highlight the row and click the OK button. Warning - The TWBS Credit Card Processing application will only support the SAP® Business One Payment Means screen to directly charge a single credit card in a document transaction. Support for multiple card transactions is only for prior authorization settlements.
The data for the selected credit card will be populated to the Payment Means screen fields. Verify the amount in the Amount Due field. Click the OK button on the Payment Means screen. Warning - Once the OK button on the Payment Means screen has been clicked, existing authorizations will be settled or new authorizations will be completed. Failure to complete the Incoming Payment will not cancel or void these authorizations.
Click the Continue button on the SAP system message prompt.
Click the Continue button on the SAP system message prompt.
Click the Add button on the Incoming Payment screen to complete the creation of the Incoming Payment.
How To Settle Credit Card Authorizations
The TWBS Credit Card Processing application keeps track of every A/R Invoice, Credit Memo, and Down Payment Invoice added to SAP® Business One with a Payment Terms code that matches the one defined on the TWBS Credit Card Processing configuration screen. Authorization settlement can be performed through the following integration points.
How To Map Payment Methods for IP Settlement
The SAP® Business One Incoming Payment credit card payment allows for the specification of a payment method. The TWBS Credit Card Processing application has the ability to use this information from SAP® Business One to default this value while loading the Payment Means screen or to set this value while creating the Incoming Payment through the Data Interface (DI).
Click the SAP menu option for Credit Card Payment Methods under the Administration a Setup a Banking menus to load the SAP® Business One Credit Card Payment Methods - Setup screen.
The Name column reflects the name of the credit card payment method. The Card column reflects the name of the credit card associated with the payment method. Note - The payment methods will only be mapped if the card specified is a specific value. The All value will not be included in the mapping logic.
If there are no payment methods set up for the credit card, the property will not be defaulted/set. If there is one payment method set up for the credit card, that payment method code will be used to default the payment method while loading the Payment Means screen or to set the payment method while creating the Incoming Payment through the Data Interface (DI). If there is more than one payment method set up for the credit card, the first payment method code (sorted alphabetically by Name) will be used to default the payment method while loading the Payment Means screen or to set the payment method while creating the Incoming Payment through the Data Interface (DI). When the payment method code is used to default the payment method while loading the Payment Means screen, the value will be set in the field highlighted below…
Incoming Payment Screen Authorization Settlement
The SAP® Business One Incoming Payment/Payment Means screen allows the user to settle credit card authorizations for a document during the process of creating the Incoming Payment for the document.
Click the SAP menu option for Incoming Payments under the Banking a Incoming Payments menus to load the SAP® Business One Incoming Payments screen.
Single Card Authorization IP Settlement
Selection of a document with a single authorization and settlement of the authorization with the payment provider during the creation of the Incoming Payment in SAP® Business One.
- Click the SAP menu option titled Incoming Payments under the Banking a Incoming Payments menus to launch the SAP® Business One Incoming Payments screen.
- Enter the code for the Business Partner for the transaction.
- Select the document for which you want to create the Incoming Payment.
Documents using the Payment Terms code defined on the TWBS Credit Card Processing configuration screen can only be processed one at a time through the Incoming Payments screen.
Selecting multiple documents not set to the Credit Card Processing Payment Terms code for a combined Incoming Payment will correctly capture the funds for the documents and disperse them in the SAP® Business One system. However, the application transaction and log tables will not reflect the distribution between the documents. It is recommended that you process one document at a time.
- Click the Payment Means icon from the SAP icons bar above.
- Click the Credit Card tab if it isn't the selection when the Payment Means screen loads.
- If an authorization processed through the TWBS Credit Card Processing application exists, the button will be disabled and the authorization information will be populated in the fields on the Payment Means screen.
- If an authorization processed through the TWBS Credit Card Processing application does not exist, the Choose Credit Cards button will be enabled.
- Click the Choose Credit Cards button to launch the following screen which lists the credit cards associated with the selected Business Partner so that a card may be selected for the authorization.
- Select the credit card associated with the Business Partner that you want to use for the authorization. Highlight the row and click the OK button.
The TWBS Credit Card Processing application will only support the SAP® Business One Payment Means screen to directly charge a single credit card in a document transaction. Support for multiple card transactions is only for prior authorization settlements.
- The data for the selected credit card will be populated to the Payment Means screen fields.
- Verify the amount in the Amount Due field.
- Click the OK button on the Payment Means screen.
Once the OK button on the Payment Means screen has been clicked, existing authorizations will be settled or new authorizations will be completed. Failure to complete the Incoming Payment will not cancel or void these authorizations.
- Click the Continue button on the SAP system message prompt.
- Click the Continue button on the SAP system message prompt.
- Click the Add button on the Incoming Payment screen to complete the creation of the Incoming Payment.
Multiple Card Authorization IP Settlement
Selection of a document with multiple authorizations and settlement of the authorizations with the payment provider during the creation of the Incoming Payment in SAP® Business One.
- Click the SAP menu option titled Incoming Payments under the Banking a Incoming Payments menus to launch the SAP® Business One Incoming Payments screen.
- Enter the code for the Business Partner for the transaction.
- Select the document for which you want to create the Incoming Payment.
Documents using the Payment Terms code defined on the TWBS Credit Card Processing configuration screen can only be processed one at a time through the Incoming Payments screen.
Selecting multiple documents not set to the Credit Card Processing Payment Terms code for a combined Incoming Payment will correctly capture the funds for the documents and disperse them in the SAP® Business One system. However, the application transaction and log tables will not reflect the distribution between the documents. It is recommended that you process one document at a time.
- Click the Payment Means icon from the SAP icons bar above.
- Click the Credit Card tab if it isn't the selection when the Payment Means screen loads.
- The authorization information for one of the authorizations will be displayed in the Payment Means screen.
- To view the data for any of the authorizations, click on the # for the authorization in the Vouchers grid on the right side of the screen.
- Verify the amounts in the Amount Due field.
- Click the OK button on the Payment Means screen.
Once the OK button on the Payment Means screen has been clicked, existing authorizations will be settled. Failure to complete the Incoming Payment will not cancel or void these authorizations.
- Click the Continue button on the SAP system message prompt.
- Click the Continue button on the SAP system message prompt.
- Click the Add button on the Incoming Payment screen to complete the creation of the Incoming Payment.
Multiple Card Authorization IP Partial Settlement
Selection of a document with multiple authorizations and settlement of some of the authorizations with the payment provider during the creation of an Incoming Payment in SAP® Business One.
- Click the SAP menu option titled Incoming Payments under the Banking a Incoming Payments menus to launch the SAP® Business One Incoming Payments screen.
- Enter the code for the Business Partner for the transaction.
- Select the document for which you want to create the Incoming Payment.
Documents using the Payment Terms code defined on the TWBS Credit Card Processing configuration screen can only be processed one at a time through the Incoming Payments screen.
Selecting multiple documents not set to the Credit Card Processing Payment Terms code for a combined Incoming Payment will correctly capture the funds for the documents and disperse them in the SAP® Business One system. However, the application transaction and log tables will not reflect the distribution between the documents. It is recommended that you process one document at a time.
- Adjust the Total Payment amount to reflect the total of the authorizations that you want to settle.
- Click the Payment Means icon from the SAP icons bar above.
- Click the Credit Card tab if it isn't the selection when the Payment Means screen loads.
- Select the authorization from the Vouchers grid on the right side of the screen that you want to remove from settlement.
- With the cursor on the authorization name from the Vouchers grid, click the right button on your mouse to access the right-click menu of the screen.
- Select the Delete Row option from the right-click menu.
- The Payment Means screen will be reloaded to reflect the removal of the authorization .
- Verify the amount(s) in the Amount Due field for the authorizations to be settled.
- Click the OK button on the Payment Means screen.
Once the OK button on the Payment Means screen has been clicked, existing authorizations will be settled. Failure to complete the Incoming Payment will not cancel or void these authorizations.
- Click the Continue button on the SAP system message prompt.
- Click the Continue button on the SAP system message prompt.
- Click the Add button on the Incoming Payment screen to complete the creation of the Incoming Payment.
- Open the document. The amount total from the Incoming Payment will now be reflected as an Applied Amount on the document.
Batch Processing Screen Authorization Settlement
The TWBS Credit Card Processing application's Batch Processing screen allows the user to settle single or multiple documents with credit card authorizations and create Incoming Payments for the documents in the SAP Business One system through the SAP Data Interface (DI). This can be done through the following methods…
Single Step Authorization Batch Settlement
Selection of documents and click one button to settle the selected authorization(s) with the payment provider and create Incoming Payment in SAP® Business One in one step.
- Click the SAP menu option for Batch Processing under the Banking a Incoming Payments a TWBS Credit Card Processing menus to load the Batch Processing screen.
- Click the Unsettled Authorizations tab.
- Select any documents that you want to settle and create Incoming Payments for by placing a check mark in the selection column on the screen.
- Click the Settled Authorizations tab.
- Select any documents that you want to create Incoming Payments for by placing a check mark in the selection column on the screen.
- Make sure that the checkbox option for Settle and Create Incoming Payment at the bottom of the screen is selected.
If there are multiple authorizations against a single document, the separate authorizations do not all have to be processed at the same time. These authorizations can be settled or have Incoming Payments created at different times.
- Click the Process button.
Double Step Authorization Batch Settlement
Selection of documents and click buttons to settle the selected authorization(s) with the payment provider and create Incoming Payment in SAP® Business One in two separate steps.
- Click the SAP menu option for Batch Processing under the Banking a Incoming Payments a TWBS Credit Card Processing menus to load the Batch Processing screen.
- Click the Unsettled Authorizations tab.
- Select any documents that you want to settle and create Incoming Payments for by placing a check mark in the selection column on the screen.
- Make sure that the checkbox option for Settle and Create Incoming Payment at the bottom of the screen is not selected.
If there are multiple unsettled authorizations against a single document, they do not have to be settled at the same time.
- Click the Settle button.
- Click the Settled Authorizations tab.
- Select any documents that you want to create Incoming Payments for by placing a check mark in the selection column on the screen.
- Make sure that the checkbox option for Settle and Create Incoming Payment at the bottom of the screen is selected.
If there are multiple settled authorizations against a single document, they do not have to create an Incoming Payment at the same time.
- Click the Create Incoming Payment button.
Once an authorization has been settled through the Batch Processing screen, the Incoming Payment must be created through this screen as well. If the document is brought up in the Incoming Payment screen, the settled authorization will not be associated.
Multiple Card Authorization Batch Settlement
Selection of documents and click one button to settle the selected authorization(s) with the payment provider and create Incoming Payment in SAP® Business One in one step.
- Click the SAP menu option for Batch Processing under the Banking a Incoming Payments a TWBS Credit Card Processing menus to load the Batch Processing screen.
- Click the Unsettled Authorizations tab.
- Select any documents that you want to settle and create Incoming Payments for by placing a check mark in the selection column on the screen.
- Click the Settled Authorizations tab.
- Select any documents that you want to create Incoming Payments for by placing a check mark in the selection column on the screen.
- Make sure that the checkbox option for Settle and Create Incoming Payment at the bottom of the screen is selected.
If there are multiple authorizations against a single document, the separate authorizations do not all have to be processed at the same time. These authorizations can be settled or have Incoming Payments created at different times.
- Click the Process button.
Multiple Card Authorization Batch Partial Settlement
Selection of documents and click one button to settle the selected authorization(s) with the payment provider and create Incoming Payment in SAP® Business One in one step.
- Click the SAP menu option for Batch Processing under the Banking a Incoming Payments a TWBS Credit Card Processing menus to load the Batch Processing screen.
- Click the Unsettled Authorizations tab.
- Select any documents that you want to settle and create Incoming Payments for by placing a check mark in the selection column on the screen.
- Click the Settled Authorizations tab.
- Select any documents that you want to create Incoming Payments for by placing a check mark in the selection column on the screen.
- Make sure that the checkbox option for Settle and Create Incoming Payment at the bottom of the screen is selected.
If there are multiple authorizations against a single document, the separate authorizations do not all have to be processed at the same time. These authorizations can be settled or have Incoming Payments created at different times.
- Click the Process button.
Right-Click Menu Settlement and Incoming Payment
The TWBS Credit Card Processing application allows the user to access the functionality of batch authorization settlement and Incoming Payment creation from right-click menu options on either the A/R Invoice or A/R Down Payment Invoice screens.
- Click the SAP menu option titled A/R Invoice or A/R Down Payment Invoice under the Sales - A/R menu to load the appropriate marketing document screen.
- Load the Invoice or Down Payment Invoice into the appropriate screen.
- Click the right button on your mouse to access the right-click menu of the screen.
The right-click Credit Card Authorization menu options will only be available on documents with Payment Terms codes that match the code designated in the Credit Card Configuration screen.
- Under the Credit Card Authorization right-click menu, you will see the following menu options…
- Settle - This option will settle the authorization(s) with the payment provider.
- Create Payment - This option will create the Incoming Payment in SAP® Business One provided that the authorization(s) for the document have already been settled.
- Settle and Pay - This option will settle the authorization(s) with the payment provider and create the Incoming Payment in SAP® Business One in one step.


