
Table of Contents
Formula Basics
Formulas are managed in individual form controls. There are two types of formulas.
Calculation formulas are used to place the results of a computation using values in two (or more) other controls. Fixed values can also be used in control-level calculations.
Aggregate formulas are used to provide either a sum or average of values in the details grid (rows) section of the form and report them in a header-level field.
Create Formula Tool
The Create Formula tool for header/footer fields has two sections, one for calculation formulas and one for aggregate formulas. The Create Formula tool for grid (row) controls only has a section for calculation formulas.
The tool also has an upper area and a lower area. The upper area provides a list of operators that can be used followed by a list of controls that can be used in the formula. The lower area is a working area to develop the formula.
Calculation Formulas – Operators & Values
Operators and values that can be used for calculation formulas are displayed in the right-hand column of the upper area of the tool. When working with a control in the grid (rows) area of a form, the aggregate functions information is not displayed.

The various formula functions that are available for calculation formulas are selected from the Operators drop-down list. Functions that are available will vary depending on the type of control to which they are connected. The functions are listed in the table below.
Controls that are available for use in formulas are listed in the Formula Fields list. Note that only numeric and date controls are available.
Notes regarding the following tables.
The usage examples show the formulas using only controls as values. Static values can also be used when appropriate. For example, the Addition formula shown in the table could also be reflected as Add control A + 10 to create new value in control C. An example of using a static value is found in the Examples section of this document.
“N” indicates that this formula is available in a numeric-type control. “D” (Date) and “DT” (Date/Time) indicate that this formula is available in a date-type control.
The value returned in the Day Diff, etc. functions can be either positive or negative. A positive value indicates that date B is later than date A. A negative value indicates that date B is earlier than date A.
The value used in the Add Day, etc. functions can be either positive or negative. A positive value will calculate a date in the future. A negative value will calculate a date in the past.
Functions that can be used by the calculation functions are listed in the Formula Fields area.
| Function | Use | Target Control Type |
|---|---|---|
| Addition | Add control A + control B to create new value in control C | N |
| Subtract | Subtract control A - control B to create new value in control C | N |
| Multiply | Multiply control A times control B to create new value in control C | N |
| Division | Divide control A by control B to create new value in control C | N |
| Days Diff | Calculate difference in days between date in control A and date in control B to create new numeric value in control C | N |
| Months Diff | Calculate difference in months between date in control A and date in control B to create new numeric value in control C | N |
| Years Diff | Calculate difference in years between date in control A and date in control B to create new numeric value in control C | N |
| Hours Diff | Calculate difference in hours between date-time in control A and date in control B to create new numeric value in control C | N |
| Minutes Diff | Calculate difference in minutes between date-time in control A and date in control B to create new numeric value in control C | N |
| Seconds Diff | Calculate difference in second between date-time in control A and date in control B to create new numeric value in control C | N |
| Add Day | Add the numeric value of days from control A to the date in control B to create new date value in control C | D |
| Add Month | Add the numeric value of months from control A to the date in control B to create new date value in control C | D |
| Add Year | Add the numeric value of years from control A to the date in control B to create new date value in control C | D |
| Add Hour | Add the numeric value of hours from control A to the date-time in control B to create new date-time value in control C | DT |
| Add Minute | Add the numeric value of minutes from control A to the date-time in control B to create new date-time value in control C | DT |
| Add Second | Add the numeric value of seconds from control A to the date-time in control B to create new date-time value in control C | DT |
Aggregate Formulas – Operators & Values
Operators and values that can be used for control-level formulas are displayed in the left-hand column of the upper area of the tool.

Creating a Formula
The basic process of creating a formula using the Create Formula tool is straightforward. Step-by-step instructions for creating simple control-level and aggregate formulas are provided, followed by various examples.
The process described here uses the Create Formula tool. The formula can also be keyed in directly if you are comfortable with the syntax.
Remember that although the formula is saved when you save it as described in the following steps, it is not saved as part of the form until you click either [Save] or [Save & Close] at the form level.
- Click the “Edit” link of the control that will hold the result of the formula in the form layout tool.
- Formulas are defined using the “Formula Field” property of a form control as highlighted in the image below.

The first part of the formula is displayed in the field and can be modified here if desired. Click the […] button to open the Create Formula tool.
Create a Calculation Formula
In this example, we will add the values from control Numeric1 and Numeric2 together. The resulting value is placed in control NumericFormula. Since the NumericFormual control is where the result will be stored it is where the formula is created.
- Add operator
- Select the desired Operator from the drop-down list.
- Click on [Insert Operator]. The basic formula structure is placed at the position of the cursor in the Formula area.
- Add first value
- Click on the control to be the first value used in the formula from the Formula Fields list. Be sure that the row is highlighted.
- Position the cursor in the Formula area at the beginning of the formula structure.
- Click on [Insert Field]. The selected value is placed in the “Formula” area at the position of the cursor.
- Add second value
- Click on the control to be the second value used in the formula from the Formula Fields list. Be sure that the row is highlighted.
- Position the cursor in the Formula area within the parentheses of the formula structure.
- Click on [Insert Field]. The selected value is placed in the “Formula” area at the position of the cursor.
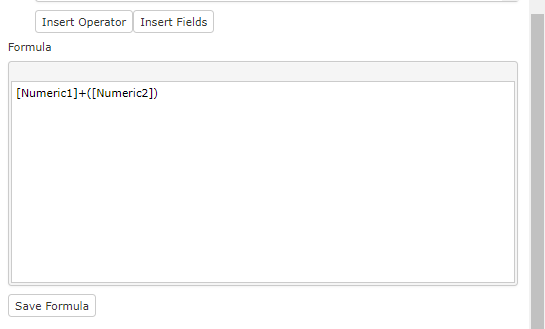
- Click [Save Formula] to save the formula and return to the control screen.

Create an Aggregate Formula
In this example, we will sum the values from a control in the grid (rows) section of the form. The resulting value is placed in control GridSubTotal, which is in the “header” section of the form.
- Add aggregate
- Select the desired aggregate operator from the drop-down list.
- Select the column to be aggregated from the “Aggregate Fields” list.
- Click on [Insert Aggregate]. The formula is placed in the “Formula” area.
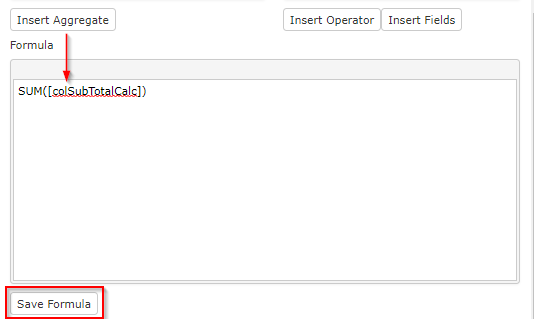
- Click [Save Formula] to save the formula and return to the control screen.

Date Calculation Formulas
It is also possible to do calculations with dates. There are two options: calculate a new date and find the time difference between two dates. These options are only displayed when the appropriate field types are found in the form layout. The calculations can return, and use, numeric values representing years, months, days, hours, and minutes. The value returned is controlled by the specific calculation selected. The following examples use “days” but the calculation can use any of the other timeframes noted.
Calculate a New Date
In this example we will calculate a new date based on a date already in a control and a value that represents a specific number of days.
- Add operator
- Select the desired Operator from the drop-down list. In this case it will be “Add Days”
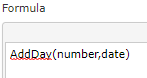
- Click on [Insert Operator]. The basic formula structure is placed at the position of the cursor in the Formula area. In this case the formula looks like this:
- Add the number to be used in the calculation.
- Highlight the “number” value in the formula.
- Click on the control (field) that represents the numeric value to be used in the formula from the Formula Fields list. Be sure that the row is highlighted.
- Click on [Insert Field]. The selected value replaces the word “number” in the formula.
- You can also use a static value by typing the value in the formula.
- Add the date to be used in the calculation.
- Highlight the “date” value in the formula.
- Click on the control that represents the date value to be used in the formula from the Formula Fields list. Be sure that the row is highlighted.
- Click on [Insert Field]. The selected value replaces the word “date” in the formula.

The completed formula for this example looks like this.

Calculate Days Difference
In this example we will calculate a numeric value representing the number of days between two dates.
- Add operator
- Select the desired Operator from the drop-down list. In this case it will be “Days Diff.”
- Click on [Insert Operator]. The basic formula structure is placed at the position of the cursor in the Formula area. In this case the formula looks like this:

- Add the first date to be used in the calculation.
- Highlight the “startdate” value in the formula.
- Click on the control that represents the date value to be used in the formula from the Formula Fields list. Be sure that the row is highlighted.
- Click on [Insert Field]. The selected value replaces the word “startdate” in the formula.
- Add the second date to be used in the calculation.
- Highlight the “enddate” value in the formula.
- Click on the control that represents the date value to be used in the formula from the Formula Fields list. Be sure that the row is highlighted.
- Click on [Insert Field]. The selected value replaces the word “enddate” in the formula.

The complete formula for this example looks like this:

If the returned value is reversed from what you expected (i.e. negative instead of positive), reverse the values for startdate and enddate. But also keep in mind that a negative value might be appropriate. For example, the “end date” might actually be before the “start date.”
Formula Examples
Addition
[Numeric1]+([Numeric2])
Subtraction
[Numeric1]-([Numeric2])
Multiplication
[Numeric1]*([Numeric2])
Division
[Numeric1]-([Numeric2])
Add Year/Month/Day/Hour/Minute to a Date
AddDay([Numeric1][Date1])
Year/Month/Day/Hour/Minute Difference Between Two Dates
DATEDIFF([Date1],[Date2])


