
This is an old revision of the document!
Table of Contents
Versago Installation/Upgrade
The processes to install and upgrade Versago are described here.
Environment and Security
Versago environment and security information is found here.
Installing Versago
Click here for installation instructions.
Upgrading Versago
Click here for upgrade instructions.
Removing Versago
Uninstall Versago via the standard Windows uninstall process in “Programs and Features” in Control Panel.
- Remove the “Third Wave Versago Portal …” application.
- Remove the IIS website “Versago” if it still exists
- Delete the folder C:\Program Files (x86)\TWBS\Versago
If you are also using Bizweaver and plan to continue to do so you will need to “reinstall” Bizweaver to set the Bizweaver web service port.
Accessing the Versago Setup Function
There may be situations where you need to return to the setup function.
- To start the following process manually, use the URL http://localhost:YourPort/M.htm#/Setup. Be sure to use the port number specified during the installation process.
- To start the following process manually for SSL installations, use the URL https://localhost:YourPort/M.htm#/Setup
Starting Versago with a Simple URL
This adjustment should not be required beginning with v2.3.
When Versago is installed, the path to the home page must be explicitly stated. For example, in Versago v2 the path that must be entered is:
http://versago.yourDomain.com/m.htm#
However, many companies would prefer to enter just http://versago.yourDomain.com to open Versago. This can be done by making a technical change to the Windows Internet Information System (IIS) configuration. We recommend contacting Third Wave support if you are not comfortable making these changes. This change has only been confirmed for installations where Versago is the only website running in the IIS instance.
Application of the Change
- Open the Windows IIS Manager (Administrative Tools > IIS Manager).
- Double-click on the Versago website.
- Various options are displayed.
- Look for the “HTTP Redirect” icon in the IIS section of the page.
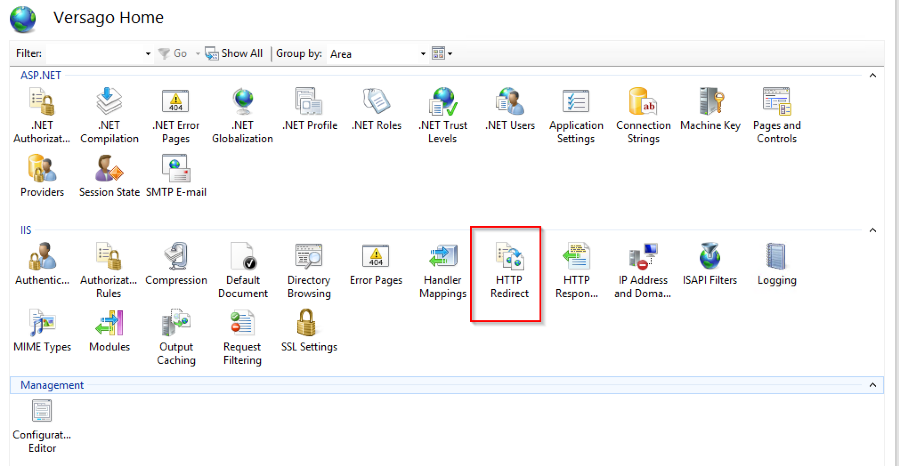
- Double-click the “HTTP Redirect” icon.
- A new dialog page is opened.
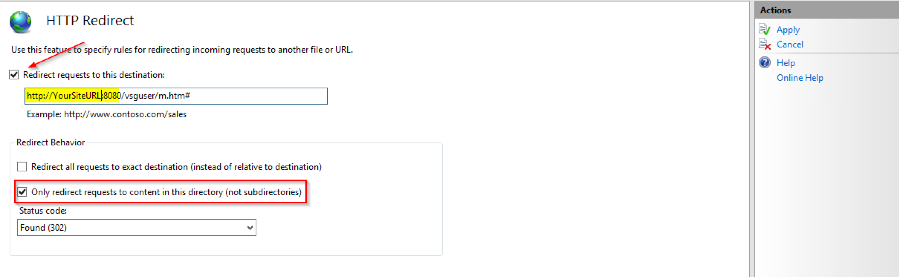
- Select the “Redirect requests to this destination” checkbox. Enter the full URL that is currently used to access the Versago site.
- Examples:
https://versago.yourDomain.com/m.htm# if SSL is being used.
http:/versago.yourDomain.com:8080/m.htm# if SSL is not being used.
- Select the “Only redirect requests to content in this directory (not subdirectories)” checkbox.
- If this option is not selected the process will go into a loop and eventually fail.
- Click the [Apply] option in the Actions section on the right side of the page.
- Restart the website.
- Try to access Versago using the primary URL for the site (e.g. https://versago.yourDomain.com or http://versago.yourDomain.com as needed)


The actual URL may be different for your company. For example, Third Wave has a site named “portal.twbs.com”, another company has one named “portal.ABCcompany.info”, and so on.


