
This is an old revision of the document!
Table of Contents
Introduction (Migration Assistant)
This document describes the steps for exporting Versago objects (reports, forms, etc.) from a Versago instance and importing them back into a Versago instance.
Audience
This document is intended for Versago administrators. End-users do not have access to this function.
Related Documents
The following documents contain additional information that may be helpful with understanding these processes.
Special Terminology
- “Objects” is used to generically refer to the various components of Versago including reports, forms, dashboards, etc.
Overview
The Versago export process provides a mechanism to create content in an instance of Versago, and then export that content for other uses. Other uses might include transferring the content to another instance of Versago or simply to have a backup.
Conversely, the Versago import process takes the exported information and brings it back into Versago. The receiving Versago instance can be a different instance, or the same instance where it originated.
Exported information is written to a file with a “.vgo” extension. These files cannot be edited directly, nor can other applications use them.
To Begin
- Click on the Admin link in the profile section of the Versago home page to access the Administration console.
- Import and Export functions are found under the Migration Assistant category of the menu.
Please note that this wizard will not manage the export/creation of database objects such as views, stored procedures, and crystal reports. Those will need to be scripted and managed outside of this wizard.
Export
The export process consists of ten object selection steps. You are stepped through each one and allowed to select the objects you want to export. As you move through the steps you will notice that some items have already been selected. This means that they are used by an object in a previous step, so they will be needed to recreate that object. These “auto-selected” objects cannot be removed from the export list.
On all tabs other than the Package and Database Object tabs you will see third box on the right-hand side of the page. This box displays some basic information about whatever object has been selected in either the left or middle panes.
- Click on the Export link in the Admin console to begin.
Package Tab
Basic information about this export is defined in this tab.

- Enter a Package Name (required).
- Enter a Package Description (required).
- Enter a Package Version (required).
Package Name, Package Description, and Package Version are only used for visual identification during the import process. The information in these fields is at your discretion.
The output file can also be password protected if desired, although this is not mandatory.
- Select the Password Protection checkbox.
- Enter the desired password.
- This field is only available if the Password Protection checkbox has been selected.
- Click [Next] to continue.
The selection process for the Menu, Forms, Dashboard, and Reports tabs is the same.
- Select the checkbox in the left-hand pane to mark each item to be exported.
- Use the “Select All” checkbox to automatically mark all items.
- Click the > arrow between the panes to select the marked items for export.
- The marked items are moved to the middle pane.
- To remove an item from the “to be exported” list -
- Highlight (click on) the item in the right-hand pane.
- Click the < arrow between the panes to remove the item.
- Click [Next] to continue or [Back] to return to the previous step.
Menu Tab
Custom menus can be selected for export on this tab.

Forms Tab
Forms can be selected for export on this tab.

Dashboard Tab
Dashboards can be selected for export on this tab.

Reports Tab
Reports can be selected for export on this tab.

The selection process for the User, Profile, Roles, and Company tabs is the same.
- Click on a row to highlight it.
- Only one item at a time can be selected.
- Click the > arrow to move it to the “selected” list.
User Tab
Users can be selected for export on this tab. This option is not commonly used.

Profile Tab
Profiles can be selected for export on this tab.

Roles Tab
Roles can be selected for export on this tab.

Company Tab
Company (database connections) can be selected for export on this tab.

Database Objects Tab
This is the final step of the export process before creating and saving the export file.

The left-hand pane shows what type(s) of database object(s) have been found. This is for information only and no action is required. Any tables listed in this section will be created in the target system if they do not already exist.
SQL Views and SQL Stored Procedures referenced by Versago SQL Select statements are not created as part of the Export/Import process. These must be imported manually from the source system using normal SQL tools.
- Click [Finish] to initiate the generation of the export file.
- Click [Back] to return to the previous tab.
- An indicator is displayed while the export file generation is working.
- When the file has been created a standard browser file download dialog is presented.
- If your browser is set up to always put downloaded files into your “Downloads” folder, the file will be saved with the name Export.vgo. The name of the file can be changed to whatever is desired.
- The file name can be changed using the normal file-rename process.
- If your browser is set up to allow you to control where downloaded files are placed, you can change the folder and file name at this point.
- The file extension will always be “.vgo” and cannot be changed.
- A summary of the export process is displayed in the right-hand pane.
- In general, you will want to look for any “Failed” messages since they will indicate a problem with the export process.
When the export file has been generated & saved, and the summary has been reviewed, simply move away from the Export function. Clicking [Finished] again will cause the export generation process to be executed again.
Import
The import process takes information from a previously generated export file and brings the information into the instance of Versago where the import is being executed.
Before You Begin
- The import will require that you “map” database (Company) connections from the source system to the new system. These connections must be defined before you start the import process.
- Be sure the needed export files are available to use for selection via a standard Windows file explorer dialog.
- Click on the Import link in the Admin console to begin.

- Click the [Select Files] button.
- A standard Windows file explorer dialog is presented.
- Select the appropriate Versago export files (.vgo extension).
- Only one file can be processed at a time.
- The file information and included objects are displayed.
- Two options are available for handling duplicate objects.
- Skip processing of an incoming object (e.g. a report name, profile name, etc.) if it already existing in the receiving database.
- Update the existing object if it already exists in the receiving database.
- Tables used by forms are not updated with this process.
- De-select any objects that are not to be imported at this time.
- All objects are selected by default.
- Use caution when de-selecting items since some items may be used in other objects.
- If a needed object is not created, it may cause other objects to fail as well.
- Map target companies (database connections in the receiving Versago instance) to the companies from the source Versago instance.
- This mapping is required to proceed.
- Click [Import] to begin processing.
- Information about the import processing is displayed in the Summary (right-hand) panel.
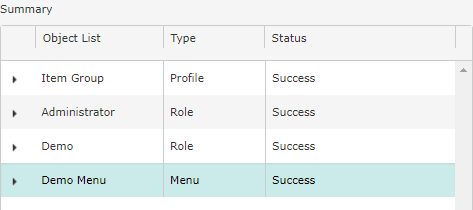

- Expand the row for additional information.
- Use the Download Summary link at the bottom of the page to export a comma-delimited file with import information. This is particularly helpful if errors were encountered.
Appendix A – Special Uses of Migration Assistant
Updating Database (Company) Connections
The Migration Assistant can be a useful tool when it necessary to change the database connection for multiple objects. This might occur when several objects have been developed while pointing to a test database and now need to be pointed to the live database.
- Export the objects to be updated.
- Import back into the same Versago instance.
- Map the original connection to the new connection.
- Be sure the “Update existing …” option is selected.
- Since the objects will already exist, they will be updated with the new connection information.


